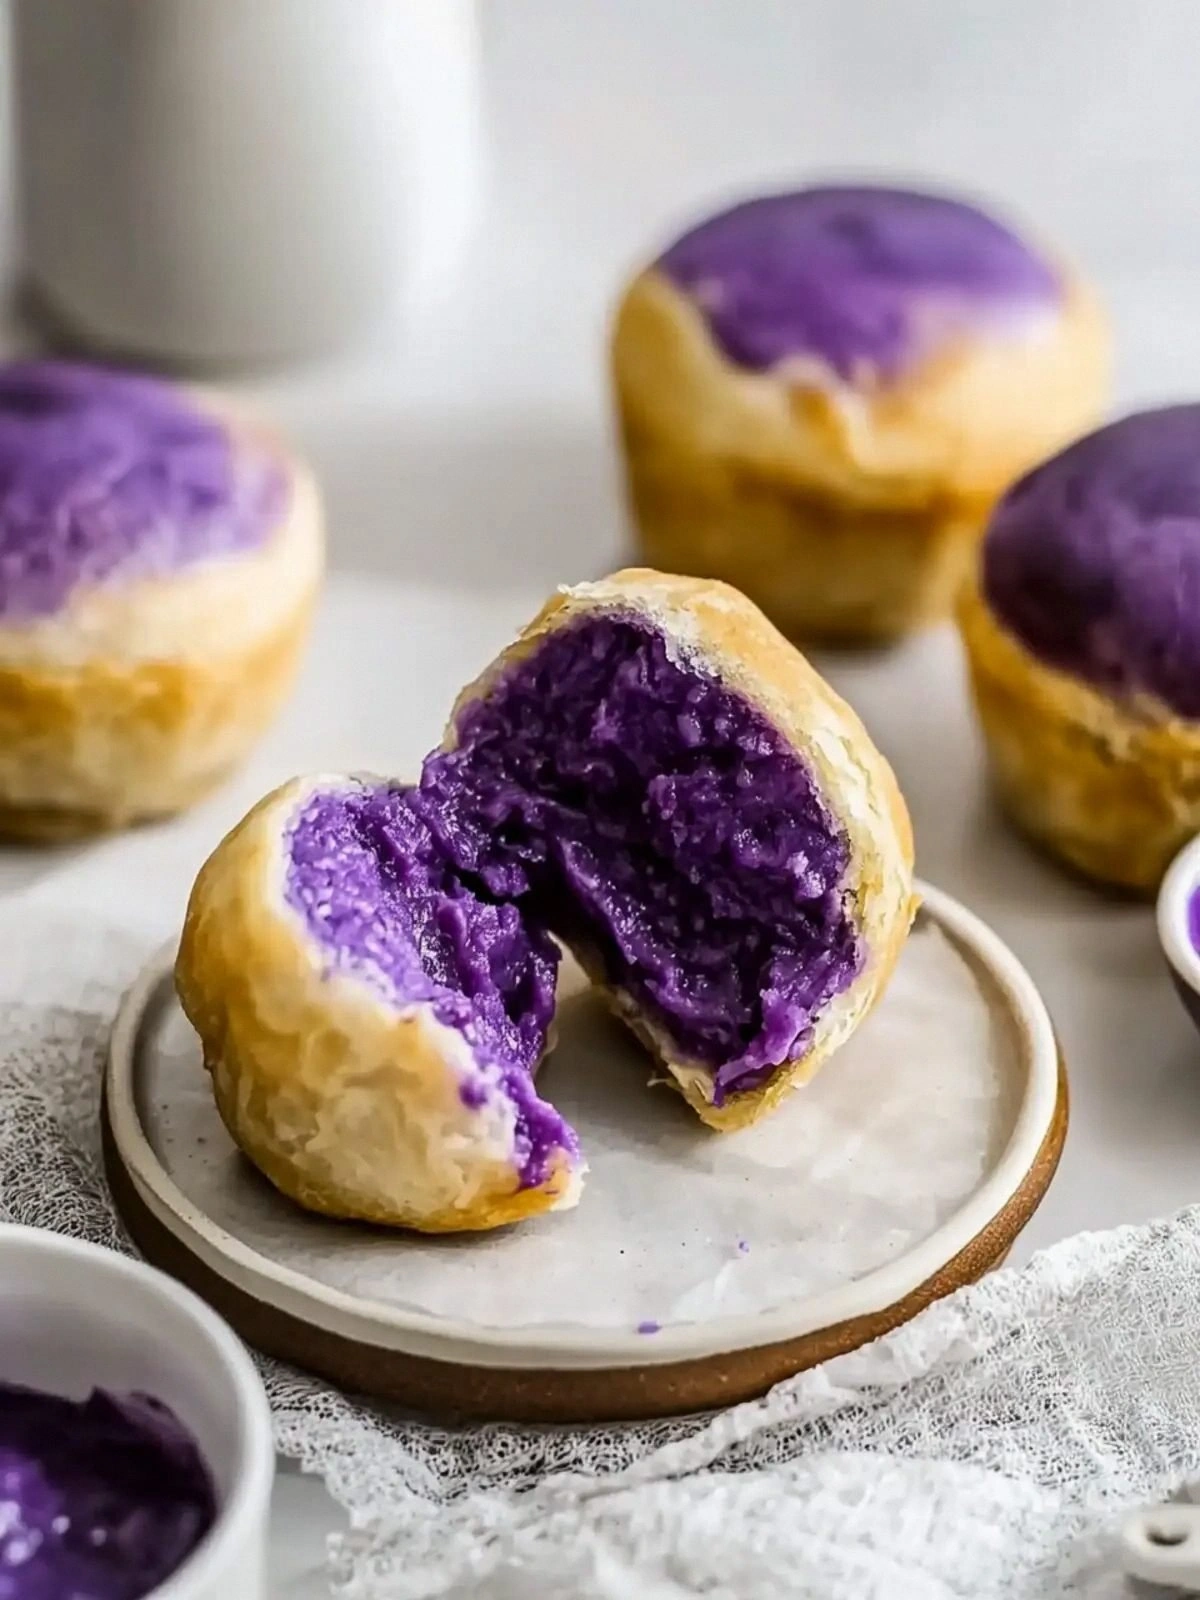
I still remember the night I tried to recreate that legendary Filipino street snack, the humble hopia, with a twist that made my taste buds do a little dance. The kitchen was a battlefield: flour dusted the countertop like a fine powder, the aroma of freshly boiled ube was thick enough to feel in the air, and the sound of the mixer whirring was a steady drumbeat. I had watched a handful of videos, but none promised that flaky, buttery texture that would make the pastry melt in your mouth while the sweet purple filling sang a chorus of caramelized sugar and coconut. That night, after a few disastrous attempts—one that left a half-baked dough stuck to the pot, another that tasted like a soggy cake—I finally found a method that worked like a charm. It was a revelation, and I swear I was shouting, “This is hands down the best version you'll ever make at home!”
Picture yourself pulling a tray of golden, buttery hopia from the oven, the steam rising like a sweet cloud, the scent of ube filling wafting through the kitchen. The edges crackle, the crust is a crisp, flaky lace that shatters like thin ice when you bite into it, and the interior is a silky, velvety purple custard that swirls like a sunset. If you've ever struggled to get that perfect flaky pastry, you're not alone—I've tried countless times, and each failure taught me a lesson that led to this perfected recipe. The secret? A simple technique that transforms ordinary flour into a delicate, layered pastry, and a bold twist that brings a whole new level of flavor to the classic hopia.
I dare you to taste this and not go back for seconds. The first bite will have you questioning every other pastry you've ever eaten. And if you’re still skeptical, consider this: most recipes get this completely wrong, missing the flaky texture or the balanced sweetness. This is the game-changer you’ve been waiting for. I’ll be honest—once I tasted the first batch, I ate half before anyone else could even get a bite. That’s how powerful this recipe is. Stay with me here—you’re about to learn how to make the most irresistible Ube Hopia.
Let me walk you through every single step—by the end, you’ll wonder how you ever made it any other way. From the moment you mix the dough to the final golden crust, each step is designed to give you that perfect, flaky texture and a filling that’s both sweet and fragrant. The technique is simple enough for beginners, yet sophisticated enough to impress seasoned bakers. I’ve sprinkled in a few insider secrets that will elevate this humble snack into a showstopper at any gathering. And trust me, this recipe is so versatile that it can be your go-to dessert, snack, or even a sweet appetizer for brunch.
What Makes This Version Stand Out
- Texture: The pastry layers are so light and flaky that they practically melt in your mouth. The technique of adding cold oil and a touch of water creates distinct lamination, giving each bite a crisp edge and a tender center.
- Flavor: The ube halaya is pure, vibrant purple, delivering a natural sweetness that’s not overpowering. The subtle hint of coconut from the filling balances the richness of the dough.
- Simplicity: With just seven ingredients, this recipe is quick to assemble—no exotic spices or hard-to-find items needed.
- Make‑ahead: Once you’ve prepared the dough, you can pre‑shape the hopia, store them in the fridge, and bake them later without losing their flakiness.
- Crowd Reaction: Friends and family will ask you for the recipe after the first bite; it’s the kind of treat that turns a casual gathering into a memorable event.
- Ingredient Quality: Using fresh ube halaya ensures a vibrant color and a natural sweetness that canned or pre‑sweetened versions can’t match.
Alright, let's break down exactly what goes into this masterpiece. This version is engineered to give you that perfect flaky crust while keeping the filling sweet and luscious. The next step is to understand why each ingredient matters, and how swapping or skipping it can change the entire outcome.
Inside the Ingredient List
The Flour Foundation
All-purpose flour is the backbone of the hopia, providing structure and a neutral flavor that lets the ube shine. It’s the most forgiving flour for beginners, yet it still offers the right balance of protein to create a tender crumb. If you want a slightly crispier crust, you can substitute 50% of the flour with cake flour, which reduces gluten formation. However, be careful—too much cake flour can make the dough crumbly and difficult to roll.
The Sweet Touch
Sugar is the silent hero that caramelizes during baking, giving the pastry a golden hue and a subtle crunch. The ¼ cup of sugar is enough to sweeten the dough without overpowering the ube’s natural sweetness. If you’re watching your sugar intake, you can reduce the amount by a quarter, but expect the dough to be slightly less crisp. Alternatively, you can use coconut sugar for a deeper caramel flavor.
The Unexpected Star
Ube halaya is the star that turns this hopia into a masterpiece. It’s a sweet purple yam jam that offers both flavor and vibrant color. The 1 cup of ube halaya should be at room temperature so it’s easy to spread and mix. If you can’t find ube halaya, you can make your own by boiling purple yams, mashing them, and sweetening with sugar and coconut milk.
The Final Flourish
Cold water and oil are crucial for creating the flaky layers. The water hydrates the flour, while the cold oil creates pockets that puff up when baked. The ¼ cup of oil should be cold; if it’s warm, the dough will be too sticky and the layers won’t separate. You can use neutral oils like canola or vegetable, or for a richer flavor, use a splash of sesame oil.
Everything’s prepped? Good. Let’s get into the real action. I promise you, the dough will feel like a smooth, pliable dough that’s easy to work with, and the filling will be silky and fragrant.
The Method — Step by Step
- In a large mixing bowl, whisk together the flour, salt, and sugar until the mixture is uniform. The goal is to ensure the salt is evenly distributed so every bite has consistent flavor. If you’re using cake flour, blend it with the all-purpose flour at a 1:1 ratio. This step sets the foundation for a light, airy dough.
- Add the cold oil to the dry ingredients. Use a pastry cutter or your fingertips to blend the oil into the flour until the mixture resembles coarse crumbs. The oil should coat the flour but not fully dissolve it. This technique creates the lamination that will give the hopia its signature flaky layers.
- Pour in the cold water gradually, stirring with a wooden spoon until a sticky dough forms. The dough should be tacky but not overly wet; add a tablespoon of water if it feels too dry. Knead the dough on a lightly floured surface for about 3 minutes, just until it comes together. Over‑kneading will develop gluten and make the pastry tough.
- Shape the dough into a ball, wrap it in plastic wrap, and refrigerate for at least 30 minutes. Chilling firms the dough and makes it easier to roll out. While it chills, you can prepare the filling by whisking the ube halaya with the egg until smooth. The egg adds richness and helps bind the filling.
- Once chilled, roll the dough out on a lightly floured surface to a thickness of about 1/8 inch. Use a round cutter (about 4 inches in diameter) to cut out circles. The size can be adjusted based on your preference, but a 4-inch circle is the classic hopia size.
- Place a spoonful of the ube filling onto the center of each dough circle. Spread the filling slightly so it doesn’t spill over the edges when folded. If you like a more concentrated flavor, use a smaller amount of filling. This step is where the magic happens— the filling must be evenly distributed for a balanced bite.
- Fold the dough over the filling to form a half-moon shape. Press the edges together with a fork to seal, ensuring no filling escapes during baking. A tight seal is essential to keep the filling inside and to create the classic hopia shape.
- Place the sealed hopia on a parchment-lined baking sheet. Brush the tops lightly with a beaten egg or milk to give them a golden glaze. Preheat the oven to 375°F (190°C) and bake for 20–25 minutes, or until the crust is golden brown and crisp. Keep an eye on the edges— they should not brown too quickly. The final result should be a pastry that’s crisp on the outside and silky on the inside.
That’s it—you did it. But hold on, I've got a few more tricks that'll take this to another level. The next section will show you how to tweak the dough for extra flakiness, how to add a caramel glaze, and how to store the pastries for later enjoyment.
Insider Tricks for Flawless Results
The Temperature Rule Nobody Follows
The key to flaky pastry is temperature control. Keep the dough cold until you’re ready to roll it out. If the dough warms up, the oil will melt into the flour, and you’ll lose the lamination that creates those delicate layers. I’ve found that keeping the dough in a bag in the fridge for at least an hour before rolling is essential for a crisp finish.
Why Your Nose Knows Best
The aroma of the dough as it bakes is a reliable indicator of doneness. When the hopia starts to emit a nutty, toasted scent, it’s almost ready. The smell is stronger than the visual cue of golden color. Trust your nose—it’s the most accurate way to gauge when the pastry is perfect.
The 5-Minute Rest That Changes Everything
After baking, let the hopia rest on a wire rack for 5 minutes. This allows the steam to escape, preventing the pastry from becoming soggy. The resting period also lets the filling set slightly, making it easier to slice or serve. I always recommend this step; it’s a small time investment for a huge quality payoff.
Keep the Filling Moist
If your ube filling feels dry, add a splash of coconut milk or a teaspoon of sugar. The extra moisture keeps the filling silky and prevents it from drying out during baking. A moist filling also balances the crispness of the dough, creating a harmonious bite.
Use a Silicone Baking Mat
A silicone mat keeps the hopia from sticking to the sheet, making it easier to remove without tearing the pastry. It also promotes even heat distribution, ensuring the crust browns uniformly. I’ve used this trick for years, and it’s a game-changer for batch baking.
Creative Twists and Variations
This recipe is a playground. Here are some of my favorite ways to switch things up:
Coconut Crumble Topping
Add a sprinkle of toasted coconut flakes on top before baking. The coconut adds a nutty crunch and a tropical aroma that complements the ube’s sweetness. It’s a simple tweak that elevates the flavor profile.
Chocolate Drizzle Finish
After baking, drizzle melted dark chocolate over the hopia. The bittersweet chocolate contrasts with the sweet filling and adds a luxurious touch. This variation is perfect for a dessert table.
Nutty Ube Variation
Mix ground almonds or toasted cashews into the ube filling for added texture and a subtle nutty flavor. The nuts also provide a pleasant crunch when bitten into, creating a multi-sensory experience.
Spiced Ube
Add a pinch of cinnamon or nutmeg to the ube filling for a warm, aromatic twist. The spices complement the natural sweetness and give the pastry a cozy feel, especially during cooler months.
Mini Hopia
Cut the dough into smaller circles (about 3 inches) for bite-sized snacks. These mini hopia are perfect for parties or as an elegant finger food. The smaller size also reduces baking time slightly.
Storing and Bringing It Back to Life
Fridge Storage
Store cooked hopia in an airtight container in the refrigerator for up to 3 days. The pastry will stay fresh, and the filling will remain moist. If you notice the crust becoming soggy, place a paper towel inside the container to absorb excess moisture.
Freezer Friendly
Wrap each hopia tightly in plastic wrap, then place them in a freezer bag. They can be frozen for up to 2 weeks. When you’re ready to enjoy them, thaw at room temperature for 30 minutes before reheating.
Best Reheating Method
To restore crispness, preheat your oven to 350°F (175°C) and bake the frozen hopia for 10–12 minutes. Alternatively, you can microwave for 20–30 seconds, then pop them in the oven for a minute to crisp the edges. A tiny splash of water before reheating steams the pastry back to perfection.