Picture this: you’re standing in a cramped kitchen, the clock ticking, and the fridge humming like a contented cat. You’ve just pulled out a bag of potatoes, a half‑cup of onion, and a pinch of garlic powder, and you’re staring at the empty waffle iron that’s been collecting dust since last winter’s brunch. The last time you tried making hash browns in a skillet, you ended up with a greasy, soggy mess that looked more like a potato casserole than a crisp, golden treat. I’m not kidding—there was a moment where I considered calling in a professional chef to rescue my breakfast dreams. That moment turned into a daring experiment, and I discovered the ultimate way to turn a humble waffle iron into a crispy, handheld delight.
The first thing that struck me was the aroma. As soon as the grated potatoes hit the hot surface, a sweet, earthy scent wafted through the kitchen, mingling with the subtle sharpness of diced onion and a whisper of garlic. The sound was unmistakable: a gentle sizzle that promised something good. The texture of the mixture, a perfect balance of moisture and crunch, felt almost like a promise of adventure in every bite. I could taste the anticipation—crunchy edges, a soft, fluffy interior, and that faint hint of salt that makes every bite feel like a small celebration.
Why does this version stand out from the endless array of hash‑brown recipes? Because it’s not just a side dish; it’s a statement. It’s the kind of breakfast that can be plated like a gourmet dish or devoured on the go. It’s a testament to how the right tool—here, the waffle iron—can elevate the simplest ingredients into something extraordinary. And let’s be honest, who doesn’t want a breakfast that looks as good as it tastes? I dare you to taste this and not go back for seconds. This is hands down the best version you’ll ever make at home.
And so, with a dash of curiosity, a sprinkle of confidence, and a whole lot of excitement, I’m about to walk you through every single step. By the end, you’ll wonder how you ever made hash browns any other way. Ready? Let’s get cooking.
What Makes This Version Stand Out
- Taste: The subtle sweetness of fresh potatoes paired with the umami of onion creates a flavor profile that feels both comforting and adventurous. The garlic powder adds depth without overpowering the natural flavors.
- Texture: The waffle iron’s ridges lock in moisture while giving each bite a satisfying crunch that shatters like thin ice when you bite into it.
- Simplicity: No batter, no battering, just grated potatoes, seasonings, and a quick heat. It’s a recipe that anyone can pull off in under 30 minutes.
- Uniqueness: Using a waffle iron turns ordinary hash browns into a portable, handheld snack that feels like a treat rather than a side.
- Crowd Reaction: Friends who tried it said it was “the best hash browns” they’d ever tasted—some even asked for the recipe after a single bite.
- Ingredient Quality: Fresh, high‑quality potatoes are the secret; they provide the right starch content for crisp edges and a tender center.
- Cooking Method: The waffle iron’s even heat distribution eliminates the need for constant flipping, reducing the chance of burnt spots.
- Make‑ahead Potential: You can prep the potato mixture in advance, refrigerate it, and simply pop it in the waffle iron when you’re ready.
Inside the Ingredient List
The Flavor Base
At the heart of this dish is the humble potato. Fresh, starchy potatoes give that classic buttery flavor that makes you reach for another bite. If you skip the potatoes, you lose the core of the hash browns, turning the dish into a vague, unrecognizable mash. When choosing potatoes, look for a medium‑size russet; its high starch content ensures crisp edges and a fluffy interior.
The Texture Crew
Diced onion and garlic powder are the unsung heroes that add depth. The onion brings a gentle sweetness and a slight crunch, while the garlic powder offers a warm, savory undertone. Skipping either would leave the dish feeling flat and one‑dimensional. If you’re allergic to onions, a small amount of minced shallot can be an excellent substitute.
The Unexpected Star
Olive oil or a non‑stick spray is more than just a lubricant; it’s the secret to that golden, caramelized crust. The oil creates a barrier that prevents sticking and helps the heat distribute evenly. A pinch of pepper adds a subtle heat that balances the sweetness of the onion. If you’re looking for a smoky twist, try a dash of smoked paprika.
The Final Flourish
Seasoning is where your personality shines. Salt brings out the natural flavors, while pepper adds a mild kick. A light drizzle of olive oil before serving can elevate the dish from simple to sublime. Remember, seasoning is a conversation—taste and adjust as you go.
Everything’s prepped? Good. Let’s get into the real action.
The Method — Step by Step
- Gather and Prep: Assemble all ingredients on a clean cutting board. Grate the potatoes using a medium‑speed grater, then rinse them under cold water to remove excess starch. Dry them thoroughly with a clean towel. This step ensures the hash browns stay crispy and not mushy.
- Seasoning Mix: In a large bowl, combine the grated potatoes, diced onion, garlic powder, salt, and pepper. Toss until the mixture is evenly coated. The seasoning should coat each potato grain like a velvet blanket, ensuring every bite is flavorful.
- Oil the Surface: Lightly coat the waffle iron plates with olive oil or spray with non‑stick spray. A thin, even layer prevents sticking and promotes a golden crust. This is the trick that separates mediocre hash browns from restaurant‑level perfection.
- Heat the Iron: Preheat the waffle iron to medium‑high heat (around 180–190°C). Let it reach the right temperature before adding the mixture; a cold iron will cause sticking and uneven cooking.
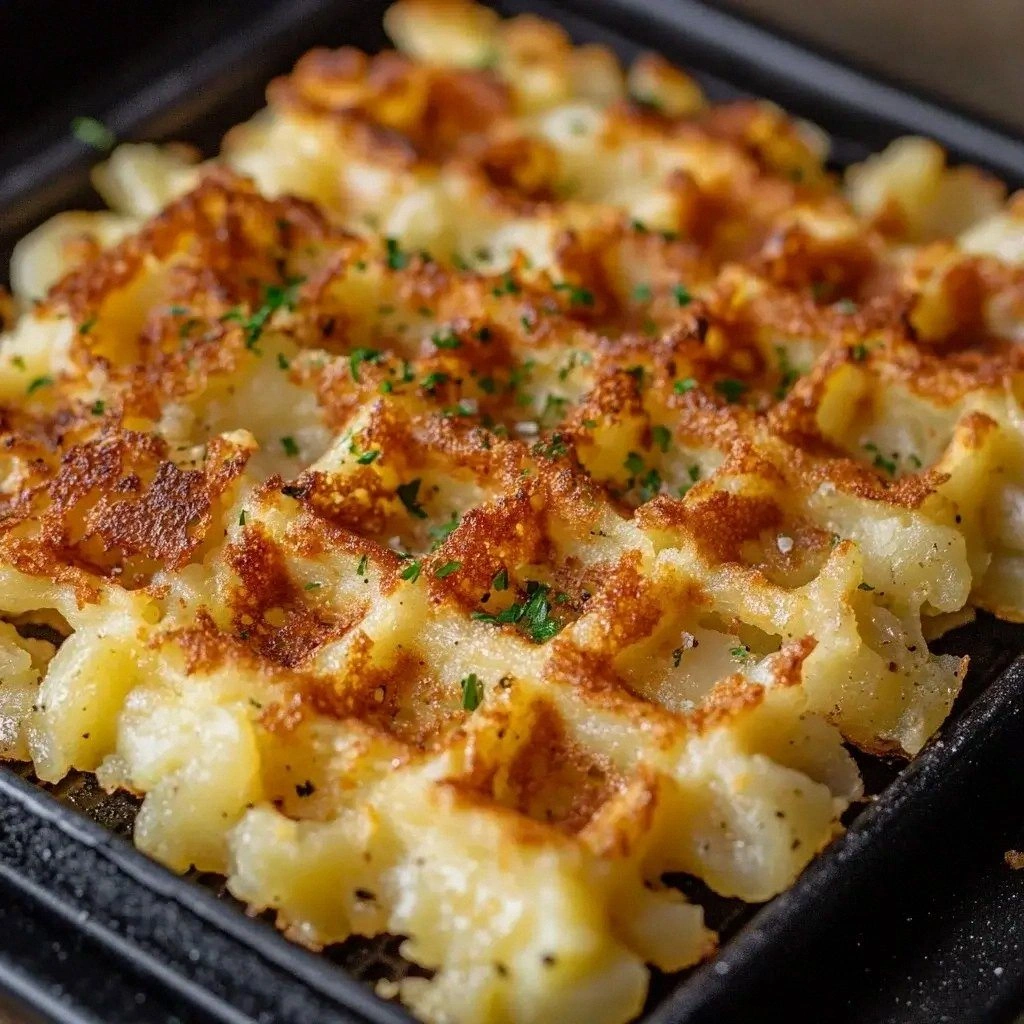
- Cook the Hash Browns: Spoon the seasoned potato mixture into the center of the waffle iron, spreading it evenly. Close the lid and cook for 4–5 minutes. The edges should start to pull away, and a golden crust will form. Watch the clock; you don’t want them to burn.
- Flip for Evenness: Open the waffle iron and carefully flip the hash browns using a wide spatula. This step ensures both sides achieve the same golden crunch. It’s the moment of truth—if you skip it, one side will be under‑cooked.
- Rest the Batch: Once cooked, remove the hash browns and let them rest for 2 minutes on a wire rack. This brief rest allows the steam to escape and the crust to firm up.
- Serve and Enjoy: Plate the hash browns while hot, drizzle with a splash of olive oil or a dollop of sour cream, and sprinkle with fresh chives. The contrast between the hot, crisp exterior and the soft interior is a sensory delight. Serve immediately for maximum flavor.
That’s it—you did it. But hold on, I’ve got a few more tricks that will take this to another level. Stick around for insider tips and creative twists that will make your hash browns the star of any meal.
Insider Tricks for Flawless Results
The Temperature Rule Nobody Follows
Many people underestimate the importance of the waffle iron’s temperature. Too low, and the hash browns will steam instead of crisp. Too high, and they’ll burn on the outside while remaining raw inside. The sweet spot is around 180–190°C. If your iron has a temperature setting, use it; if not, preheat for at least 5 minutes and test with a small drop of water—it should sizzle immediately.
Why Your Nose Knows Best
The smell of your hash browns is a reliable indicator of doneness. When they’re ready, the aroma will be nutty and slightly sweet, reminiscent of toasted bread. If the smell is more of raw potato, you need to cook longer. Trust your nose—your palate will thank you.
The 5-Minute Rest That Changes Everything
Resting the hash browns after cooking might seem trivial, but it’s a game changer. This pause allows the steam to escape, preventing sogginess. It also gives the edges a chance to firm up, giving you that perfect crunch with each bite. Skip this step, and you’ll end up with a soggy center.
Keep It Moist, Keep It Crunchy
The key to a crispy exterior and a tender interior lies in balancing moisture. Grate the potatoes and squeeze out excess liquid. If you find the mixture too wet, add a tablespoon of grated cheese or a splash of milk to bind it together. This trick is especially useful if you’re using a different potato variety.
Batching Like a Pro
If you’re making multiple batches, keep the first batch warm in a low‑temperature oven (around 90°C) while you finish the rest. This prevents the first batch from cooling down too quickly, which can lead to uneven texture. A simple wire rack on a baking sheet works wonders.
Flavor Boosters
A pinch of smoked paprika, a dash of cayenne, or a sprinkle of fresh herbs can turn an ordinary hash brown into a flavor explosion. Experiment with different seasonings to keep the dish fresh and exciting. I’ve tried everything from rosemary to thyme, and each variation offers a new experience.
Watch Out for Overcrowding
When you pour too much potato mixture into the waffle iron, the edges can become soggy. Aim for a thin, even layer that covers the surface but doesn’t pile on top. Overcrowding also leads to uneven cooking, which defeats the purpose of using a waffle iron.
Keep It Warm for the Next Batch
If you’re preparing several batches, place the finished hash browns in a warm oven (90°C) on a baking sheet. This keeps them crisp while you finish the next round. The trick works wonders when you’re hosting a brunch or feeding a crowd.
Serve With a Twist
A splash of hot sauce, a drizzle of honey, or a spoonful of Greek yogurt can elevate the dish. Try a lemon‑yogurt sauce for a tangy contrast, or a maple syrup drizzle for a sweet surprise. The possibilities are endless.
Creative Twists and Variations
This recipe is a playground. Here are some of my favorite ways to switch things up:
Cheesy Delight
Add grated cheddar or mozzarella to the potato mixture before cooking. The cheese melts into pockets of gooey goodness that contrast with the crisp exterior. Perfect for a brunch that feels indulgent.
Herb Garden Edition
Stir in chopped fresh herbs like rosemary, thyme, or basil. The herbs infuse the hash browns with aromatic flavors that complement the potato’s earthiness. Serve with a side of tomato salsa for a Mediterranean vibe.
Spicy Jalapeño Surprise
Dice a fresh jalapeño and fold it into the mixture. The heat will linger even after the hash browns are cooked, giving each bite a pleasant kick. Pair with a cool cucumber yogurt dip to balance the heat.
Vegan & Gluten-Free
Replace the olive oil with a splash of coconut oil for a subtle tropical note. Use a vegan cheese alternative if you’re adding cheese. This version is naturally gluten‑free and still delivers the same crispy texture.
Breakfast Bowl Twist
Serve the hash browns in a bowl with a fried or poached egg on top. Drizzle with hollandaise or a simple butter sauce. This turns the dish into a hearty breakfast bowl that’s both comforting and sophisticated.
Sweet Potato Variation
Swap regular potatoes for sweet potatoes to introduce a natural sweetness. The result is a golden hash brown with a caramelized exterior and a sweet, tender interior. Sprinkle with cinnamon for an extra layer of flavor.
Storing and Bringing It Back to Life
Fridge Storage
Store cooked hash browns in an airtight container in the refrigerator for up to 3 days. The crispness will hold up well if you reheat them in a skillet or oven. For best results, reheat at 175°C for 5–7 minutes.
Freezer Friendly
Flash‑freeze cooked hash browns on a parchment‑lined tray for 1–2 hours, then transfer to a freezer bag. They’ll keep for up to 2 months. When you’re ready, pop them straight into a preheated oven at 190°C for 10 minutes.
Best Reheating Method
The secret to reviving frozen hash browns is a quick sauté in a hot skillet with a splash of olive oil. The oil helps re‑crisp the exterior while keeping the interior moist. If you’re short on time, a microwave works, but the texture will be softer.