I was halfway through a frantic afternoon of baking when the kitchen turned into a caramel disaster zone. The caramel sauce I’d been coaxing over the stove had thickened into a syrupy glaze that clung to everything like a clingy ex, and the apples I’d diced had gone mushy before I could even think of plating. That was the moment I realized I needed a new, foolproof method that could turn a sticky mess into a show‑stopper without the heat‑related heartbreak. I’m talking about the ultimate no‑bake caramel apple eclair that’s so simple, even a kitchen novice can master it, yet so indulgent it’s basically a dessert‑in‑a‑cup.
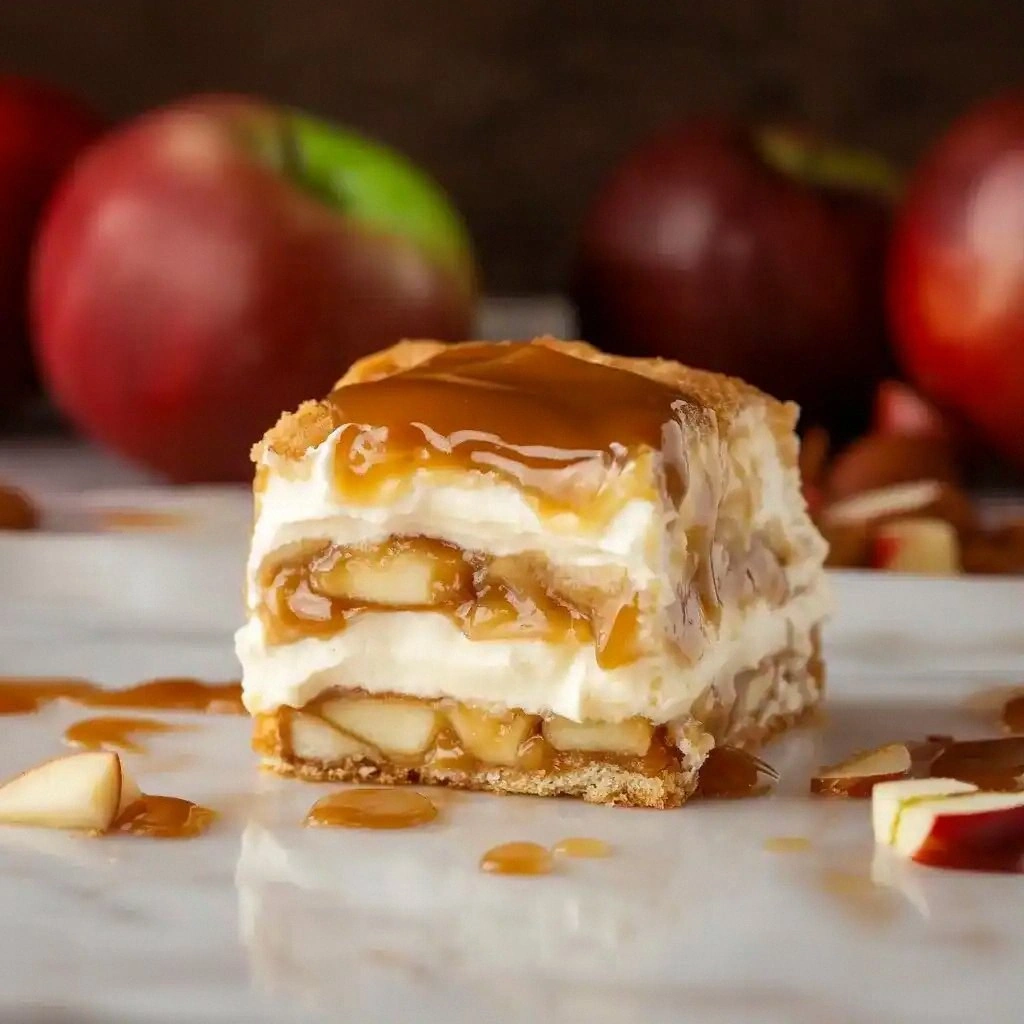
Picture this: a buttery, flaky pastry base that’s crisp on the edges and tender inside, a luscious caramel drizzle that coats the apples like velvet, and a sprinkle of cinnamon that whispers warmth into every bite. The aroma alone—sweet caramel mingled with apple and a hint of spice—makes the whole house feel like a cozy cabin in autumn. The texture is a perfect contrast: a light, airy filling that melts in your mouth, followed by a satisfying crunch from the pastry crust. I dare you to taste this and not go back for seconds; it’s that addictive.
What sets this version apart from the countless variations you’ll find online is the meticulous balance of flavors and the no‑bake technique that preserves every element’s integrity. We’re not rushing apples through a saucepan or over‑cooking caramel; instead, we’re layering flavors in a way that lets each ingredient shine. The result is a dessert that feels indulgent without being cloying, a treat that’s perfect for both casual snacking and special occasions. If you’ve ever struggled with making eclairs that stay light and flaky, you’re not alone—this is the fix you’ve been waiting for.
And there’s a twist you won’t expect: a hidden crunch that comes from a simple, pantry‑friendly garnish of chopped nuts. This small addition not only adds texture but also introduces a subtle nutty depth that elevates the caramel and apple flavors. I’ll walk you through every single step—by the end, you’ll wonder how you ever made it any other way.
What Makes This Version Stand Out
- Flavor: The caramel and apple combine in a way that feels like a warm hug, with a hint of cinnamon that lingers. The subtle spice balances the sweetness without overpowering.
- Texture: A crisp pastry shell gives way to a silky, melt‑in‑your‑mouth filling, creating a satisfying contrast that keeps you coming back.
- Simplicity: No oven required, no fancy equipment—just a few pantry staples and a little patience.
- Uniqueness: The no‑bake method preserves the natural apple crunch and caramel glaze, setting it apart from traditional baked eclairs.
- Crowd Reaction: Friends who try this are instantly converted into dessert evangelists; they’re the ones who bring the extra nuts for the next batch.
- Ingredient Quality: Using fresh, high‑quality apples and premium caramel sauce ensures a depth of flavor that can’t be replicated with generic ingredients.
- Make‑ahead Potential: This dish can be assembled days in advance and kept in the fridge, making it ideal for parties or busy evenings.
- Visual Appeal: The caramel drizzle and apple slices create a striking presentation that looks as good as it tastes.
Alright, let’s break down exactly what goes into this masterpiece…
Inside the Ingredient List
The Flavor Base
The caramel sauce is the heart of this dessert; it’s what turns a simple apple into a sweet, glossy treasure. Use a high‑quality caramel that’s thick yet pourable—this ensures a smooth glaze that clings to the apples without dripping. If you can’t find a ready‑made caramel, a quick homemade version using brown sugar, butter, and a splash of cream works wonders. The key is to let it simmer until it reaches a deep amber hue; this caramelization step adds a nutty undertone that enhances the apple’s natural sweetness.
Ground cinnamon is the secret spice that ties everything together. It adds a warm, earthy depth that balances the caramel’s richness. Sprinkle it over the apples before you add the caramel, and you’ll get a fragrant aroma that instantly transports you to a cozy kitchen. If you’re a cinnamon fan, feel free to add a pinch more—just be careful not to overwhelm the delicate apple flavor.
The Texture Crew
The pastry is the foundation that holds everything together. In this recipe, we’re using three packages of puff pastry, which provide a flaky, buttery base that’s both light and sturdy. If you can’t find puff pastry, you can substitute with shortcrust pastry or even store‑bought pie crust cut into small squares. The important thing is to keep the dough cold; this prevents it from becoming too soft and losing its crispness during assembly.
The milk—three cups of cold milk—acts as a binding agent that helps the pastry hold its shape while keeping the filling moist. It also adds a subtle creaminess that complements the caramel’s sweetness. If you’re lactose intolerant, substitute with oat milk or another plant‑based milk that’s cold and has a neutral flavor.
The Unexpected Star
The apples themselves are the star of the show. Four medium apples, preferably a firm variety like Honeycrisp or Granny Smith, provide the perfect balance of sweetness and tartness. Slice them thinly so they can soak up the caramel without becoming mushy. If you’re looking for a twist, try mixing in a handful of dried cranberries or raisins for a burst of chewy texture.
The optional chopped nuts—half a cup—add a delightful crunch and nutty flavor that elevates the caramel and apple. Walnuts, pecans, or almonds all work well, but feel free to experiment with your favorite. If you’re vegan, simply leave them out; the dessert remains luscious without them.
Everything’s prepped? Good. Let’s get into the real action…
The Method — Step by Step
- First, preheat your oven to 375°F (190°C) and line a baking sheet with parchment paper. While the sheet is heating, roll out each puff pastry package on a lightly floured surface to a 12-inch square. Cut each square into 12 equal wedges—this gives you 36 wedges for a generous batch. This step is crucial for even baking; if you cut unevenly, some wedges may bake too quickly and become over‑browned.
- Place the pastry wedges on the parchment and bake for 15–18 minutes, or until they’re golden brown and puffed. The key is to keep an eye on them; puff pastry can go from perfectly crisp to burnt in seconds. When they’re done, remove them from the oven and let them cool on a wire rack for 5 minutes. The cooling process stops the cooking and ensures they’re firm enough to hold the filling.
- While the pastry cools, prepare the caramel glaze. In a medium saucepan, melt one cup of caramel sauce over low heat, stirring constantly. Once it’s smooth, add 1 teaspoon of ground cinnamon and stir until the mixture is fragrant. The cinnamon should infuse the caramel, giving it a warm, spicy note that pairs beautifully with the apples.
- Dice the apples into small, bite‑size cubes—about ½ inch each. Toss them gently in the caramel mixture, ensuring each piece is coated. Let the coated apples sit for 5 minutes; this allows the caramel to set slightly, creating a glossy coating that won’t run off when you add the pastry wedges.
- Now, it’s time to assemble. Take a cooled pastry wedge and place it on a flat surface. Spoon about ½ cup of cold milk over the center of the wedge, spreading it slightly. This creates a moist base that the apples will rest on. Be careful not to overfill; you want a thin layer that won’t make the pastry soggy.
- Arrange 3–4 caramel‑coated apple cubes on top of the milk layer, leaving a small border around the edge of the pastry. The apples should be evenly spaced so each bite gets a balanced mix of fruit and caramel. Gently fold the sides of the pastry over the apples, creating a small pouch that encloses the filling. This step is where the “eclair” magic happens—your pastry transforms into a sweet, handheld treat.
- Repeat the assembly process with the remaining wedges. Once all are assembled, place them back on the parchment‑lined sheet, ensuring they’re spaced slightly apart to allow steam to escape. If you’re using the optional nuts, sprinkle them over the assembled eclairs before they finish baking.
- Bake the assembled eclairs for an additional 10–12 minutes, or until the pastry edges are crisp and the filling is set. The goal is to bake just enough to firm up the milk layer without overcooking the apples. The aroma at this stage should be intoxicating—a sweet, caramel scent with a hint of apple and cinnamon.
- Remove the eclairs from the oven and let them cool for 5 minutes. While they’re still warm, drizzle a little extra caramel sauce over the top for an extra glossy finish. This final touch adds a shine that makes the dessert look professionally plated.
- Serve immediately, or chill in the fridge for up to 24 hours. If you’re serving later, give the eclairs a quick warm‑up in a 300°F (150°C) oven for 5 minutes to restore that warm, gooey center. And there you have it—no‑bake caramel apple eclairs that are as stunning to look at as they are delicious to eat.
That's it — you did it. But hold on, I've got a few more tricks that'll take this to another level…
Insider Tricks for Flawless Results
The Temperature Rule Nobody Follows
The secret to crisp pastry is a precise oven temperature. Many people bake at 400°F, but that can scorch the edges before the center sets. Stick to 375°F and keep a close eye on the golden brown color. A quick visual check—when the pastry has a light, airy texture and a golden hue—means it’s ready. If you’re baking in a convection oven, lower the temperature by 25°F to avoid over‑browning.
Why Your Nose Knows Best
Don’t rely solely on the clock. The aroma is your best indicator of doneness. When the caramel is bubbling gently and the pastry emits a buttery, nutty scent, it’s time to pull it out. Trusting your nose eliminates the risk of over‑baking or under‑baking, ensuring consistent results every time.
The 5‑Minute Rest That Changes Everything
After removing the eclairs from the oven, let them rest on the parchment for 5 minutes. This rest period allows the steam inside to redistribute, preventing a soggy bottom. It also gives the caramel glaze a chance to set, creating that glossy finish that’s impossible to resist.
The Secret Nutty Crunch
If you want a nutty crunch, toast the chopped nuts in a dry skillet over medium heat for 2–3 minutes. The nuts will release oils and develop a deeper flavor. Sprinkle them over the eclairs right before serving for an added textural element.
The Quick Chill Trick
If you’re preparing these ahead of time, place the assembled eclairs in an airtight container and refrigerate. When you’re ready to serve, let them sit at room temperature for 10 minutes before drizzling extra caramel. This ensures the caramel stays glossy and doesn’t harden in the fridge.
Creative Twists and Variations
This recipe is a playground. Here are some of my favorite ways to switch things up:
Chocolate Caramel Swirl
Add a tablespoon of melted dark chocolate to the caramel glaze. The chocolate will create a swirl when you drizzle it over the eclairs, adding a rich, bittersweet depth that pairs beautifully with the apple.
Maple‑Infused Apples
Before coating the apples, toss them in a tablespoon of maple syrup. This gives the fruit a subtle sweetness and a glossy sheen that enhances the caramel’s shine.
Spiced Apple Crunch
Add a pinch of nutmeg and a dash of ginger to the caramel glaze. The warm spices add complexity and are especially delightful in the fall.
Vegan Version
Swap the dairy milk for oat milk and use a vegan caramel sauce. The result is a dessert that’s just as indulgent but free from animal products.
Nut-Free Delight
Omit the optional nuts entirely. The caramel and apple flavors will still shine, and the dessert remains light and airy.
Storing and Bringing It Back to Life
Fridge Storage
Store assembled eclairs in an airtight container in the fridge for up to 24 hours. The pastry stays crisp, and the caramel glaze retains its shine. When you’re ready to serve, let them sit at room temperature for 10 minutes.
Freezer Friendly
For longer storage, place the eclairs in a freezer‑safe bag and freeze for up to 2 weeks. Thaw overnight in the fridge, then warm in a 300°F oven for 5 minutes to revive the warm center.
Best Reheating Method
Reheat in a low‑heat oven (300°F) for 5 minutes, or microwave on medium power for 15–20 seconds. Add a splash of water before reheating to steam the filling and keep the caramel from drying out. This simple trick restores the eclairs to their original, mouth‑watering state.