I was halfway through a frantic weekday dinner when my roommate dared me to make something that could turn a bland night into a full‑blown celebration. I stared at the pantry, grabbed a stick of butter, a bottle of maple syrup, and a bag of chocolate chips, and thought, “What if I could combine the comfort of a classic shortbread with the cozy warmth of maple and the playful charm of bear shapes?” The idea was half‑serious, half‑impulse, and completely unstoppable. I tossed the butter into a pan, and the moment it hit the heat, a nutty aroma rose like a promise of something magical.
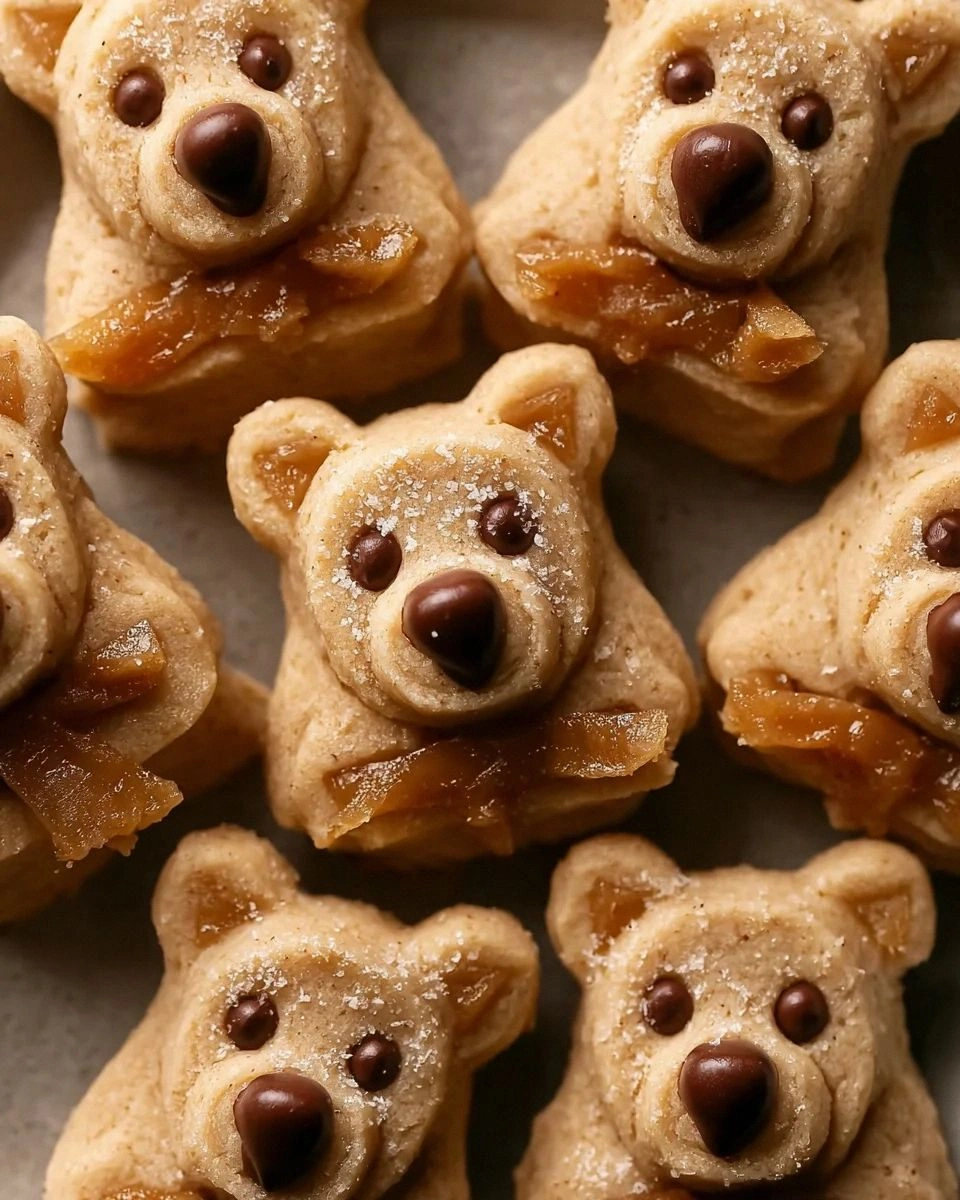
The kitchen instantly transformed into a sensory playground. The sizzling butter sang a low, buttery chorus, the maple syrup dripped in a caramel‑gold cascade, and the dark brown sugar melted into a glossy pool that smelled like a campfire in autumn. My hands felt the buttery warmth radiating from the pan, and my nose was assaulted by a fragrant blend of vanilla, cinnamon, and nutmeg that made me feel like I was strolling through a maple forest at sunrise. I could already picture the bears—golden, crisp, with a hint of sparkle from the chocolate chips—lining a festive platter.
Most shortbread recipes either fall flat on the palate or become overly sweet and crumbly. This version, however, is a game‑changer. The secret lies in browning the butter to unlock a deep, nutty flavor, then marrying it with pure maple syrup for an earthy sweetness that isn’t cloying. The addition of a pinch of baking powder gives the cookies a tender, melt‑in‑your‑mouth texture while keeping the edges perfectly crisp. And those chocolate chips? They’re tiny, dark‑eyed bears that add just the right amount of surprise without stealing the spotlight.
I’ll be honest — I ate half the batch before anyone else got a chance to try them, and I dare you to taste this and not go back for seconds. Picture yourself pulling these golden bears out of the oven, the whole kitchen smelling like a maple‑kissed bakery, the crust cracking gently as you lift one with a spatula. Okay, ready for the game‑changer? Let me walk you through every single step — by the end, you’ll wonder how you ever made shortbread any other way.
What Makes This Version Stand Out
- Flavor Depth: The brown butter adds a toasty, nutty foundation that ordinary butter simply can’t match, while maple syrup brings a natural, caramel‑like sweetness that feels both rustic and refined.
- Texture Harmony: A delicate balance of buttery crumb and a faint, airy lift from baking powder creates a cookie that is crisp at the edges yet melt‑in‑your‑mouth soft inside.
- Simplicity: Only eleven pantry staples are needed, and the technique is straightforward enough for a novice yet satisfying for a seasoned baker.
- Unique Shape: Cutting the dough into bear silhouettes adds a whimsical, Instagram‑ready twist that makes these cookies perfect for parties, kids, or a cozy night in.
- Crowd Reaction: Expect immediate “wow” moments; guests often ask for the recipe before they’ve even taken the first bite.
- Ingredient Quality: Using real pure maple syrup and unsalted butter ensures each bite bursts with authentic flavor, no artificial shortcuts.
- Cooking Method: Browning the butter first creates a flavor base that infuses the entire dough, a step most recipes skip.
- Make‑Ahead Potential: The dough can be chilled for up to 24 hours, and the baked bears keep fresh for a week, making them an ideal make‑ahead treat.
Inside the Ingredient List
The Flavor Base
Unsalted butter is the heart of this recipe. By cooking it until it turns a golden amber, you coax out a deep, nutty aroma that transforms the entire cookie. If you skip browning, you’ll end up with a bland, one‑dimensional shortbread. For the best results, use European‑style butter with a higher butterfat content; it browns evenly and yields a richer flavor.
Pure maple syrup is the sweetener that sets this recipe apart from ordinary sugar‑only shortbreads. Its complex, woody notes complement the browned butter perfectly. Always opt for Grade A, dark‑amber maple syrup for maximum depth. If you’re out of maple, a high‑quality amber honey can work, but the flavor profile will shift toward floral sweetness.
Dark brown sugar contributes a subtle molasses undertone that rounds out the sweetness and adds a slight chewiness. It also helps the cookies achieve that beautiful caramel color. In a pinch, you can substitute with an equal amount of light brown sugar, but expect a milder flavor.
The Texture Crew
All‑purpose flour provides the structural backbone. Its protein content creates just enough gluten to hold the cookies together without making them tough. If you prefer a softer crumb, you can replace half of the flour with cake flour, but the bears may spread a bit more.
Baking powder is the secret lift that keeps the interior tender. Only a teaspoon is needed; too much will cause the cookies to puff and lose their shortbread character. For a gluten‑free version, use a blend of rice flour and a gluten‑free baking powder, but be aware the texture will be slightly different.
A pinch of salt is essential. It balances the sweetness, enhances the butter’s flavor, and prevents the cookies from tasting flat. Sea salt or kosher salt works best because of its flaky texture.
The Unexpected Star
Vanilla extract adds warmth and rounds the flavor profile, while maple extract boosts the maple presence for those who crave an extra punch. Use pure vanilla extract rather than imitation for a cleaner taste. If you’re allergic to vanilla, a splash of almond extract can add a pleasant nuance.
Ground cinnamon and nutmeg introduce a cozy spice layer that pairs beautifully with maple. Cinnamon offers a sweet, woody note, and nutmeg adds a subtle, earthy depth. A pinch too much nutmeg can become overpowering, so measure carefully.
The Final Flourish
Chocolate chips are optional, but they transform each bear into a playful character with “eyes” and “noses.” Choose semi‑sweet or dark chips for a balanced bite; milk chocolate can become too sweet. If you’re vegan, use dairy‑free chocolate chips, and the flavor will remain just as delightful.
Everything's prepped? Good. Let’s get into the real action…
The Method — Step by Step
Start by cutting the unsalted butter into 1‑inch cubes. Place them in a medium‑sized saucepan over medium heat. As the butter melts, watch for it to foam, then turn a deep amber color and emit a nutty scent. That sizzle when it hits the pan? Absolute perfection. Immediately remove the pan from the heat and pour the brown butter into a heat‑proof bowl to stop the cooking process.
Kitchen Hack: To keep the butter from over‑cooking, set a timer for 2 minutes once it starts to foam; you’ll catch the perfect golden stage every time.While the butter cools slightly, whisk together the pure maple syrup, dark brown sugar, vanilla extract, and maple extract in a large mixing bowl. The mixture should look glossy and start to thicken as you stir. This is the sweet, aromatic base that will coat every crumb. Let it sit for a minute so the sugar begins to dissolve; you’ll notice a faint steam rising—a sign you’re on the right track.
Gradually pour the warm brown butter into the syrup‑sugar mixture, whisking constantly. The dough will thicken instantly, forming a cohesive, slightly sticky mass. At this point, you can feel the dough becoming silky under the whisk—like a velvety ribbon. If the mixture looks too runny, add a tablespoon of flour; if it’s too stiff, a splash of milk will loosen it just enough.
In a separate bowl, combine the all‑purpose flour, baking powder, ground cinnamon, ground nutmeg, and salt. Whisk these dry ingredients together to ensure even distribution of the spices and leavening agent. This step prevents pockets of cinnamon or salt from ending up in one bite, which could throw off the flavor balance.
Add the dry ingredient mixture to the wet butter‑syrup blend. Using a wooden spoon or a spatula, fold everything together until just combined. Over‑mixing will develop gluten and make the cookies tough, so stop as soon as you no longer see flour streaks. The dough should feel slightly sticky but manageable—if it clings to your fingers, chill it for 10 minutes.
Fold in the chocolate chips (if using) with a gentle hand, ensuring they’re evenly dispersed. The chips will act as the “eyes” of each bear, adding a burst of melty chocolate in every bite. At this stage, you can also add a handful of chopped walnuts for extra crunch, but remember that the classic version shines on its own.
Watch Out: If you add too many chocolate chips, the dough may become overly soft and spread during baking; keep the ratio balanced.Cover the dough with plastic wrap and refrigerate for at least 30 minutes, or up to 24 hours. Chilling firms the butter, making it easier to roll out and cut into shapes. This also allows the flavors to meld, resulting in a deeper, more harmonious taste. While you wait, preheat your oven to 350°F (175°C) and line two baking sheets with parchment paper.
Place the chilled dough on a lightly floured surface and roll it out to about ¼‑inch thickness. Using a bear‑shaped cookie cutter, press firmly to cut out the silhouettes. Gather the scraps, re‑roll, and continue cutting until all the dough is used. If the dough sticks, sprinkle a bit more flour underneath, but avoid over‑flouring, which can dry out the cookies.
Arrange the bears on the prepared baking sheets, spacing them about 1 inch apart. Bake for 12‑15 minutes, or until the edges turn a light golden brown and the tops look just set. The cookies will continue to firm up as they cool, so resist the urge to over‑bake. When you pull them out, the aroma of maple, butter, and spice will fill your kitchen, making you want to hug the oven.
Kitchen Hack: Transfer the baked bears to a wire rack immediately; this prevents steam from making the bottoms soggy.Allow the bears to cool completely on the rack before storing. They will firm up further as they reach room temperature, achieving that perfect snap when you bite into the edge. Once cooled, arrange them on a platter, drizzle a thin stream of melted chocolate for extra flair, and watch your guests swoon.
That's it — you did it. But hold on, I've got a few more tricks that'll take this to another level…
Insider Tricks for Flawless Results
The Temperature Rule Nobody Follows
Never let the butter get too hot after browning; a temperature above 350°F can burn the nutty notes, turning them bitter. Let it sit for a minute or two off the heat, then incorporate it while still warm. This ensures the butter stays liquid enough to blend smoothly without scorching. I once rushed this step and ended up with a burnt aftertaste that no amount of maple could rescue.
Why Your Nose Knows Best
Your sense of smell is the ultimate doneness gauge. When the butter first browns, the scent shifts from milky to toasted almond—this is your cue to remove it from heat. Later, as the cookies bake, the moment you smell a faint caramel‑maple perfume, the edges are just about ready. Trust that nose; it’s more reliable than a timer.
The 5‑Minute Rest That Changes Everything
After rolling out the dough, let it rest for five minutes before cutting. This short pause allows the gluten to relax, resulting in a more tender crumb. Skipping this step often leads to a slightly tougher bite, especially if you’re using all‑purpose flour with higher protein. I tried cutting straight away once, and the bears were noticeably denser.
Chocolate Chip Placement Precision
For the cutest “eyes,” press each chip gently into the bear’s head area before baking. This prevents them from sinking or sliding off during the bake. A light tap with the back of a spoon secures them in place. If you’re feeling adventurous, use a tiny dab of melted chocolate to glue the chips for a flawless look.
Freezing the Dough for Future Batches
Wrap the unbaked dough tightly in plastic wrap, then place it in a freezer bag. It will keep for up to a month. When you’re ready, thaw it in the fridge overnight, then roll and cut as usual. This hack is perfect for holiday prep when you need a batch ready to go in minutes.
Creative Twists and Variations
This recipe is a playground. Here are some of my favorite ways to switch things up:
Maple‑Pecan Delight
Swap half the chocolate chips for toasted pecan pieces. The nuts add a buttery crunch that pairs beautifully with the maple, creating a sophisticated flavor profile perfect for adult gatherings.
Spiced Pumpkin Bears
Replace ¼ cup of the flour with pumpkin puree and add a pinch more cinnamon and nutmeg. The orange‑gold hue and subtle pumpkin taste make these ideal for autumn celebrations.
White Chocolate & Cranberry
Use white chocolate chips instead of dark, and fold in dried cranberries. The sweet‑tart contrast brightens the cookies, making them a festive holiday treat.
Salted Caramel Drizzle
After the bears have cooled, drizzle a thin stream of homemade salted caramel and sprinkle a pinch of flaky sea salt. The salty‑sweet combo elevates the simple shortbread into a gourmet indulgence.
Vegan Version
Replace butter with a plant‑based alternative (such as coconut oil) and use agave syrup instead of maple for a fully vegan cookie. The texture stays buttery, and the flavor remains richly sweet.
Storing and Bringing It Back to Life
Fridge Storage
Place the cooled bears in an airtight container with a paper towel on top to absorb any excess moisture. They’ll stay fresh for up to a week, retaining their crisp edges and chewy centers.
Freezer Friendly
Layer the bears between sheets of parchment and seal the container tightly. They freeze beautifully for up to three months. When you’re ready to enjoy them, let them thaw at room temperature for 15 minutes, then give them a quick 3‑minute warm‑up in a 300°F oven.
Best Reheating Method
To revive that fresh‑out‑of‑the‑oven snap, place the bears on a baking sheet, add a tiny splash of water (about a teaspoon) to the tray, and warm for 5 minutes at 350°F. The steam revives the crumb without making them soggy, and the butter‑maple aroma returns instantly.