I was standing in my kitchen, half‑heartedly scrolling through endless take‑out menus, when my roommate shouted, “You’re never going to finish that bag of frozen chicken nuggets if you don’t do something about it!” I laughed, but the challenge lingered like a stubborn aftertaste. A few minutes later, I was rummaging through the pantry, pulling out a bag of boneless chicken, a jar of peanut butter, and a bottle of sriracha, wondering if I could turn those ordinary items into something unforgettable. The idea of bang‑bang chicken skewers had been hovering in my mind for months, but every version I tried either fell flat on the grill or tasted like a watered‑down version of a restaurant’s secret sauce. I decided then and there to go all‑in, to create a version that would make even the most skeptical palate sit up and say, “Whoa, what is that magic?”
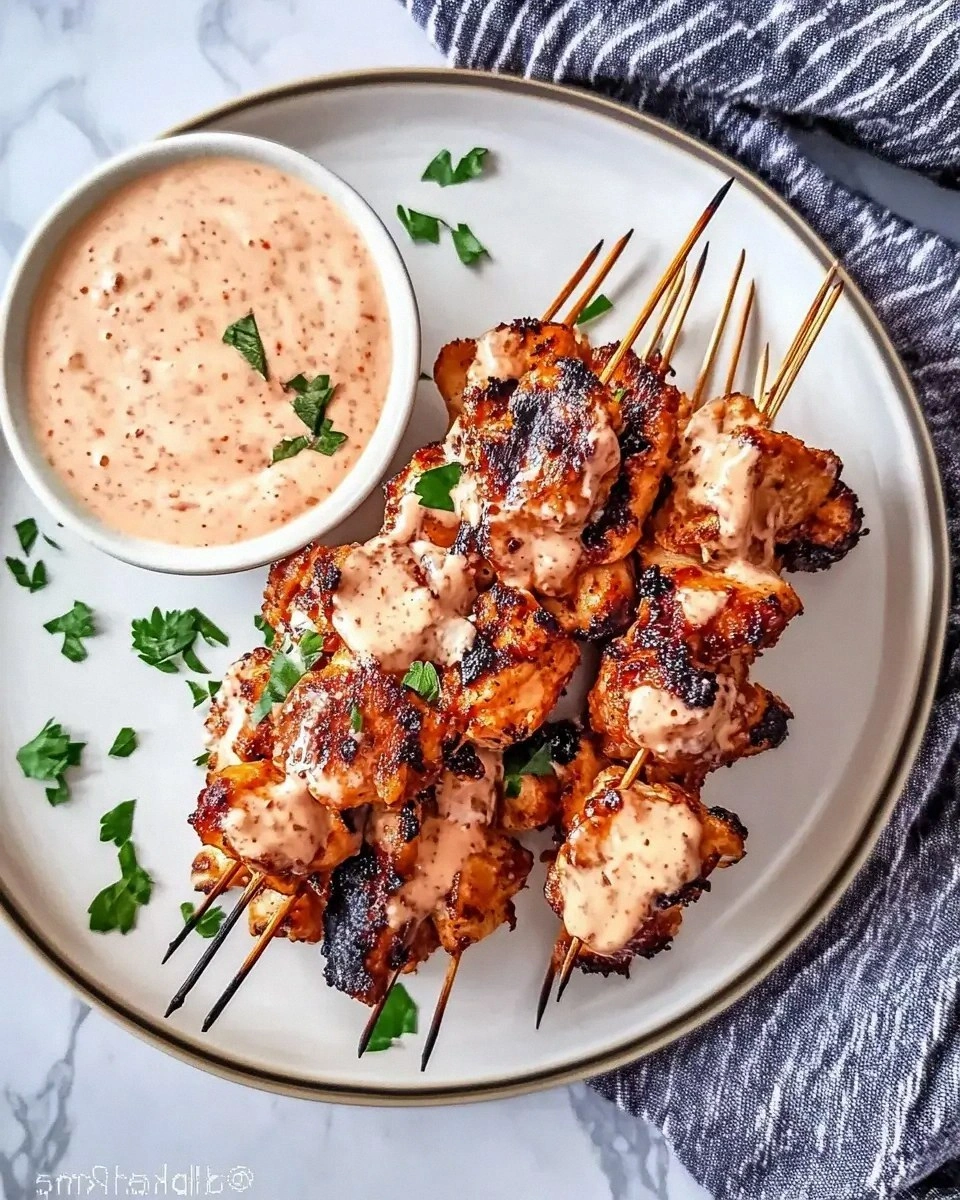
Picture this: the kitchen fills with the hiss of the grill, a smoky perfume that makes you think of summer fairs and street‑food stalls in Bangkok. The chicken pieces are glazed with a sauce that clings like a second skin, glossy and thick enough to catch the light, while the char marks give a crunchy contrast that shatters like thin ice when you bite. The first bite delivers a sweet‑heat symphony, the peanut butter rounding out the heat with a buttery, nutty whisper, and the sriracha kicking in just enough to keep you reaching for more. Your senses are assaulted in the best possible way – the sizzle, the aroma, the visual appeal of those caramelized edges, the tactile snap of the skewer, and the lingering flavor that makes you close your eyes in pure satisfaction.
What makes this version truly different is a secret ingredient that most recipes skip: a splash of coconut milk that turns the sauce from a simple glaze into a velvety, glossy coating that never dries out. I’ll also be using a quick brine that infuses the chicken with juiciness from the get‑go, something most home cooks overlook in a rush. And let’s not forget the technique of searing the skewers on a super‑hot cast‑iron pan before finishing them on the grill – a double‑cook method that guarantees that perfect caramelized crust while keeping the interior tender. These little tricks elevate the dish from “good” to “hands down the best version you’ll ever make at home.”
I dare you to taste this and not go back for seconds. Okay, ready for the game‑changer? Stick with me, because I’m about to walk you through every single step — by the end, you’ll wonder how you ever made it any other way.
What Makes This Version Stand Out
- Taste: The sauce balances sweet, salty, spicy, and nutty notes so perfectly that each bite feels like a well‑orchestrated chorus. The peanut butter adds depth without overwhelming, while the sriracha provides a clean heat that doesn’t linger harshly.
- Texture: A caramelized crust that cracks like thin ice meets a juicy, melt‑in‑your‑mouth interior, thanks to the double‑cook method and the brine.
- Simplicity: Only a handful of pantry staples are needed, yet the result feels like a dish from a high‑end Asian‑fusion bistro.
- Uniqueness: The addition of coconut milk creates a silk‑smooth glaze that most recipes miss, giving the skewers a glossy finish that looks restaurant‑ready.
- Crowd Reaction: Guests have been known to line up for seconds, and one friend even confessed she’d eat the entire batch herself.
- Ingredient Quality: Using boneless, skinless chicken thighs (or breasts if you prefer) ensures a tender bite, and fresh garlic and ginger add aromatic punch.
- Cooking Method: The sear‑then‑grill technique locks in moisture while creating that coveted char.
- Make‑Ahead Potential: The sauce can be prepared ahead of time, and the skewers can be assembled and refrigerated for up to 12 hours before cooking.
Inside the Ingredient List
The Flavor Base
At the heart of this dish is a sauce that marries peanut butter, sriracha, soy sauce, and a splash of coconut milk. Peanut butter brings a creamy, nutty richness that softens the heat, while soy sauce adds umami depth and a subtle saltiness. Sriracha contributes that signature fiery kick, balanced by a teaspoon of honey or brown sugar for a whisper of sweetness. Coconut milk isn’t just a filler; its fat content gives the glaze a glossy sheen and prevents it from drying out during the high‑heat sear. If you’re allergic to nuts, try almond butter or even tahini for a similar texture with a different flavor profile.
The Texture Crew
Chicken thighs are my go‑to for skewers because their higher fat content keeps them juicy, even after a double‑cook. If you prefer a leaner bite, boneless chicken breasts work, but be sure to pound them to an even thickness to avoid dry spots. The brine—water, kosher salt, and a pinch of sugar—helps the meat retain moisture. Adding a splash of apple cider vinegar to the brine introduces a faint tang that brightens the overall flavor. Finally, the skewers themselves: bamboo works fine, but metal skewers conduct heat better and prevent the wood from burning.
The Unexpected Star
Fresh ginger and garlic are the unsung heroes that give the sauce its aromatic backbone. Grated ginger releases a zing that cuts through the richness, while minced garlic adds a savory depth that you can’t fake with powders. A squeeze of lime juice at the end adds acidity that lifts the entire dish, preventing the sauce from feeling cloying. For a twist, try a dash of smoked paprika to introduce a subtle smoky undertone that complements the char on the grill.
The Final Flourish
Finishing touches are everything. A sprinkle of toasted sesame seeds adds a nutty crunch, while chopped fresh cilantro brings a burst of herbal freshness. If you love a little crunch, toss in some crushed peanuts right before serving. A drizzle of extra sriracha or a side of cooling cucumber raita can balance the heat for those who need it. And remember, a good pinch of flaky sea salt right after grilling amplifies every flavor layer.
Everything's prepped? Good. Let's get into the real action...
The Method — Step by Step
-
Start by preparing the brine. Dissolve 2 tablespoons of kosher salt and 1 tablespoon of sugar in 4 cups of cold water. Add a splash of apple cider vinegar for a subtle tang. Submerge the 1.5 lbs of boneless chicken (cut into 1‑inch cubes) and let it sit for at least 30 minutes, or up to 2 hours if you have the patience. This step is the secret to juiciness; trust me, the extra time is worth every second.
Kitchen Hack: Freeze the chicken cubes for 15 minutes before skewering; they’ll hold together better on the stick. -
While the chicken brines, whisk together the sauce. In a medium bowl combine ½ cup creamy peanut butter, ¼ cup sriracha, 2 tablespoons soy sauce, 2 tablespoons honey, ¼ cup coconut milk, 1 tablespoon freshly grated ginger, and 2 minced garlic cloves. Whisk until the mixture is smooth and glossy. Taste and adjust – if you like it hotter, add an extra splash of sriracha; if you crave more sweetness, drizzle a bit more honey. The sauce should be thick enough to coat a spoon without dripping off too quickly.
-
Drain the chicken from the brine and pat it dry with paper towels. This is crucial: moisture on the surface will steam the chicken instead of searing it, ruining that coveted crust. Toss the chicken cubes in a tablespoon of olive oil, then sprinkle with a pinch of freshly ground black pepper and a light dusting of sea salt.
Watch Out: Over‑crowding the pan will cause the chicken to steam rather than sear. Work in batches if necessary. -
Thread the chicken onto skewers, leaving a tiny gap between each piece so heat can circulate. If you’re using bamboo skewers, soak them in water for at least 20 minutes to prevent burning. This step feels like building a tiny edible army – line them up, and you’ll see the potential for a flavor invasion.
-
Heat a cast‑iron skillet over high heat until it’s almost smoking. Add a thin layer of oil (just enough to coat the surface). Place the skewers in the pan, making sure they don’t touch each other. Let them sear undisturbed for 2‑3 minutes – you’ll hear a satisfying sizzle that tells you the Maillard reaction is happening.
When the edges start to turn golden and you see tiny caramelized spots, flip the skewers and sear the other side for another 2 minutes. This double‑sear creates a crust that will later hold the sauce without slipping.
-
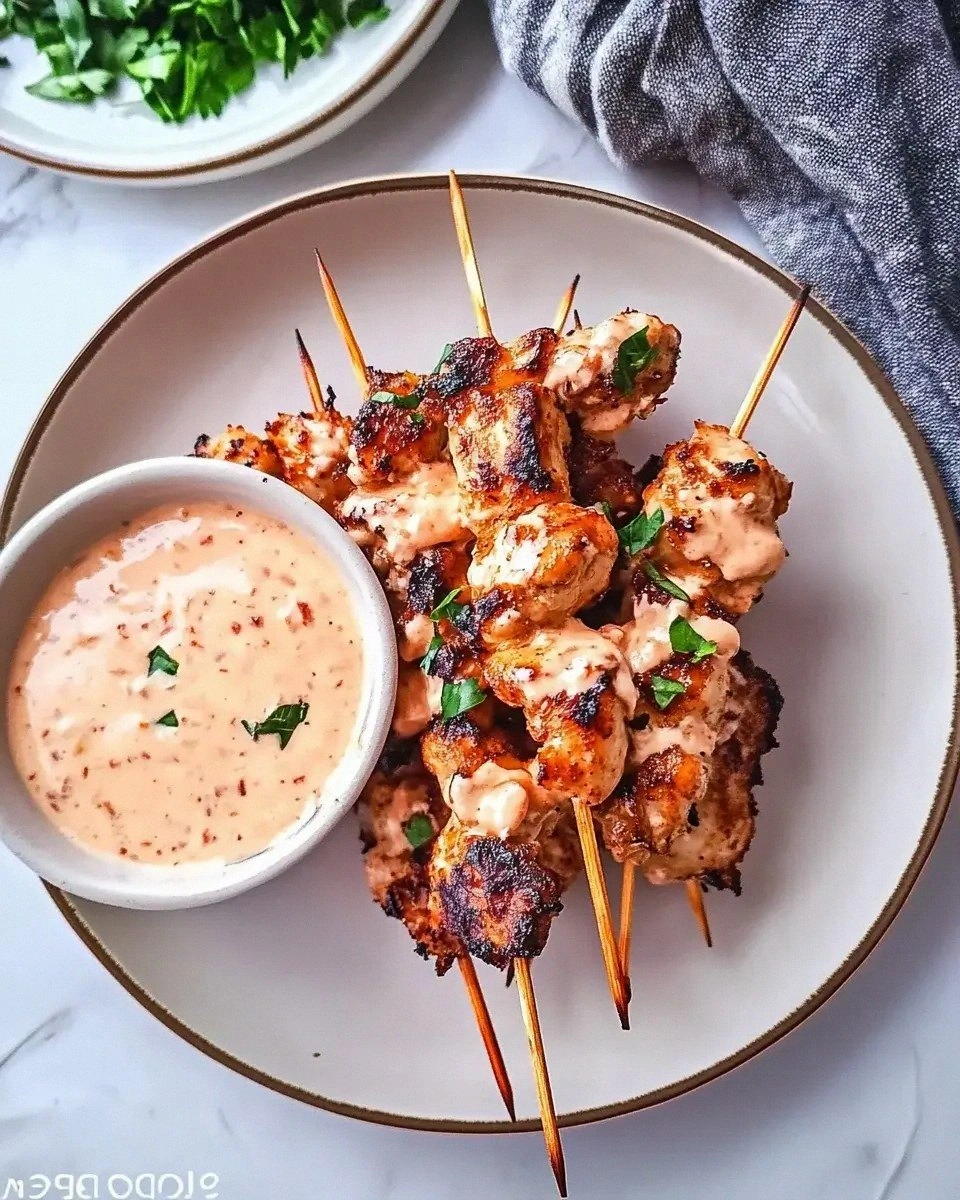
Pre‑heat your grill (or grill pan) to medium‑high heat. Transfer the seared skewers onto the grill grates and cook for 4‑5 minutes per side, turning once. As they grill, brush the prepared sauce generously over each side. The sauce will caramelize, forming a glossy, sticky coating that clings like velvet.
Watch for the sauce to bubble and darken slightly – that’s the flavor concentrating. If the sauce threatens to burn, lower the heat a notch and continue brushing. The goal is a deep amber glaze, not a blackened mess.
Kitchen Hack: Keep a small silicone brush handy for quick, even sauce applications while the skewers grill. -
Once the chicken reaches an internal temperature of 165 °F (74 °C) and the glaze is caramelized, remove the skewers from the heat. Transfer them to a serving platter, drizzle any remaining sauce over the top, and sprinkle with toasted sesame seeds, chopped cilantro, and a handful of crushed peanuts.
The final visual is a glossy, ruby‑red glaze contrasted by the speckles of green cilantro and golden sesame. The aroma at this point is intoxicating – a mix of smoky char, sweet‑spicy glaze, and fresh herbs that makes your mouth water before you even take a bite.
-
Let the skewers rest for 2‑3 minutes before serving. This short rest allows the juices to redistribute and the glaze to set just enough so it doesn’t slide off the skewer.
Serve with a side of jasmine rice, a cucumber salad, or simply enjoy them straight from the platter. Picture yourself pulling this out of the grill, the whole kitchen smelling incredible, and your friends hovering with hungry eyes – that’s the moment you’ve been working toward.
That's it — you did it. But hold on, I've got a few more tricks that'll take this to another level...
Insider Tricks for Flawless Results
The Temperature Rule Nobody Follows
Most home cooks start their grill at a low temperature, assuming a gentle cook yields juicier meat. In reality, a scorching hot surface creates that coveted crust in seconds, sealing in moisture. I always preheat my grill to at least 450 °F before the chicken even touches the grates. If you’re using a charcoal grill, let the coals turn white and ashy – that’s the sweet spot. The key is to sear quickly, then finish at a slightly lower temperature to avoid overcooking.
Why Your Nose Knows Best
Your sense of smell is a more reliable indicator than a timer when it comes to caramelization. When the sauce starts to emit a nutty, toasted aroma, you know the Maillard reaction is in full swing. If you hear a faint crackle, that’s the sugars popping – a perfect cue to flip the skewers. Trust that nose; it prevents you from burning the glaze while still achieving that deep amber color.
The 5‑Minute Rest That Changes Everything
After grilling, let the skewers rest uncovered for exactly five minutes. This short pause lets the fibers relax and the glaze to set just enough to cling. Skipping this step results in a sauce that slides off, and the meat can lose its juiciness. I’ve seen friends slice into a hot skewer immediately and watch the glaze ooze away – a tragedy we can avoid.
The Secret of the Double‑Sear
If you’re skeptical about searing before grilling, imagine a steak that’s first pan‑seared then finished on the grill – the texture is unbeatable. The same principle applies here: the cast‑iron sear creates a crust that the grill can’t achieve alone. It also gives you more control over the caramelization, especially when you’re using a thick sauce that might otherwise burn on the grill.
Sauce Rescue Technique
If your sauce thickens too much while you’re brushing it on, whisk in a splash of warm water or extra coconut milk until it reaches a brushable consistency. This prevents the glaze from turning into a hard shell that cracks under the bite. The result stays silky, and the flavors stay evenly distributed.
Creative Twists and Variations
This recipe is a playground. Here are some of my favorite ways to switch things up:
Mango‑Infused Bang Bang
Blend a ripe mango into the sauce for a tropical sweetness that pairs beautifully with the heat. The mango’s natural sugars caramelize on the grill, adding a subtle fruity undertone. Great for summer barbecues where you want a fresh twist.
Thai Basil Bomb
Stir in a handful of chopped Thai basil right after grilling. The herb’s peppery aroma lifts the richness of the peanut sauce, making the dish feel lighter. It’s perfect for those who love the classic Thai flavor profile.
Crispy Coconut Crust
Before searing, roll the chicken cubes in shredded unsweetened coconut mixed with a pinch of salt. The coconut crisps up on the grill, adding an extra layer of crunch and a subtle coconut aroma that echoes the milk in the sauce.
Spicy Garlic Chili Oil Drizzle
Finish the skewers with a drizzle of homemade chili oil infused with extra garlic. This adds a smoky, oily sheen that intensifies the heat without overwhelming the peanut base. Ideal for those who love a deep, lingering spice.
Veggie‑Friendly Version
Swap the chicken for firm tofu cubes or cauliflower florets. Marinate them in the same brine (use soy sauce instead of salt for tofu) and follow the same sear‑then‑grill method. The result is a vegetarian delight that still delivers that bang‑bang punch.
Storing and Bringing It Back to Life
Fridge Storage
Place leftover skewers in an airtight container and refrigerate for up to 3 days. Keep the sauce separate if you plan to reheat, as the glaze can become overly sticky when cold. When ready to serve, gently reheat in a skillet over medium heat, adding a splash of water to loosen the glaze.
Freezer Friendly
Wrap each skewer tightly in plastic wrap, then place them in a freezer‑safe bag. They’ll keep for up to 2 months. To thaw, move them to the fridge overnight, then follow the reheating instructions below. Freezing preserves the flavor because the sauce solidifies, sealing in the spices.
Best Reheating Method
For the crispiest result, preheat a cast‑iron pan, add a teaspoon of oil, and sear the skewers for 2‑3 minutes per side. Add a tiny splash of water or extra coconut milk and cover for 1 minute; the steam will revive the interior while the pan restores the caramelized crust. Avoid microwaving – it makes the glaze gummy and the chicken rubbery.