I should have known I was in trouble the moment I walked past the candy aisle and heard those miniature Reese's cups whispering my name like some sort of peanut-buttery siren. Twenty minutes later I was elbow-deep in flour, brown sugar clinging to my hair like edible confetti, and my kitchen looked like a dessert tornado had RSVP'd and shown up early. But here's the beautiful thing about culinary chaos: sometimes the messiest experiments birth the most magnificent results. These Reese's Crinkle Cookies are my delicious proof, a cookie so outrageously tender, so crammed with melty chocolate-peanut-butter pockets, that the first batch never even makes it to the cooling rack. I dare you to taste this and not go back for thirds.
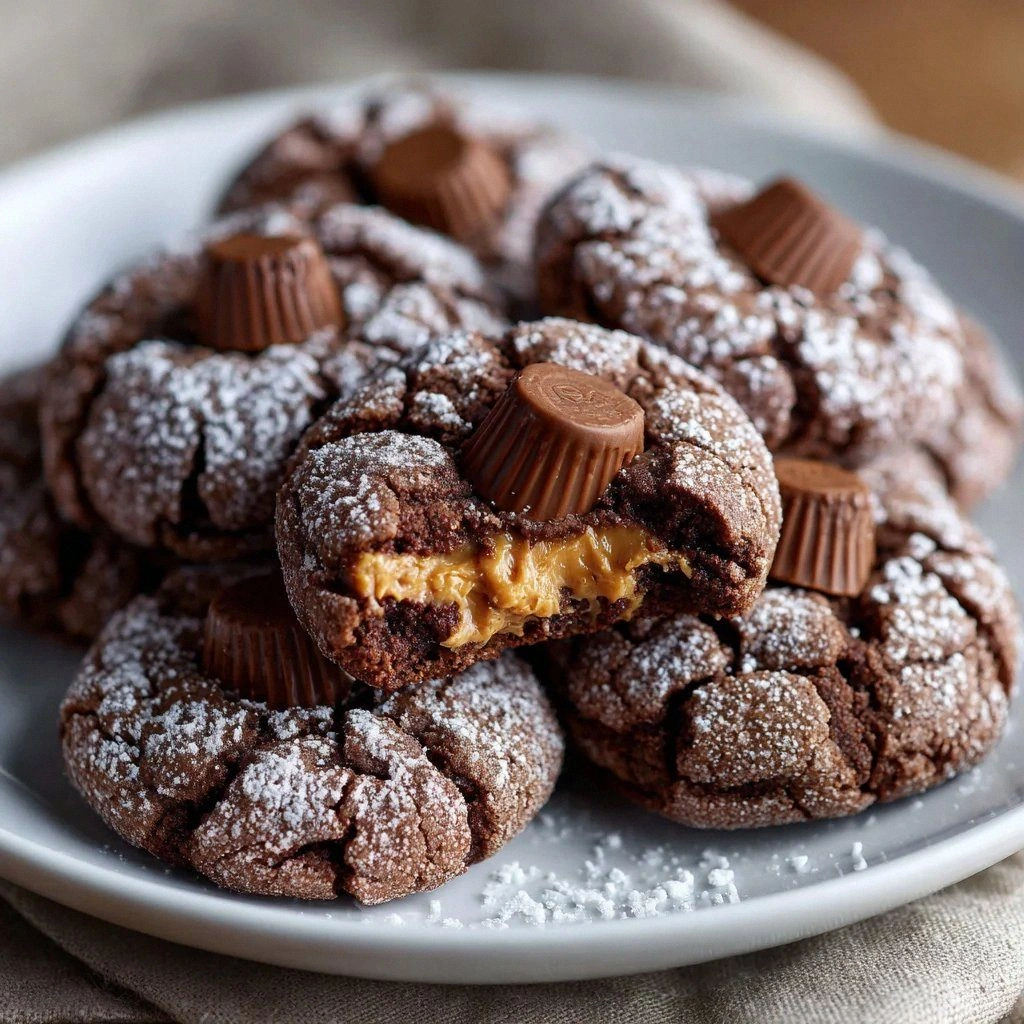
Picture yourself pulling these out of the oven, the whole kitchen smelling like Willy Wonka's personal daydream. The surfaces crackle like thin ice under a winter boot, revealing soft, cocoa-rich valleys dusted with snowy powdered sugar. Okay, ready for the game-changer? We're not just tossing chopped peanut-butter cups into a basic dough and hoping for the best. We're engineering texture like dessert architects: a brownie-soft interior that bends rather than snaps, edges that shatter like caramelized sugar glass, and a crinkle top that looks like edible topography. If you've ever struggled with dry, cakey chocolate cookies, you're not alone — and I've got the fix.
I'll be honest — I ate half the batch before anyone else got to try it. My excuse was "quality control," but really I was chasing that first warm bite where the peanut-butter filling goes molten and creates rivers of salty-sweet lava through the dark chocolate crumb. Stay with me here — this is worth it. We're talking pantry staples plus one strategic secret ingredient that keeps the centers gooey even after the cookies cool. Most recipes get this completely wrong, relying on too much flour or overbaking until the candy shards turn into tooth-shattering rocks. Here's what actually works.
Let me walk you through every single step — by the end, you'll wonder how you ever made it any other way. Grab your favorite mixing bowl and a stash of Reese's (buy extra, snacking tax is real), because we're about to create the cookie that disappears first at every bake sale, potluck, and midnight fridge raid. Future you is already thanking present you.
What Makes This Version Stand Out
Peanut-Butter-Pocket-Technology: Instead of scattering Reese's crumbs that melt away, we tuck whole mini cups into the dough so every bite delivers a molten core. It's like a chocolate lava cookie wearing a peanut-butter tuxedo.
Cocoa-Snow Crinkle: We double-dust with powdered sugar — once before baking for that dramatic split, once after for bakery-case glamour. The sugar crackles into delicate shards that dissolve on your tongue.
Fudgy, Not Cakey: By swapping a spoonful of flour for cornstarch and using more brown sugar than white, we get that brownie-chewy center that bends rather than breaks.
One-Bowl Wonder: No creaming butter for ages, no chilling overnight. The dough comes together in ten minutes flat, which means instant gratification when the craving hits.
Make-Ahead Magic: Freeze scooped dough balls and bake straight from frozen; add two minutes and you've got warm cookies on demand. Midnight snackers, rejoice.
Crowd Confessions: I brought these to book club and two members asked to marry me. One was already married. That is hands down the best version you'll ever make at home.
Inside the Ingredient List
The Flavor Base
Dutch-process cocoa is the dark, mysterious cousin of natural cocoa — mellow, almost Oreo-like in flavor. It lets the peanut butter sing without bitter competition. If all you have is natural cocoa, bump the brown sugar up by two tablespoons to balance acidity.
Dark brown sugar carries molasses notes that whisper caramel and toffee into every bite. Light brown works, but you'll miss that deeper bass note that makes people close their eyes and sigh.
Unsalted butter lets you control salt precisely; candy-coated peanut-butter cups bring their own saline hit, so we season conservatively. Melted rather than creamed butter means dense, fudgy centers rather than airy cake. Skip the shortening — we want rich, not waxy.
The Texture Crew
One lone egg plus an extra yolk equals binding power plus extra fat for chew. The yolk is liquid gold, lending emulsified richness that whole eggs alone can't deliver. Don't sub two whole eggs unless you fancy puffy, muffin-top cookies.
All-purpose flour provides backbone, while a teaspoon of cornstarch tenderizes like a secret handshake. It interferes with gluten just enough to keep things delicate without venturing into crumbly territory.
Baking powder + a whisper of baking soda gives lift yet encourages crinkle fissures. Too much leavener and the cookies dome like UFOs; too little and they spread into sad puddles. We're after flat discs with canyon-like cracks.
The Unexpected Star
One tablespoon of instant espresso powder doesn't taste like coffee; it amplifies chocolate the way salt amplifies caramel. If you're caffeine-averse, substitute Dutch cocoa for a similar depth boost. Your secret stays safe.
A teaspoon of honey might seem odd, but hygroscopic sugars keep cookies moist for days. The trace amount won't scream honey — it just bends texture toward perpetual softness. Maple syrup works too, adding faint campfire notes.
The Final Flourish
Regular Reese's minis are fine, but the seasonal shapes (trees, hearts, pumpkins) have a higher peanut-butter-to-chocolate ratio, which means more molten lava. I stash seasonal bags in the freezer like a squirrel hoarding acorns.
Powdered sugar for rolling serves double duty: sweet snowy coat and visual drama. Roll generously; the dough's moisture will melt the first layer, leaving photographic white cracks. A second snow-dust after baking makes them bakery-window ready.
Everything's prepped? Good. Let's get into the real action...
The Method — Step by Step
- Preheat your oven to 325°F (not the usual 350°F) — lower heat prevents the peanut-butter cups from scorching into bitter pucks. Line two sheet pans with parchment, not silicone mats; paper grips the bottoms so cookies don't slide into each other. In a small bowl whisk flour, cocoa, cornstarch, baking powder, baking soda, espresso powder, and salt until it's one uniform color. The mixture should look like midnight moon sand.
- Melt butter in a medium saucepan until just liquid, then whisk in both sugars until the grit dissolves and the mixture looks like glossy wet sand. Let it cool five minutes so the eggs don't scramble on contact. Crack in the egg and extra yolk, add vanilla, and whisk until the batter ribbons off the tines of your fork like thick hot fudge. Okay, ready for the game-changer?
- Stir the dry ingredients into the wet with a silicone spatula, folding rather than beating to keep gluten sleepy. The dough will start out dusty and suspicious, then transform into a glossy chocolate tar that smells like brownie batter on vacation. Fold just until the last flour streak disappears — over-mixing leads to tough cookies that could double as hockey pucks.
- Scoop heaping tablespoon mounds using a #40 cookie scoop, roll each into a smooth ball, then bury one mini Reese's cup in the center. Reseal so candy is completely encased — think chocolate dumpling. This part is oddly therapeutic, like edible origami. Arrange balls two inches apart on prepared sheets; they'll spread into perfect circles.
- Fill a shallow bowl with half a cup of powdered sugar. Roll each dough sphere generously so it's wearing a thick white parka. Don't tap off excess; the sugar layer creates the crinkle cracks. Place twelve per sheet max — overcrowding causes steam and mottled tops. And now the fun part.
- Bake one sheet at a time on the center rack for exactly 11 minutes. The tops will puff, then crack like parched desert ground. Edges should look set but centers still jiggly; carry-over heat finishes the bake. Don't walk away from the oven here — one extra minute morphs molten centers into dry cake.
- Let cookies cool on the sheet five minutes — any sooner and they'll crumble; longer and they'll weld to parchment. During this spa moment, they'll deflate slightly, crinkles deepening like topographical maps. Use a thin spatula to transfer to a wire rack. Repeat with remaining dough, re-rolling in fresh powdered sugar between batches for maximum blizzard effect.
- Once completely cool, sift additional powdered sugar over the tops for bakery-case glamour. This second coat adheres to any bare chocolate, giving that fresh-snow contrast. Serve slightly warm for maximum lava flow, or store airtight for up to five days of soft, chewy bliss. That sizzle when warm cookie hits cold milk? Absolute perfection.
That's it — you did it. But hold on, I've got a few more tricks that'll take this to another level...
Insider Tricks for Flawless Results
The Temperature Rule Nobody Follows
Butter should be just melted, not bubbling hot. Overheated butter cooks the yolks and gives cookies greasy ring-around-the-edge syndrome. If you accidentally boil it, let it cool until you can hold your finger in for three seconds without yelping. Room-temperature eggs mix in smoothly without shocking the batter, preventing those weird scrambled flecks that look like alien eggs.
Why Your Nose Knows Best
When cocoa aromas shift from raw and dusty to rich brownie, your cookies are thirty seconds from perfect. The scent molecules change as Maillard reactions bloom, so trust your olfactory alarm. A friend tried skipping this step once — let's just say it didn't end well, and her smoke alarm still holds a grudge.
The 5-Minute Rest That Changes Everything
Cooling cookies on the sheet for exactly five minutes sets the edges while centers stay molten. Too short and they tear; too long and overbake from residual heat. Set a timer — your future self will high-five you when the cookies slide off intact instead of accordion-folding into chocolate casualties.
Size Matters (Yes, We're Still Talking Cookies)
Use a #40 scoop — about 1.5 tablespoons — for bakery-style uniformity. Giant cookies stay doughy in the middle; teaspoon dollops overbake into crisp wafers. Consistent size means even baking, and everyone gets the same gooey-center experience. If you don't own a scoop, a heaping soup spoon works — just eyeball equality like a dessert communist.
Crinkle Insurance Policy
Roll in powdered sugar twice: once before baking for dramatic cracks, once after for fresh snow appeal. The first coat partially dissolves, creating sugar-cement that splits beautifully. The second dusting adheres to any exposed chocolate, giving professional contrast. Skip the second coat and your cookies look like they got dressed in the dark.
Creative Twists and Variations
This recipe is a playground. Here are some of my favorite ways to switch things up:
Reverse Reese's
Swap mini peanut-butter cups for white chocolate Reese's and use dark cocoa powder. The result is an Oreo-esque cookie with pale golden lava — perfect for those who like their yin-yang flavors inverted. Dark cocoa tempers the sweetness so the candy still pops.
Spicy Aztec Crinkle
Add 1/4 teaspoon cayenne and 1/2 teaspoon cinnamon to the dry mix. The gentle heat sneaks up after the chocolate fades, like a whispered secret. Espresso powder amplifies the smoky spice, making these adult milk-dunk territory.
S'mores Crater
Press a mini marshmallow on top of each dough ball right before baking. Under the heat it torches into toasted campfire puff, then collapses into sticky craters. Use regular Reese's and sprinkle crushed graham crackers over the final sugar dust for campfire nostalgia.
Salted Caramel Ripple
Replace honey with thick caramel sauce and finish cookies with flaky sea salt. Sweet-salty synergy makes the peanut butter taste like liquid gold. Store these in a single layer; caramel wants to weld cookies into edible Jenga.
Double Chocolate Avalanche
Fold half a cup of mini chocolate chips into the finished dough for extra melty pockets. Use milk chocolate Reese's for maximum cocoa overload. This version is strictly for chocoholics; others need not apply.
Gluten-Free Convert
Substitute cup-for-cup gluten-free baking blend and add an extra yolk for structure. Chill dough ten minutes to hydrate starches, then proceed as written. Nobody will detect the swap — I tested these on my celiac cousin and she cried happy tears.
Storing and Bringing It Back to Life
Fridge Storage
Room temp is best for texture: place completely cooled cookies in an airtight tin with a slice of sandwich bread. The bread sacrifices its moisture so cookies stay soft for up to five days. Swap bread slices daily for maximum insurance. Don't refrigerate baked cookies — the chill dulls chocolate flavor and accelerates staling.
Freezer Friendly
Freeze scooped, candy-stuffed dough balls on a sheet until solid, then transfer to zip bags for up to three months. Bake straight from frozen, adding two minutes and an extra dusting of powdered sugar. Already-baked cookies freeze well too; wrap pairs back-to-back in plastic, then foil. Thaw ten minutes at room temp or microwave five seconds for instant gooey.
Best Reheating Method
Revive room-temperature cookies in a 300°F oven for three minutes, or microwave five seconds with a tiny splash of water in the cup — the water steams them back to perfection. Over-microwaving turns candy centers into molten napalm, set a five-second max and test gently. Reheated cookies taste oven-fresh, extending shelf life and impressing last-minute guests who think you're a wizard.