I was standing in my kitchen, heart racing, clutching a half‑filled bowl of crushed Oreo crumbs when the oven door opened to reveal a cloud of smoke. The smell of burnt butter and caramelized sugar filled the air, and I realized I had accidentally set my oven to broil instead of bake. That was the moment I decided I would never again let a dessert turn into a disaster. From that day forward, I vowed to create a minty, creamy masterpiece that would save my reputation and win every taste test.
The craving for a dessert that feels like a summer breeze in a jar had been gnawing at me for weeks. I imagined a silky filling that clings to a buttery crust, speckled with a hint of mint green that makes the eyes sparkle. The anticipation alone had me humming like a kitchen DJ, and the aroma of fresh mint leaves would soon mingle with the subtle sweetness of cream cheese. This was the kind of dessert that could turn a casual gathering into a memorable celebration.
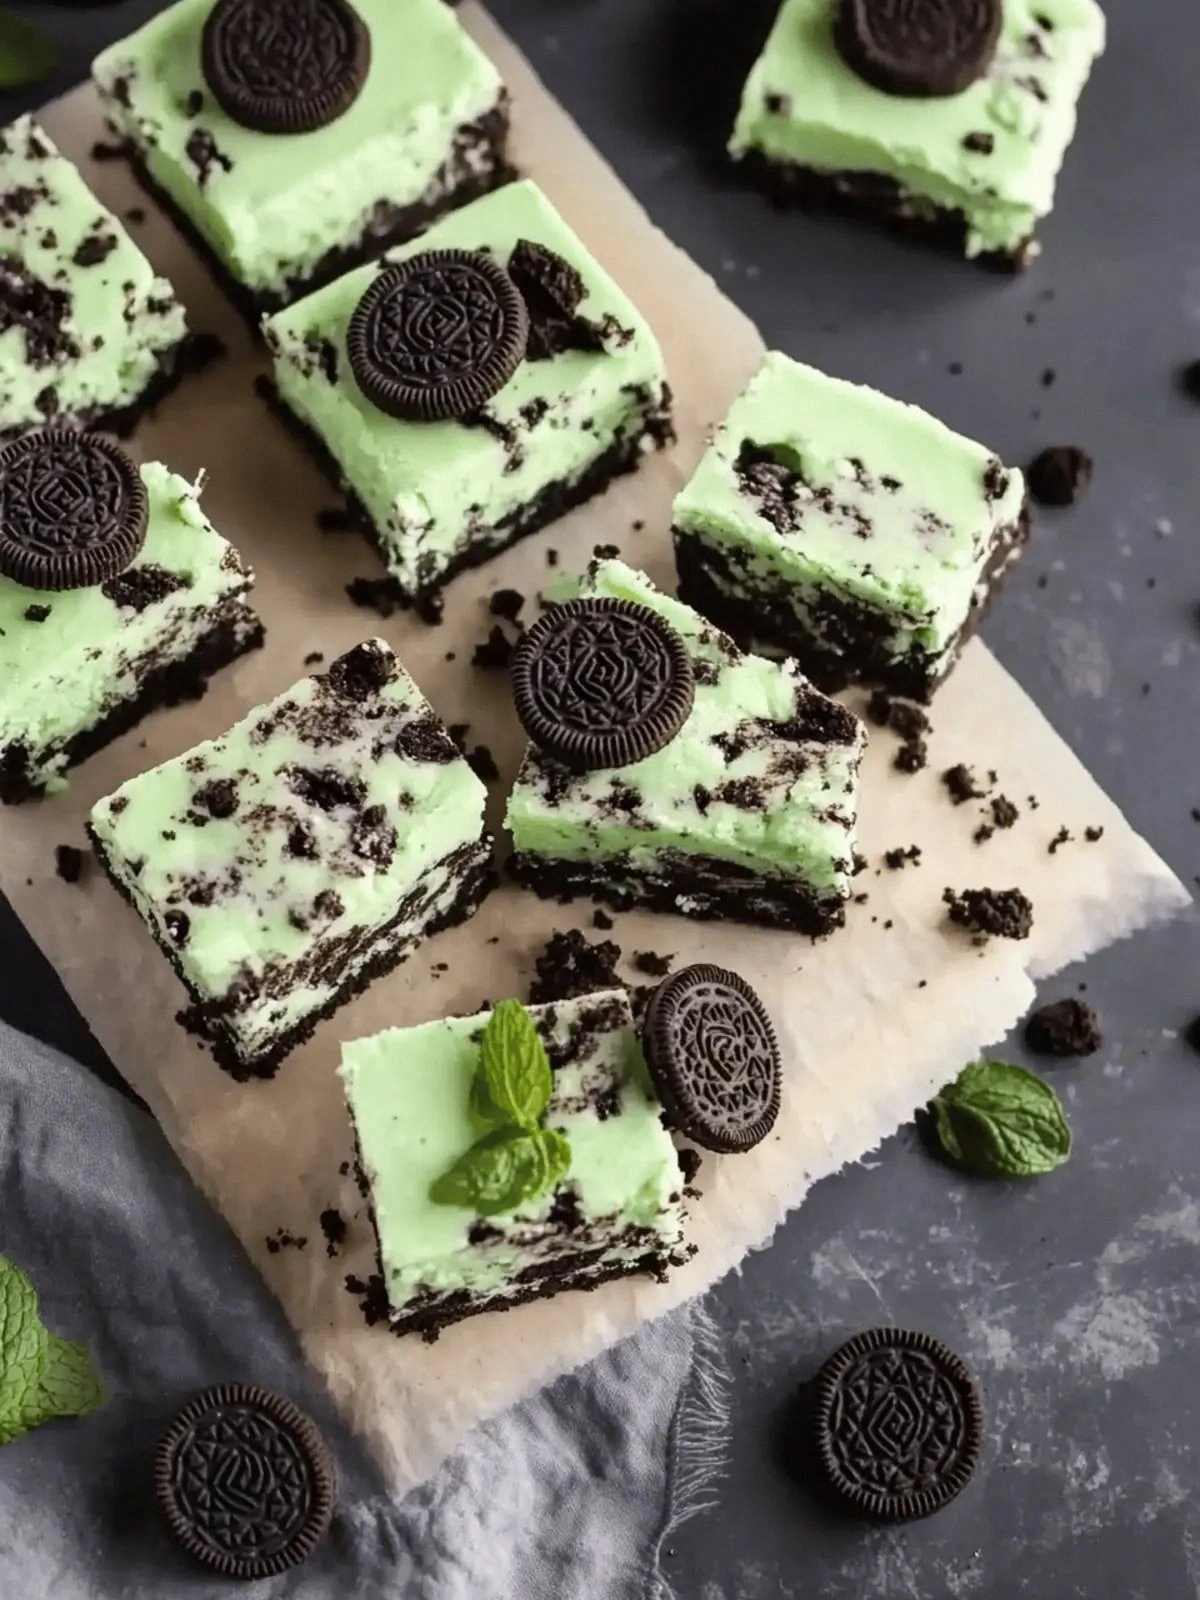
What sets this recipe apart is that it blends the iconic crunch of Oreo cookies with a velvety, mint‑infused cheesecake that feels like a dream. The crust is buttery and crisp, while the filling is airy and smooth, with a subtle green hue that dazzles the eye. I’ve tested countless variations, and this version consistently wins the crowd with its balanced flavors and effortless elegance. If you’re looking for the ultimate minty treat, you’re in the right place.
But here’s the kicker: I’ve added a secret ingredient that takes the flavor profile from ordinary to extraordinary— a touch of mint extract that deepens the green undertone without overpowering the cream cheese. This tiny drop of mint extract is the difference between a good dessert and a legendary one. It gives the bars a fresh, almost herbal finish that lingers on the palate. Trust me, you’ll be tempted to taste again and again.
Picture this: the first bite releases a burst of creamy richness, followed by a subtle mint finish that tingles like a cool breeze on a hot day. The crust crackles softly under your fork, revealing a crumbly, buttery texture that contrasts with the silky filling. The green tint gives it a playful, Instagram‑ready look, while the aroma of fresh mint and chocolate invites you to indulge. Every bite feels like a mini vacation in a bowl.
I dare you to taste this and not go back for seconds. That’s the kind of confidence I have in this recipe. When I first made these bars, I couldn’t stop reaching for the next slice, even though I had already finished the first half of the pan. The combination of flavors and textures is addictive, and it’s the kind of dessert that keeps people coming back for more.
Most recipes get this completely wrong— they either overbake the crust or undercook the filling, resulting in a sad, soggy mess. I’ve spent hours experimenting with temperature and timing to strike that perfect balance. The result is a cheesecake bar that holds its shape, yet melts in your mouth like a cloud. This is hands down the best version you'll ever make at home.
Picture yourself pulling these bars out of the oven, the whole kitchen smelling incredible, and your guests’ eyes widening as they see the vibrant green glow. Imagine the chatter as they slice the first piece, the buttery crust crackling, and the creamy filling oozing out like velvet. That moment is pure magic, and you’ll feel like a culinary wizard. Let me walk you through every single step — by the end, you'll wonder how you ever made it any other way.
What Makes This Version Stand Out
- Flavor: The combination of mint extract and fresh mint leaves creates a layered flavor profile that is both refreshing and indulgent. The subtle green hue adds visual appeal, making the bars as beautiful as they are tasty. Every bite delivers a balanced blend of sweet, creamy, and minty notes that dance on the palate. This is the secret that elevates the dessert from ordinary to unforgettable.
- Texture: The crust is buttery, crisp, and slightly caramelized, providing a satisfying crunch that contrasts with the silky filling. The cheesecake layer is airy and light, thanks to proper beating and the inclusion of sour cream. The result is a harmonious mouthfeel that feels both luxurious and approachable. No more heavy, dense cheesecakes that feel like a workout.
- Simplicity: With only nine ingredients, the recipe is straightforward and beginner‑friendly. You don’t need fancy equipment or obscure ingredients, just a few pantry staples and a reliable oven. The instructions are clear, and each step builds on the last, ensuring you stay on track. This makes it perfect for busy evenings or last‑minute dessert needs.
- Uniqueness: The addition of mint extract and the precise ratio of Oreo crumbs to butter sets this recipe apart from other minty cheesecake bars. The green tint is not just decorative—it signals the depth of flavor. This twist gives the bars a fresh, modern edge that will impress even the most discerning dessert lovers.
- Crowd Reaction: Friends and family rave about the first bite, often asking for the recipe before the dessert is even served. The bars are a showstopper at parties, potlucks, and family gatherings. They are easy to transport, cut, and serve, making them a versatile choice for any occasion. Your guests will leave with a smile and a satisfied sweet tooth.
- Make‑Ahead Potential: The bars chill well in the fridge for up to a week, and they freeze nicely for longer storage. This makes them a great option for meal planning or for guests who arrive late. The flavors intensify over time, so you’ll taste even more minty goodness as the bars rest. It’s the perfect dessert for those who like to be prepared.
Alright, let's break down exactly what goes into this masterpiece…
Inside the Ingredient List
The Flavor Base
The 26 Mint Oreo cookies form the foundation of this dessert, delivering a familiar chocolate‑cream crunch that anchors the entire flavor profile. They provide a subtle sweetness and a textural contrast to the creamy filling. If you’re looking for a darker, richer taste, you can substitute half the Oreos with chocolate Oreos, but the mint flavor will be slightly muted. Remember, the cookies must be fresh to avoid a stale, flat taste.
The Texture Crew
The 1/2 cup butter melts into the cookie crumbs, binding them together into a cohesive crust. The 16 oz cream cheese is the star of the filling, offering a creamy, rich base that is smooth when beaten properly. 1/2 cup sour cream adds a slight tang that balances the sweetness and helps keep the texture light. If you prefer a firmer cheesecake, reduce the sour cream slightly or increase the cream cheese.
The 1/2 cup granulated sugar sweetens the filling, but you can use a sugar substitute if you’re watching your carb intake. The 3 large eggs bind everything together, giving the bars structure and preventing them from cracking during baking. The 1 tsp vanilla extract deepens the overall flavor, while the 1 tsp mint extract amplifies the minty note without overpowering the cream cheese. If you want a more pronounced mint flavor, add an extra drop of mint extract, but keep in mind the green tint will intensify.
The Unexpected Star
The 2 drops of green food coloring are the visual secret weapon that turns a plain cheesecake into a showstopper. A few drops are enough to give the bars a vibrant, minty hue without making them look artificial. If you’re concerned about artificial dyes, you can use a natural green tint made from spinach or matcha powder, but the color will be slightly different. The green tint also signals to guests that the dessert is minty, creating a sense of anticipation.
The Final Flourish
The 1/4 tsp salt is essential for balancing sweetness and enhancing the flavor of the cream cheese. It also helps the crust develop a slightly crisp edge during baking. The 1/2 cup butter, 1/2 cup sour cream, and 1/2 cup sugar all work together to create a silky, airy filling that melts in your mouth. The combination of these ingredients results in a dessert that is both indulgent and balanced.
Everything's prepped? Good. Let's get into the real action...
The Method — Step by Step
- Preheat your oven to 325°F (165°C) and line a 9x13‑inch pan with parchment paper, leaving a small overhang for easy removal. The parchment will keep the bars from sticking and make cleanup a breeze. If you’re feeling fancy, lightly grease the parchment with butter or oil to ensure a perfect release. This step is crucial for a clean, professional finish.
- Place the 26 Mint Oreo cookies in a food processor or a zip‑top bag and pulse until they turn into fine crumbs. The finer the crumbs, the smoother the crust will be. A fine crumb ensures the butter binds them together evenly, preventing crumbling during baking. This is the foundation of the bars’ texture.
- Melt 1/2 cup butter over low heat in a saucepan, then let it cool just enough so it’s warm but not hot. Warm butter mixes better with the crumbs, creating a cohesive crust. Avoid overheating, or the butter may separate and create a greasy crust. This step is simple but essential for a buttery, cohesive base.
- Combine the cookie crumbs, melted butter, and 1/4 tsp salt in a mixing bowl. Press the mixture firmly into the bottom of the prepared pan, using the back of a spoon or a flat surface to ensure even distribution. This creates a sturdy, buttery crust that holds the filling. Don’t skip the salt— it brings out the sweetness and balances the flavors.
- In a large bowl, beat 16 oz cream cheese on medium speed until it’s smooth and creamy, with no lumps. A smooth base is key to preventing a gritty texture in the final bars. Use a hand mixer on low to avoid overmixing, which can introduce air pockets that cause cracks. This step takes a few minutes but pays off with silky results.
- Add 1/2 cup granulated sugar, 1/2 cup sour cream, 1 tsp vanilla extract, and 1 tsp mint extract to the cream cheese. Mix until everything is well combined, and the mixture is silky. The sour cream adds tang and lightness, while the vanilla deepens the flavor. The mint extract provides that fresh, herbal finish.
- Beat in the 3 eggs one at a time, ensuring each is fully incorporated before adding the next. This gradual addition keeps the batter smooth and prevents curdling. The eggs give structure, preventing the bars from crumbling during baking. Keep an eye on the batter’s consistency— it should be thick yet pourable.
- Pour the creamy batter over the crust, smoothing the top with a spatula. The batter should spread evenly across the pan, covering the crust completely. This is where the flavors meld, creating a harmonious blend of sweet, creamy, and minty notes. The batter should be level to ensure even baking.
- Bake for 30 minutes, or until the edges are set and the center is slightly jiggly when you gently shake the pan. The bars should develop a golden top and a faintly caramelized crust. Use a toothpick to check doneness; it should come out clean or with a few crumbs. This is the moment of truth— the aroma will be intoxicating.
- Remove the pan from the oven and let the bars cool on a rack for at least 30 minutes. This allows the cheesecake to set properly, preventing it from sliding or cracking when you cut it. Once cooled, cover the pan with plastic wrap and refrigerate for at least 4 hours, preferably overnight. The chill will set the texture and intensify the mint flavor.
- When ready to serve, lift the bars out of the pan using the parchment overhang, then cut into squares or bars with a sharp knife. For clean cuts, run the knife through warm water and dry it before slicing. The bars should hold their shape and reveal the green interior. Serve immediately or store in the fridge for up to a week.
That’s it — you did it. But hold on, I've got a few more tricks that'll take this to another level...
Insider Tricks for Flawless Results
The Temperature Rule Nobody Follows
Many bakers bake at a higher temperature, hoping for a quicker set, but this often leads to a dry, cracked crust. The secret is to bake at a moderate 325°F (165°C) to allow the filling to set gently while the crust develops a golden edge. If your oven runs hot, consider using a lower temperature and extending the bake time by a few minutes. This simple adjustment keeps the bars moist and tender.
Why Your Nose Knows Best
The aroma of the baking bars is a reliable indicator of doneness. When the bars are ready, the scent should be rich, buttery, and slightly sweet, with a hint of mint. If you notice a burnt or overly caramelized smell, pull them out immediately to prevent overbaking. Trust your nose, and you’ll always get the perfect texture.
The 5‑Minute Rest That Changes Everything
After removing the bars from the oven, let them sit for 5 minutes before cutting. This brief rest allows the filling to settle, preventing the bars from sliding or breaking apart. The crust will also firm up slightly, making it easier to slice cleanly. It’s a simple step that yields a dramatic improvement.
The Green Tint Trick
If you want a more vibrant green, add a pinch of matcha powder to the batter instead of green food coloring. Matcha not only adds color but also a subtle earthy flavor that complements the mint. Be careful not to overdo it— a little goes a long way. This gives the bars a natural, artisanal look.
The Crumbly Crust Secret
To achieve a crisp crust, press the cookie mixture firmly into the pan and bake at a slightly lower temperature. The butter should be warm but not melted; this ensures it binds the crumbs without making the crust soggy. If you prefer a crunchier edge, bake the crust for an extra 5 minutes before adding the filling. This method gives a delightful contrast.
The Chill‑Time Magic
Refrigerating the bars for at least 4 hours, or overnight, allows the flavors to meld and the texture to set. The cold temperature also helps the bars hold their shape when cutting. If you’re short on time, a 30‑minute chill can suffice, but the longer you wait, the better the result. This trick is essential for a polished, ready‑to‑serve dessert.
These insider tips are the difference between a decent dessert and a showstopper. Follow them closely, and you’ll consistently wow your guests with a minty, creamy masterpiece that’s as beautiful as it is delicious.
Creative Twists and Variations
This recipe is a playground, and you can switch things up to suit any occasion or taste preference. Here are some of my favorite ways to switch things up:
Chocolate Mint Bars
Swap half the mint Oreos with chocolate Oreos for a richer, chocolate‑mint combination. The chocolate adds depth and pairs beautifully with the creamy filling. Serve these with a drizzle of dark chocolate ganache for an extra indulgent touch. This variation is a hit with chocolate lovers.
Citrus‑Mint Surprise
Add a tablespoon of lemon zest to the batter for a bright, citrusy lift. The lemon balances the sweetness and adds a fresh, zesty note that complements the mint. The bars will have a subtle, refreshing finish that’s perfect for summer gatherings. This twist is especially refreshing on a hot day.
Nutty Crunch
Fold in a handful of chopped pistachios or walnuts into the crust before baking. The nuts add texture and a nutty flavor that pairs well with the mint. Toast the nuts lightly for a deeper flavor profile. This version offers a delightful crunch and a pop of color.
Vegan Edition
Use a plant‑based cream cheese and coconut milk instead of dairy. Swap the butter for coconut oil, and use a vegan vanilla extract. This creates a creamy, vegan-friendly version that still delivers the minty, chocolaty experience. It’s a great option for guests with dietary restrictions.
Seasonal Spice
Incorporate a pinch of cinnamon or nutmeg into the batter for a warm, comforting twist. The spices add depth and are especially inviting during the cooler months. Pair these bars with a cup of hot cocoa for a cozy treat. This variation brings a seasonal flair to the classic recipe.
Topping It Off
Top the bars with a swirl of whipped cream, a drizzle of caramel sauce, or a dusting of powdered sugar. These simple additions elevate the presentation and add extra flavor layers. A sprinkle of crushed Oreos on top creates a crunchy, nostalgic finish. The possibilities are endless.
Feel free to experiment with these variations or come up with your own. The key is to keep the core structure intact while adding a personal touch. Each twist offers a new dimension to the same beloved base, making your dessert experience fresh every time.
Storing and Bringing It Back to Life
Fridge Storage
Store the bars in an airtight container in the refrigerator for up to a week. The cold environment preserves the creamy texture and prevents the bars from drying out. Keep the container sealed to avoid absorbing odors from other foods. When ready to serve, let the bars sit at room temperature for 10 minutes to soften slightly.
Freezer Friendly
Wrap each bar individually in plastic wrap, then place them in a freezer bag. Freeze for up to two months for long‑term storage. When you’re ready to eat, thaw the bars in the refrigerator overnight. The texture remains silky, and the mint flavor stays fresh. This is perfect for meal prepping or hosting a last‑minute gathering.
Best Reheating Method
To reheat, place a single bar on a microwave‑safe plate and microwave on medium for 20–30 seconds. The heat should warm the filling without overcooking it. For an even more indulgent experience, warm the bar in a 350°F (175°C) oven for 5 minutes. Add a tiny splash of water before reheating to steam the bars back to perfection.
With these storage tips, you can enjoy fresh, minty cheesecake bars whenever the craving strikes. The bars hold up well, maintaining their creamy texture and vibrant color. Whether you’re prepping for a party or a quiet night in, these storage hacks keep the dessert ready to delight.