The moment I tripped over the sugar jar in my kitchen and let a cascade of sweet chaos spill onto the counter, I realized I had a serious case of dessert anxiety. The air was thick with the scent of melted butter and a faint hint of cinnamon that promised something sweet but not too sweet. I stared at the mess, then at the half‑baked batch of blondies that had turned a golden brown, and I thought, “This is the perfect excuse to reinvent the classic.” That night, while scrolling through recipe blogs, I stumbled across a bland, forgettable version of apple blondies that left me craving something richer, something that could stand as a centerpiece for any gathering. I decided to take that recipe and give it a maple‑glazed makeover that would make even the most seasoned bakers pause in awe.
Picture this: you’re halfway through the oven, the timer clicks, and the kitchen is suddenly alive with a deep amber glow. The sound of the timer’s final seconds is almost a drumbeat, and the aroma that fills the room is a heady blend of caramelized sugar, warm spices, and fresh apples. It’s like stepping into a living, breathing autumn scene—except it’s happening right in your own home. I dare you to taste this and not go back for seconds. The first bite is a soft, buttery bite that gives way to a gentle crunch from the apple chunks, and then the maple glaze hits your palate like velvet, leaving a lingering sweetness that keeps you reaching for more.
What sets this maple‑glazed version apart is not just the addition of maple syrup; it’s the meticulous layering of flavors and textures that make each bite a revelation. I’ve taken the humble blondie and turned it into a show‑stopper with a glossy glaze that coats the surface like a fine satin, a crust that cracks like thin ice when you break it, and a crumb that’s both tender and slightly crisp. The apples are caramelized just enough to bring out their natural sugars without overpowering the buttery base. The result? A dessert that feels luxurious yet comforting, perfect for a family dinner or an elegant brunch.
This recipe is hands down the best version you’ll ever make at home, and I’ve added a little twist that most people overlook: a touch of nutmeg that brings depth and a hint of warmth, and a final dusting of powdered sugar that adds a subtle sweetness and a touch of elegance. Picture yourself pulling this batch out of the oven, the whole kitchen smelling incredible, and knowing that every bite will be a moment of pure delight. Stay with me here — this is worth it. Let me walk you through every single step — by the end, you’ll wonder how you ever made it any other way.
What Makes This Version Stand Out
- Flavor: The maple glaze elevates the classic blondie from sweet to sublime, adding a caramel‑like depth that lingers on the tongue.
- Texture: The crisp apple pieces contrast with a soft, buttery crumb, creating a multi‑sensory experience that feels both indulgent and satisfying.
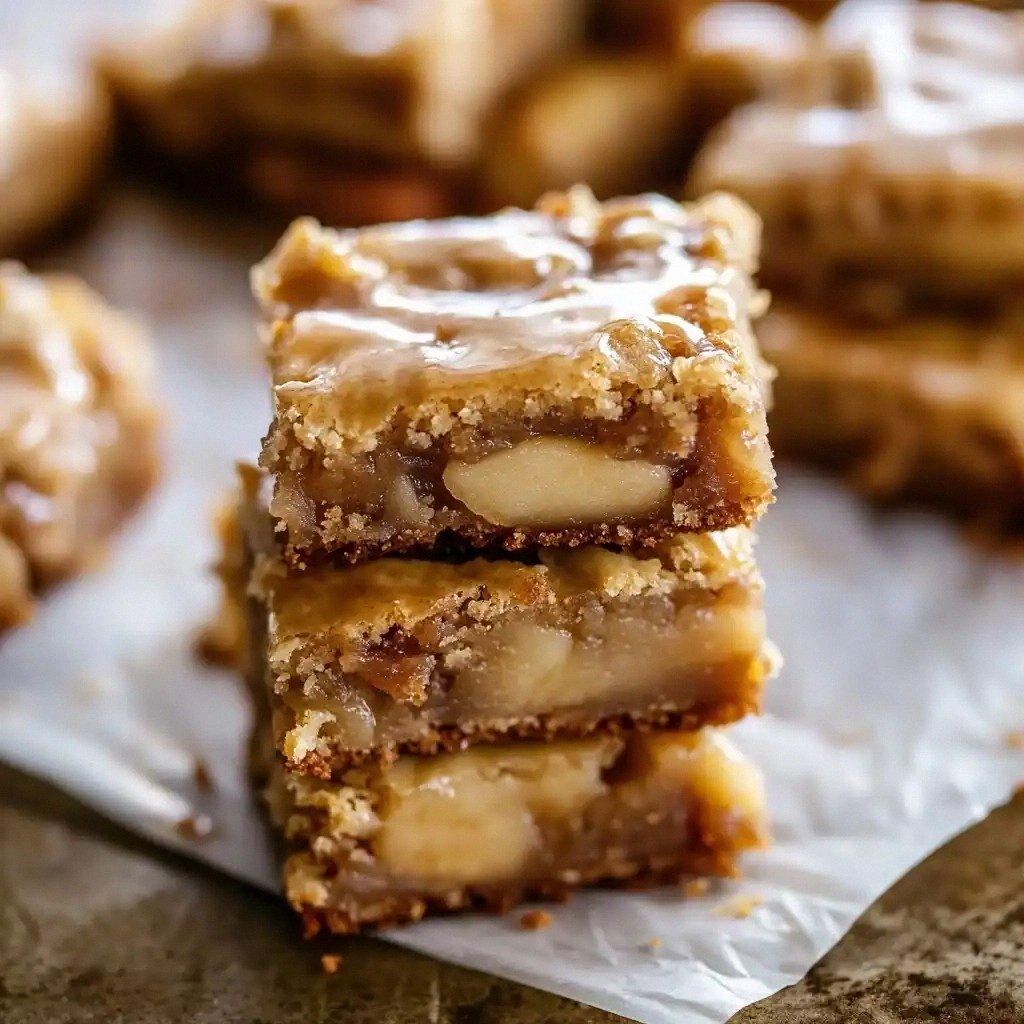
- Visual Appeal: The glossy glaze and powdered sugar dusting give the blondies a polished, almost decadent look that’s Instagram‑ready.
- Ease: With a single pan and minimal prep, this recipe is a breeze for beginners yet delivers a gourmet result.
- Versatility: Whether you’re serving it as a dessert, a brunch treat, or a snack, these blondies adapt seamlessly to any occasion.
- Ingredient Quality: Using real maple syrup and fresh apples ensures a flavor profile that’s both natural and robust.
- Make‑ahead Friendly: The glaze can be prepared in advance, and the blondies hold up well when stored properly.
- Audience: The combination of sweet, buttery, and slightly spicy notes makes it a crowd‑pleaser for both kids and adults.
Alright, let’s break down exactly what goes into this masterpiece…
Inside the Ingredient List
The Flavor Base
All-purpose flour is the backbone of these blondies, giving them that classic, slightly dense crumb that holds the glaze and apple pieces together. I’ve chosen a standard 2‑cup measure because it balances moisture and structure, preventing the blondies from becoming too cakey or too crumbly. If you’re craving a gluten‑free version, swap the flour for a 1:1 gluten‑free blend, but keep in mind that the texture will be a bit more crumbly.
Baking powder is the subtle lift that keeps the blondies from collapsing. A single teaspoon is enough to give the batter a gentle rise without making it airy. If you don’t have baking powder on hand, you can combine 1/2 teaspoon baking soda with 1 teaspoon of cream of tartar to achieve the same leavening effect.
Salt is the unsung hero that balances the sweetness and brings out the depth of the maple and apple flavors. A half‑teaspoon is a standard amount for a 4‑serving batch, but you can adjust to taste if you’re sensitive to sodium.
The Spice Crew
Ground cinnamon is the classic spice that pairs beautifully with apples and maple. A teaspoon of cinnamon adds warmth and a familiar sweetness that’s reminiscent of fall baking. If you prefer a more robust spice profile, consider adding a pinch of cloves or allspice.
Ground nutmeg is the secret ingredient that adds a subtle, nutty warmth. A quarter‑teaspoon is all you need to avoid overpowering the other flavors. Nutmeg also enhances the buttery notes, creating a harmonious flavor profile that feels comforting yet sophisticated.
The Unexpected Star
The butter, both melted and in the glaze, provides richness and a silky mouthfeel that coats the blondies. The ¾ cup of melted butter is essential for a tender crumb, while the extra quarter cup used in the glaze adds depth and a glossy sheen. If you’re looking for a lower‑fat version, consider using a combination of butter and Greek yogurt, but the texture will shift slightly.
Pure maple syrup is the star of the glaze, delivering a natural sweetness that’s far superior to refined sugar. A half‑cup of maple syrup provides the right viscosity for a glossy coating without making the blondies soggy. If you’re short on maple syrup, you can substitute it with honey or a 1:1 ratio of brown sugar syrup, though the flavor profile will differ.
The Final Flourish
Powdered sugar is the finishing touch, dusted over the cooled blondies to create a delicate, sweet finish that balances the maple glaze. A cup of powdered sugar is enough to give each blondie a light, airy finish without overwhelming the other flavors. If you’re watching sugar intake, a light dusting of coconut sugar or a sprinkle of cinnamon‑spiced sugar can be a healthier alternative.
Apples are the fruit that bring a fresh, juicy contrast to the buttery base. Two medium apples, peeled, cored, and diced, are caramelized in the pan to release their natural sugars, creating a sweet, slightly tart burst in every bite. Choosing a firm apple variety like Honeycrisp or Gala ensures a good balance of sweetness and firmness.
Everything’s prepped? Good. Let’s get into the real action…
The Method — Step by Step
- Preheat your oven to 350°F (175°C) and line a 9×13‑inch baking pan with parchment paper, leaving a little overhang on the sides for easy removal. This ensures an even bake and a clean release. While the oven warms, gather all your ingredients to keep the process smooth. The timer should be set for 30 minutes, but keep an eye on the edges for a golden finish. Remember, a slightly underbaked center will give you that chewy texture people love.
- In a medium bowl, whisk together the flour, baking powder, salt, cinnamon, and nutmeg until well combined. This dry mixture will form the foundation of your blondies, giving them structure and the subtle spice notes that dance on your palate. Make sure to sift the flour if it’s been sitting for a while; this avoids clumps and ensures a smooth batter. The aroma of the spices starts to mingle, hinting at the warmth to come.
- In a separate large bowl, combine the melted butter, brown sugar, eggs, and vanilla extract. Beat the mixture until it’s glossy and the sugar has dissolved, creating a silky base that will carry the maple glaze. This step is crucial; if the butter isn’t fully melted or the sugar isn’t dissolved, you’ll end up with a grainy texture. The mixture should have a slightly thick, custard‑like consistency.
- Pour the wet mixture into the dry ingredients and stir until just combined. Be careful not to overmix, or you’ll develop gluten and lose that tender crumb. The batter should be thick but pourable; a spoon will help you judge the consistency. At this point, the batter should feel like a rich, buttery batter that’s ready for the apples.
- Fold in the diced apples, ensuring they’re evenly distributed. The apples will caramelize in the pan, releasing their natural juices and adding a delightful burst of flavor. If you like a more pronounced apple flavor, you can add a tablespoon of apple butter or a pinch of lemon zest to the batter. The apples should look like small, glossy pearls in the batter.
- Transfer the batter to the prepared pan, spreading it evenly with a spatula. The surface should be smooth to allow the glaze to coat the blondies uniformly. Place the pan in the preheated oven and bake for 25 minutes. At this point, the edges should start pulling away from the parchment, signaling that the blondies are nearly done.
- While the blondies bake, prepare the glaze. In a small saucepan, melt the remaining butter over medium heat until it turns a light amber color. Add the maple syrup and powdered sugar, whisking until the mixture is smooth and glossy. The glaze should be thick enough to coat the top but not so thick that it clumps. The aroma will be intoxicating, a sweet, buttery scent that makes your kitchen feel like a bakery.
- When the blondies reach the 25‑minute mark, remove them from the oven and let them cool in the pan for 5 minutes. Then, using a spatula, drizzle the glaze over the warm surface, letting it seep into the cracks. The glaze will set as the blondies cool, creating a glossy, caramel‑like finish. The texture will be slightly sticky at first, then firm up as it cools.
- After the glaze has set, dust the blondies with the remaining powdered sugar for an elegant finish. Slice the blondies into squares using a hot knife to prevent sticking. Serve warm for a gooey, comforting experience, or let them cool completely for a firmer bite. The finished product should look golden, glossy, and irresistibly inviting.
That's it — you did it. But hold on, I've got a few more tricks that'll take this to another level...
Insider Tricks for Flawless Results
The Temperature Rule Nobody Follows
Many bakers set the oven to 350°F and then adjust based on experience, but I’ve learned that the ideal temperature for these blondies is 325°F (163°C). This lower heat allows the batter to bake evenly, preventing the edges from burning while the center stays moist. The trick is to preheat the oven fully and then let the blondies bake for a few extra minutes if needed. A lower temperature also gives the glaze a chance to set more evenly.
Why Your Nose Knows Best
The scent of caramelizing sugar is a reliable indicator that your blondies are almost done. As the batter bakes, the sugars begin to caramelize, releasing a sweet, buttery aroma that’s unmistakable. Trust that scent; it’s the culinary equivalent of a red traffic light. If you’re unsure, perform a quick toothpick test: insert a toothpick into the center, and if it comes out with a few crumbs but no wet batter, you’re good.
The 5‑Minute Rest That Changes Everything
Letting the blondies rest in the pan for five minutes after removing them from the oven is essential. This short rest allows the internal temperature to even out and the glaze to set into the crevices. It also makes slicing easier because the blondies hold together better. If you cut them immediately, the glaze can run off and the crumb can crumble.
The Secret to a Glossy Glaze
If you want a truly glossy glaze, add a tablespoon of corn syrup or a splash of water to the maple mixture. The extra liquid helps the glaze coat the surface smoothly without thickening too quickly. Whisk until the glaze is smooth, then pour immediately over the warm blondies. The glaze will set into a shiny, caramelized finish.
The Power of Parchment Paper
Using parchment paper is a game‑changer. It prevents the blondies from sticking to the pan, making removal effortless. The overhang on the sides allows you to lift the entire batch out with a single motion. If you don’t have parchment, a silicone baking mat works well, but it won’t give the same ease of release.
The Final Touch: Powdered Sugar Dust
Dusting powdered sugar on top not only adds sweetness but also creates a subtle contrast in texture. The fine sugar crystals give a slight crunch when you bite into the top layer. To avoid clumping, sift the powdered sugar before dusting. This final touch elevates the blondies from simple to elegant.
Creative Twists and Variations
This recipe is a playground. Here are some of my favorite ways to switch things up:
Maple‑Pecan Blondies
Swap the apples for a handful of chopped pecans. The nuts add a buttery crunch that pairs perfectly with the maple glaze. Keep the rest of the recipe identical for a nutty twist that’s still comforting.
Chocolate‑Covered Apple Blondies
After glazing, drizzle melted dark chocolate over the top. The chocolate creates a rich, bittersweet layer that contrasts with the sweet maple. Allow the chocolate to set before slicing.
Spiced Orange Blondies
Add the zest of one orange and replace half the apples with diced fresh orange segments. The citrus brightens the flavor profile, making it perfect for holiday gatherings. The orange also adds a subtle floral note.
Almond Butter Blondies
Replace the butter in the batter with almond butter for a nutty undertone. The almond butter also adds a subtle sweetness and a slightly denser crumb. The glaze will still coat beautifully.
Vegan Maple Blondies
Use a plant‑based milk, coconut oil, and flax eggs (1 tablespoon ground flaxseed mixed with 3 tablespoons water) to keep the recipe vegan. The texture will be slightly denser, but the maple glaze will still shine. This version is great for those with dietary restrictions.
Mini Blondie Cups
Divide the batter into a muffin tin and bake at 350°F for 20 minutes. These mini cups are perfect for parties or as a dessert snack. Top each with a drizzle of maple glaze for a uniform finish.
Storing and Bringing It Back to Life
Fridge Storage
Store the cooled blondies in an airtight container at room temperature for up to 4 days. If you want to keep them fresher, place them in the refrigerator, but let them sit at room temperature for 15 minutes before serving to bring back the buttery aroma.
Freezer Friendly
Wrap each blondie square tightly in plastic wrap and place in a freezer bag. They’ll keep for up to 3 months. Thaw overnight in the fridge, then let them sit at room temperature for 10 minutes before serving.
Best Reheating Method
To revive frozen or refrigerated blondies, preheat your oven to 350°F (175°C). Place the blondies on a baking sheet and heat for 5–7 minutes, or until warmed through. Add a splash of water before reheating; the steam will restore moisture and prevent the crumb from drying out.