Picture this: a Saturday morning, a half‑finished batch of cookies in the fridge, and a sudden craving that feels like a full‑scale culinary rebellion. I was standing in my kitchen, eyes flicking between the cookie sheet and the pantry, when my friend texted, “I’m craving something sweet, but not the usual.” I stared at the empty fridge, then at the can of condensed milk, the jar of light brown sugar, and the block of butter that had been patiently waiting in the freezer. A spark lit up—this was the moment I could turn a simple pantry staple into something that would make everyone in the house say, “I dare you to taste this and not go back for seconds.” That’s how I discovered James Martin’s Miso Butter Fudge, a recipe that’s hands down the best version you’ll ever make at home.
The kitchen was a symphony of sounds: the faint hiss of butter melting, the gentle clink of measuring spoons, and the rhythmic stirring of a wooden spoon against a heavy saucepan. The air smelled of caramelized sugar and a subtle, umami whisper from the miso. As I mixed, the texture transformed from a sticky, syrupy paste to a glossy, silky mixture that seemed to coat the spoon like velvet. The first bite was a burst of sweet, buttery richness balanced by the savory depth of miso, a contrast that left my taste buds dancing. If you’re wondering why this version stands out from every other recipe out there, the secret lies in the marriage of sweet and savory, the precision of technique, and the unexpected use of miso that elevates a humble fudge to a gourmet treat.
I’ve tried countless fudge recipes—some were chewy, some were crumbly, and many fell flat on the first bite. What sets this one apart is the way the miso paste dissolves into the sugar, creating a complex flavor profile that feels both comforting and adventurous. The buttery base gives it that luxurious mouthfeel, while the miso adds an earthy, slightly salty undertone that cuts through the sweetness. The result is a fudge that feels indulgent without being cloying, a dessert that can be served at a dinner party, a potluck, or a cozy night in. And the best part? The recipe is so straightforward that even a kitchen novice can master it with minimal fuss.
But before we dive into the step‑by‑step instructions, let me give you a sneak peek of a technique that will change the way you think about fudge forever. By adding a small amount of full‑fat milk and carefully controlling the temperature, you’ll achieve a texture that is creamy yet firm enough to hold its shape. Trust me, the moment you taste the first square, you’ll realize that the simple addition of milk is the secret sauce that sets this fudge apart. Stay with me—this is worth it.
What Makes This Version Stand Out
- Flavor Depth: The combination of sweet condensed milk, light brown sugar, and white miso paste creates a layered taste that evolves with each bite. The miso’s umami undertone provides a savory counterbalance to the caramel notes, producing a harmonious flavor profile that feels both exotic and familiar.
- Texture Mastery: The careful use of full‑fat milk and controlled simmering results in a fudge that is silky smooth on the inside while still firm enough to cut cleanly. The result is a dessert that melts in your mouth without becoming mushy.
- Ingredient Simplicity: With only six core ingredients, the recipe is approachable for busy cooks. The pantry staples are easy to source, and the minimal equipment—just a saucepan, a wooden spoon, and a baking pan—keeps prep time low.
- Unique Twist: Most fudge recipes rely solely on sugar and butter, but the addition of miso introduces a savory dimension that is rarely explored in dessert recipes, setting this dish apart from traditional sweet treats.
- Crowd‑Pleaser Factor: This fudge has a universal appeal; it satisfies sweet cravings while offering a subtle savory note that intrigues adventurous eaters. It’s a conversation starter at any gathering.
- Quality Ingredients: Using high‑quality butter and full‑fat milk ensures richness and depth, while the light brown sugar provides a nuanced caramel flavor that enhances the overall taste.
- Make‑Ahead Potential: Once set, the fudge can be stored in an airtight container for up to a week, making it a convenient make‑ahead dessert for parties or last‑minute cravings.
- Scalable: Whether you’re making a single batch for a small family or scaling up for a party, the recipe’s proportions remain consistent, allowing you to adjust the quantity without compromising flavor.
Alright, let’s break down exactly what goes into this masterpiece. And yes, I’ll be honest—once I tasted the first square, I ate half the batch before anyone else got a chance to try it.
Inside the Ingredient List
The Flavor Base
Condensed milk is the heart of this fudge. It’s not just a sweetener; it adds a creamy, caramelized depth that’s impossible to replicate with regular milk and sugar alone. If you skip it, you’ll lose that luscious, silky texture that makes each bite feel like a velvety cloud. For those who prefer a slightly lighter version, you can substitute half of the condensed milk with evaporated milk, but the result will be noticeably less rich.
Light brown sugar is the next star. Its molasses content gives the fudge a subtle caramel note that complements the sweet creaminess of the condensed milk. If you can’t find light brown sugar, dark brown sugar works fine, though it will intensify the molasses flavor a bit more. A pinch of sea salt is added to enhance the overall flavor profile, making the sweetness pop without overwhelming the palate.
The Texture Crew
Butter is the binding agent that gives the fudge its smooth, glossy finish. Using a high‑quality, unsalted butter ensures that no unwanted flavors interfere with the delicate balance of sweet and savory. If you’re watching your calorie intake, you can reduce the butter by a tablespoon, but expect a slightly drier texture.
Full‑fat milk is the secret to achieving the perfect consistency. It keeps the fudge from becoming too thick or too runny, allowing it to set just right. If you only have skim milk on hand, the fudge will be less rich and may not set as firm, so it’s best to stick with the full‑fat version.
The Unexpected Star
White miso paste might look like an odd choice for a dessert, but its subtle umami flavor adds an intriguing layer of complexity. The miso dissolves into the sugar mixture, creating a savory undertone that balances the sweetness. If you’re hesitant to use miso, start with just one tablespoon and taste; you’ll be surprised by how well it blends. For a more pronounced flavor, feel free to increase the amount, but remember that miso can become overpowering if you overdo it.
The Final Flourish
A pinch of sea salt is more than just a seasoning; it’s the final touch that brings all the flavors together. Salt enhances sweetness and brings out the richness of the butter and condensed milk. If you’re sensitive to sodium, use a lower‑sodium salt or reduce the pinch slightly.
Everything’s prepped? Good. Let’s get into the real action.
The Method — Step by Step
- In a heavy‑bottomed saucepan, melt the butter over medium heat. Watch the butter as it foams and then settles into a golden liquid. This is the moment you can hear the butter whispering “I’m ready.” Keep an eye on it to prevent scorching.
- Add the full‑fat milk to the pan, stirring to combine. The mixture should look like a smooth, creamy broth. The milk dilutes the butter slightly, allowing the sugar to dissolve more evenly.
- Stir in the condensed milk, whisking until the mixture is uniform. The condensed milk adds a thick, caramelized sweetness that will form the base of the fudge. At this point, the mixture should start to thicken slightly.
- Slowly whisk in the light brown sugar, one tablespoon at a time. This gradual addition helps avoid crystallization. As the sugar melts, the mixture will become glossy and thick. The aroma of caramelized sugar will fill the kitchen, making your senses sing.
- Add the white miso paste and pinch of sea salt. Stir vigorously until the miso is fully incorporated. The mixture will take on a pale amber hue and a slightly fragrant aroma. This is the point where the savory notes begin to mingle with the sweet.
- Increase the heat to medium‑high and bring the mixture to a gentle simmer. Keep it moving with a wooden spoon; you’ll notice the edges starting to pull away from the sides of the pan. This is the trickiest step—if you let it boil too hard, it will become grainy. Maintain a steady, gentle simmer.
- Simmer for 5 minutes, or until the mixture thickens to a consistency that coats the back of a spoon. You’ll know it’s ready when you can see a clear line forming between the spoon and the mixture. This step is crucial for achieving the perfect fudge texture.
- Remove the pan from the heat and pour the mixture into a greased 8‑inch square baking pan. Smooth the surface with a spatula. The mixture will look like molten chocolate, ready to set.
- Let the fudge cool to room temperature, then refrigerate for at least 2 hours until firm. The cooling process allows the sugars to crystallize properly, giving the fudge its signature smooth bite.
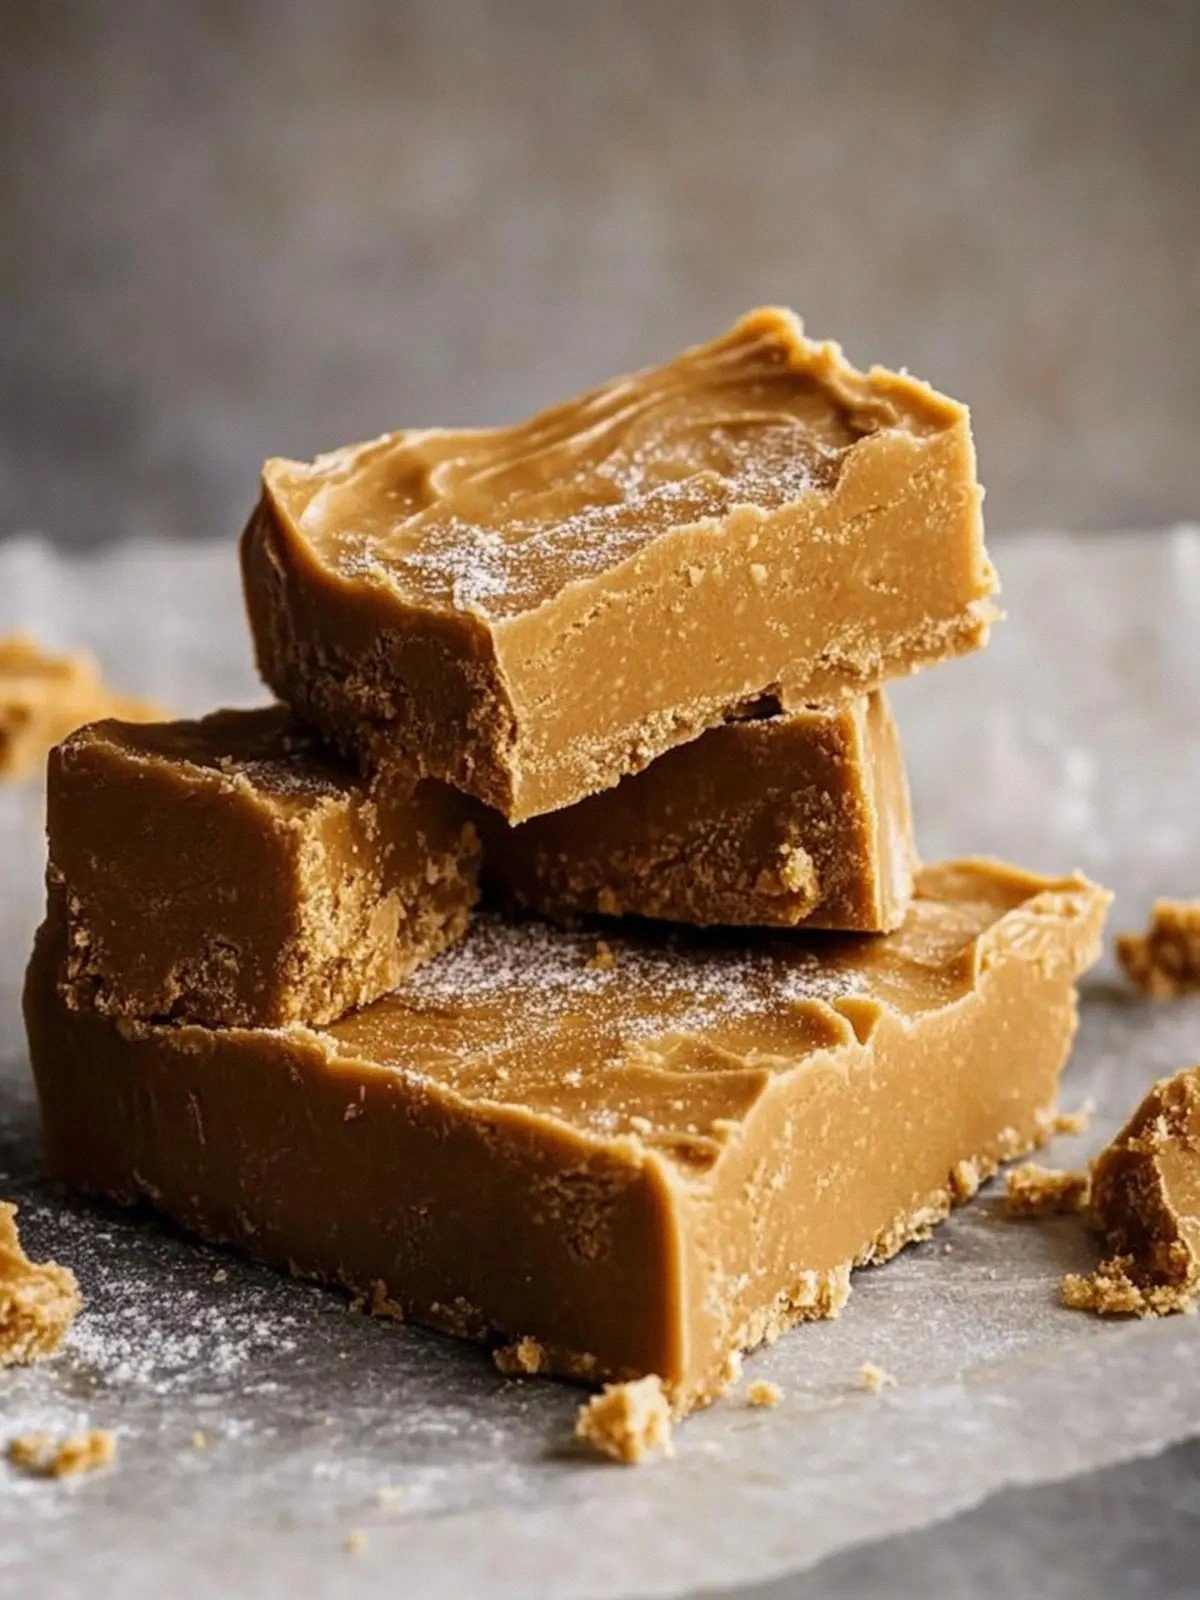
- Once set, cut the fudge into squares using a sharp knife. Serve immediately, or store in an airtight container for up to a week. The fudge will keep its texture and flavor as long as it stays chilled.
That’s it—you did it. But hold on, I've got a few more tricks that'll take this to another level. Remember the watch out box? That simmer step is where most people mess up. Keep your eyes on it, and you’ll have a flawless batch every time.
Insider Tricks for Flawless Results
The Temperature Rule Nobody Follows
Many cooks think that a higher heat will speed up the process, but in fudge making, temperature control is king. The mixture should never exceed 95°C (203°F). Use a candy thermometer if you have one; otherwise, watch for the subtle change in color and the formation of a thin film on the pan’s surface. If you’re unsure, lower the heat and let the mixture simmer gently.
Why Your Nose Knows Best
Smell is a powerful indicator of readiness. When the fudge is ready, the scent will shift from sweet to a slightly caramelized, almost toasted aroma. If the smell is still overly sweet, give it another minute. Trust your nose; it will guide you to the perfect finish.
The 5‑Minute Rest That Changes Everything
After you remove the pan from heat, let the fudge rest for exactly five minutes before pouring it into the baking dish. This pause allows the sugars to settle, reducing the chance of a grainy texture. It also gives the mixture a moment to thicken slightly, ensuring a smooth, even surface.
The Parchment Paper Trick
Lining the pan with parchment paper not only prevents sticking but also gives the fudge a clean, professional finish. When you cut it later, the squares will come out perfectly shaped, making presentation effortless.
The Secret Ingredient Swap
If you’re feeling adventurous, swap the white miso paste for a splash of soy sauce or tamari. The result will be a more pronounced savory note, but be sure to reduce the salt by half to avoid an overly salty fudge.
The Chill‑and‑Serve Combo
For an extra indulgent treat, chill the fudge for at least 4 hours before cutting. The extended chill allows the sugars to crystallize fully, giving the fudge a silky, melt‑in‑your‑mouth texture that’s almost velvety.
Creative Twists and Variations
This recipe is a playground. Here are some of my favorite ways to switch things up:
Cocoa Miso Fudge
Add 2 tablespoons of unsweetened cocoa powder to the mixture for a chocolatey twist. The cocoa deepens the flavor while complementing the miso’s umami. This version is perfect for chocolate lovers who want a savory edge.
Nutty Miso Delight
Stir in 1 cup of chopped toasted almonds or hazelnuts before pouring the mixture into the pan. The nuts add crunch and a buttery flavor that pairs beautifully with the sweet‑savory base.
Spiced Miso Fudge
Add a pinch of ground cinnamon or a splash of vanilla extract for a warm, aromatic note. The spices enhance the miso’s complexity and make the fudge feel cozy and comforting.
Seaweed Infusion
Grate a small piece of dried seaweed (such as kombu) into the mixture for an extra umami punch. The seaweed’s mineral richness elevates the fudge’s depth, creating a unique flavor profile that stands out.
Lemon Zest Surprise
Add the zest of one lemon to the mixture for a bright, citrusy contrast. The lemon zest cuts through the richness, leaving a refreshing finish that lingers on the palate.
Chili‑Miso Fusion
For those who like a bit of heat, add a pinch of cayenne pepper or a dash of sriracha. The spice balances the sweetness and brings an exciting kick to each bite.
Storing and Bringing It Back to Life
Fridge Storage
Store the fudge in an airtight container in the refrigerator for up to 7 days. The cool temperature keeps the fudge firm and prevents it from softening. When you’re ready to enjoy, let it sit at room temperature for 10 minutes to soften slightly before cutting.
Freezer Friendly
For longer storage, wrap the fudge tightly in plastic wrap and place it in a freezer bag. It will keep for up to 3 months. Thaw in the refrigerator overnight before serving.
Best Reheating Method
If your fudge has hardened in the fridge, a quick reheat can restore its silky texture. Place a few squares in a microwave-safe bowl, add a splash of milk, and microwave on low for 15–20 seconds. This gentle warming melts the fudge without scorching.