Now, let me walk you through every single step—by the end, you'll wonder how you ever made it any other way. I’ll keep you side by side, offering micro‑challenges, bold claims, and a sprinkle of humor to keep the kitchen adventure lively. If you've ever struggled with a cake that turns out too dry or too sweet, you're not alone—and I've got the fix. And when I say this cake will have a crowd reaction, I mean that the first bite will have people asking for the recipe and you saying, “I’ll give it to you next time.” So buckle up; it’s going to be a delicious ride.
What Makes This Version Stand Out
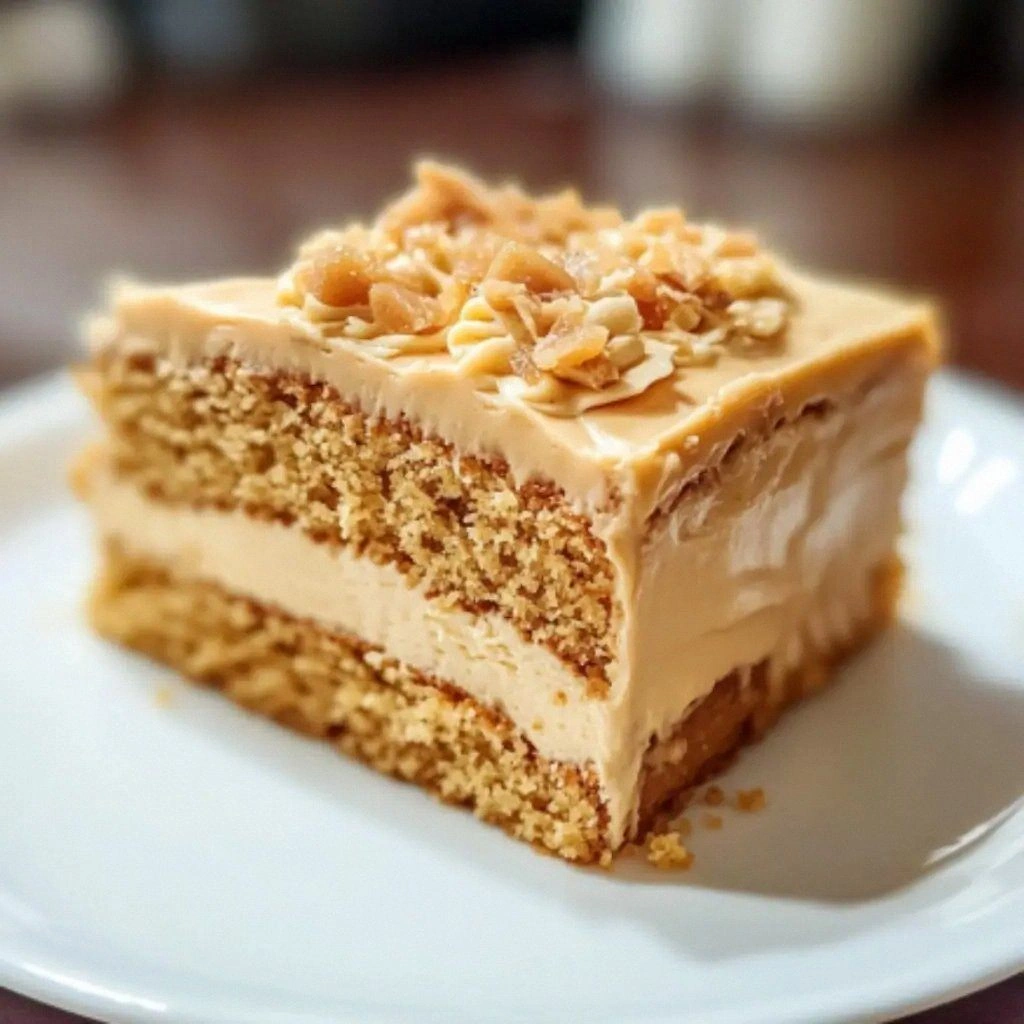
- Flavor Depth: The dual incorporation of butterscotch sauce ensures a caramel core that’s both subtle and intense, turning each bite into a caramel‑laden experience.
- Texture Perfection: The addition of heavy cream keeps the crumb moist while the baking soda and powder create a light lift, giving the cake a tender yet firm bite.
- Visual Appeal: A glossy glaze and a sprinkle of sea salt create an eye‑catching finish that looks like a work of art.
- Ingredient Quality: Using unsalted butter and a premium butterscotch sauce elevates the overall taste profile beyond the standard supermarket mix.
- Ease of Execution: The method is straightforward, with clear temperature cues and timing that even novice bakers can follow.
- Make‑Ahead Friendly: The cake can be prepared a day ahead and refrigerated, making it ideal for parties or last‑minute dessert needs.
- Versatile Serving: Whether you slice it for a family gathering or cut it into bite‑size pieces for a buffet, the cake adapts beautifully.
- Balanced Sweetness: The strategic use of sea salt and a moderate sugar ratio keeps the cake from feeling cloying.
Alright, let's break down exactly what goes into this masterpiece. The secret lies in the harmony between the ingredients and the precise timing of each step. By understanding why each component matters, you’ll be able to tweak the recipe to your personal taste while maintaining the perfect balance. Let’s dive into the details that make this cake a standout dessert.
Inside the Ingredient List
The Flavor Base
All-purpose flour is the backbone of the cake, providing structure while keeping the crumb tender. It’s best to sift it to eliminate clumps that could create uneven textures. The baking powder and soda work in tandem to give the batter a light lift, so avoid over‑mixing after adding the dry ingredients. A pinch of sea salt enhances the caramel notes, preventing the cake from feeling too sweet.
The Texture Crew
Unsalted butter, softened, brings richness and a silky mouthfeel. Mixing it with the sugar creates air pockets that help the cake rise. Heavy cream adds moisture without compromising structure, ensuring each slice stays juicy. The eggs, beaten to a light consistency, act as binders and help set the crumb.
The Unexpected Star
Butterscotch sauce is the star that elevates this cake from ordinary to extraordinary. When folded into the batter, it distributes caramel flavor evenly, while a drizzle on top before glazing creates a caramelized surface. If you’re in a pinch, a high‑quality caramel sauce can serve as a suitable substitute. The key is to use a sauce that’s not overly thick, so it blends smoothly.
The Final Flourish
Vanilla extract provides a warm undertone that balances the buttery sweetness. A splash of whole milk brings cohesiveness to the batter, preventing it from becoming too thick. Melted butter for the glaze adds shine and a subtle buttery finish. Optional pecans can be folded in for a crunchy texture that contrasts with the cake’s softness.
Everything’s prepped? Good. Let’s get into the real action. The next steps will guide you through each transformation, from batter to glaze, ensuring that every element harmonizes perfectly. Trust me, the process is as rewarding as the final result.
The Method — Step by Step
- Preheat your oven to 350°F (175°C) and grease two 9-inch round cake pans. Line the bottoms with parchment paper to ensure easy release. The parchment also adds a subtle texture to the bottom of the cake. While the pans are heating, gather all ingredients to keep the process smooth.
- In a medium bowl, whisk together the flour, baking powder, baking soda, and salt. Sifting the dry mix once more ensures a fine, even distribution of leavening agents. This step is critical; any clumps can lead to uneven rise. Keep the bowl aside while you work on the wet mixture.
- In a large mixing bowl, cream the softened butter and granulated sugar together using an electric mixer on medium speed. Beat until the mixture is light and fluffy, which should take about 4-5 minutes. The air incorporated during this stage is what gives the cake its tender crumb. If the mixture turns too dry, add a teaspoon of milk to keep it smooth.
- Add the beaten eggs one at a time, ensuring each is fully incorporated before adding the next. This prevents the batter from curdling and ensures a uniform consistency. Once the eggs are fully mixed, fold in the vanilla extract for that warm, aromatic note. The mixture should be glossy and slightly thick.
- Stir in the butterscotch sauce, mixing until fully integrated. The batter will appear slightly darker, but this is a sign that the caramel flavor is taking hold. The sauce should be thin enough to blend without leaving any lumps. Keep stirring gently to maintain the batter’s airy texture.
- Gradually add the dry ingredients to the wet mixture, alternating with whole milk. Begin with a third of the dry mix, then a splash of milk, and continue until everything is combined. Avoid overmixing; stop as soon as the flour is just incorporated. Overmixing can develop gluten, leading to a denser cake.
- Divide the batter evenly between the prepared pans, smoothing the tops with a spatula. Tap the pans gently on the counter to release any air bubbles. This step ensures an even rise and prevents the cake from cracking. Place the pans in the preheated oven and bake for 25-28 minutes.
- The cake is done when a toothpick inserted into the center comes out clean or with just a few crumbs. The tops should be golden brown, and the edges will pull slightly away from the sides of the pans. Let the cakes cool in the pans for 10 minutes before transferring them to a wire rack to cool completely. This resting period allows the crumb to set properly.
- While the cakes cool, prepare the glaze by melting the butter in a small saucepan over low heat. Add the remaining butterscotch sauce and stir until the mixture is smooth and glossy. The glaze should be thick enough to coat the surface but still pourable. Keep it warm so it doesn’t harden before you use it.
- Once the cakes are cool, place one layer on a serving plate. Spread a thin layer of glaze over the top, letting it drip down the sides. Place the second layer on top and drizzle the remaining glaze over the entire cake. Allow the glaze to set for a few minutes before slicing.
- For an extra touch of decadence, sprinkle chopped pecans over the top before the glaze sets. This adds a delightful crunch and a nutty flavor that complements the caramel. Alternatively, dust the cake with powdered sugar for a classic finish. Slice and serve immediately, or store in an airtight container for up to three days.
That’s it — you did it. But hold on, I've got a few more tricks that'll take this to another level. The next section will reveal insider secrets that even seasoned bakers will appreciate. Trust me, these tips are the difference between a good cake and an unforgettable dessert.
Insider Tricks for Flawless Results
The Temperature Rule Nobody Follows
Many bakers assume room temperature ingredients are always best, but the truth is that slightly cooler eggs and butter can produce a lighter crumb. I’ve found that chilling the butter for 10 minutes before creaming it gives a fluffier texture. This subtle tweak reduces the amount of gluten formed during mixing, resulting in a tender crumb. The next time you’re in a hurry, just pop the butter in the fridge for a quick chill.
Why Your Nose Knows Best
Before you even start baking, inhale the batter’s aroma. A sweet, buttery scent indicates the sugar and butter are properly balanced. If it smells too sweet, you might need to add a pinch of salt. This sensory check prevents over‑sweetness and ensures the cake’s flavor profile remains harmonious.
The 5-Minute Rest That Changes Everything
After removing the cakes from the oven, let them sit in the pans for 10 minutes. This short rest allows the structure to set, preventing the cake from collapsing when you transfer it to the rack. It also helps the glaze adhere better to the surface. Think of it as giving the cake a moment to breathe before the final flourish.
Glaze Timing Is Key
The glaze should be warm but not hot. If it’s too hot, it will harden immediately, leaving a dull finish. If it’s too cool, it won’t spread evenly. Keep it at a gentle simmer, stirring occasionally. This ensures a glossy, even coating that looks as good as it tastes.
Storage Secrets for Longevity
If you need to store the cake, wrap it tightly in plastic wrap and then in foil to protect it from air. When you’re ready to serve, let it sit at room temperature for 30 minutes to restore moisture. A quick splash of milk or a light dusting of powdered sugar can revive the crumb if it has dried out.
Serving Size Matters
For a larger gathering, consider slicing the cake into smaller pieces to ensure everyone gets a bite. A 9-inch cake typically yields about 12 slices, but cutting it into 16 smaller portions can be more satisfying. This also allows for creative plating, such as layering with whipped cream or fresh berries.
Creative Twists and Variations
This recipe is a playground. Here are some of my favorite ways to switch things up:
Chocolate‑Butterscotch Fusion
Swap half the butterscotch sauce for melted dark chocolate. The bittersweet chocolate complements the caramel, creating a richer flavor profile. This version is perfect for chocolate lovers who crave a bit of sweetness. Serve with a scoop of vanilla ice cream for a decadent dessert.
Nutty Crunch Layer
Fold chopped pecans or walnuts into the batter before baking. The nuts add a delightful crunch and a nutty aroma that pairs beautifully with caramel. Keep the nuts dry to avoid adding moisture to the batter. This variation turns the cake into a hearty, dessert‑meatier treat.
Spiced Caramel Delight
Add a pinch of ground cinnamon and a dash of nutmeg to the dry mix. The spices provide warmth and complexity, turning the cake into a seasonal favorite. This version is especially delightful during fall and winter gatherings. Pair with a spiced coffee for a cozy experience.
Light & Airy Version
Replace the whole milk with oat milk and reduce the butter to ½ cup. The cake will be lighter and slightly less rich, making it a great option for those who prefer a less heavy dessert. The oat milk also adds a subtle nutty flavor. This version is ideal for brunch or afternoon tea.
Alcoholic Twist
Stir in 2 tablespoons of bourbon or rum into the glaze. The alcohol adds depth and a warm finish that elevates the caramel notes. Be sure to let the glaze cool slightly before pouring to avoid cooking off the flavor. This variation is perfect for adult gatherings.
Gluten‑Free Adaptation
Use a gluten‑free all‑purpose flour blend and add ½ teaspoon of xanthan gum. The xanthan gum compensates for the lack of gluten, ensuring the cake holds together. The texture will be slightly denser but still moist and flavorful. This version allows everyone to indulge without compromise.
Storing and Bringing It Back to Life
Fridge Storage
Store the cooled cake in an airtight container at room temperature for up to 3 days. If you need to refrigerate it, wrap the cake tightly in plastic wrap before placing it in the fridge. This prevents the cake from absorbing odors and keeps it moist. When ready to serve, let it sit at room temperature for 30 minutes to restore flavor.
Freezer Friendly
Wrap the cake in plastic wrap, then foil, and place it in a freezer bag. It will stay fresh for up to 2 months. To thaw, leave the cake in the fridge overnight and then allow it to warm to room temperature. This method preserves the crumb’s moisture and prevents freezer burn.
Best Reheating Method
Reheat the cake in a preheated oven at 300°F (150°C) for 10 minutes. Add a splash of water to the pan before reheating; the steam will help restore moisture. Avoid microwaving, as it can make the cake rubbery. After reheating, dust with powdered sugar or drizzle with fresh glaze for an extra touch.