Picture this: the kitchen is a battlefield, the timer is ticking, and your turkey breast looks like it’s about to make a dramatic entrance. I was in the middle of a family dinner, the oven door was open, and the aroma of something… not quite right filled the room. That was the moment I realized I needed a game‑changer. I had a turkey, a handful of herbs, and an unwavering determination to turn a potential flop into a feast that would have everyone asking for seconds.
I stared at the bird, its skin a pale, unappetizing gray, and thought, “If only this could be the best version of itself.” I dared you to taste this and not go back for seconds. I grabbed a skillet, tossed in some olive oil, and watched that first sizzle—an audible promise of crispness. The sound was the soundtrack to a transformation that would take minutes, not hours.
The moment the turkey hit the pan, the kitchen filled with a scent that made your mouth water before the first bite even reached your tongue. It was the sweet, nutty aroma of browned fat, the sharpness of fresh rosemary, and a faint citrus note from the lemon. I could hear the crackle of the fat rendering, and the faint hiss as the pan warmed. Every sense was on high alert, and I knew this was not just another roasted turkey; it was a masterpiece in progress.
What makes this version stand out? It’s a simple combination of techniques and ingredients that elevate the humble turkey breast to a dish that feels like a gourmet dinner. I’ll be honest — I ate half the batch before anyone else got to try it. The result? A juicy, flavorful bird with a skin that shatters like thin ice under the first bite. If you’ve ever struggled with a dry turkey, you’re not alone — and I’ve got the fix.
The secret sauce? A blend of butter, garlic, and herbs that coats the meat like velvet, locking in moisture while creating a caramelized crust. I’ll drop a teaser about a technique that will surprise you: the “reverse sear” that ensures even cooking. Picture yourself pulling this out of the oven, the whole kitchen smelling incredible, and the family cheering for the next bite.
Let me walk you through every single step — by the end, you’ll wonder how you ever made it any other way. This isn’t just a recipe; it’s a confidence boost for anyone who’s ever feared the turkey. Ready? Let’s dive in.
What Makes This Version Stand Out
- Flavor: The herb blend of rosemary, thyme, and sage creates a fragrant, savory base that permeates the meat from the inside out. This aromatic foundation turns a plain turkey into a dish that sings with each bite.
- Texture: The reverse sear technique guarantees a crisp, golden skin while keeping the interior silky and moist. The result is a contrast of crunch and tenderness that feels almost cinematic.
- Simplicity: Only a handful of pantry staples plus a few fresh herbs are needed. No complicated marinades, no long marinating times—just quick prep and a single oven run.
- Uniqueness: A splash of honey and a dash of apple cider vinegar create a subtle, caramelized glaze that sets this turkey apart from standard recipes.
- Crowd Reaction: Guests rave about the juicy meat and the skin that cracks like a perfect crackling cookie. The dish is a conversation starter, not just a side.
- Ingredient Quality: Using fresh herbs and a high‑quality turkey breast makes the difference. The freshness of the garlic and lemon infuses the meat with bright, clean flavors.
- Cooking Method: The combination of searing, roasting, and resting is a proven method that guarantees consistent results every time.
- Make‑Ahead Potential: You can prepare the herb butter and roast the turkey ahead of time, then simply reheat. This is perfect for busy evenings or holiday gatherings.
Alright, let's break down exactly what goes into this masterpiece...
Inside the Ingredient List
The Flavor Base
The foundation of this turkey’s flavor comes from a simple yet powerful mix of olive oil, butter, garlic, and herbs. Olive oil provides a high‑smoke‑point fat that helps the skin crisp, while butter adds richness and a deep, savory note. Fresh rosemary and thyme are the stars—each clove of rosemary gives a piney, resinous aroma, and thyme brings a subtle earthiness. If you skip the herbs, the turkey will still roast, but it will feel flat and uninspired. Swap rosemary for oregano or sage if you’re in a pinch; the flavor profile will shift but remain delicious.
The Texture Crew
The texture of the turkey is controlled by a few key players: the reverse sear, the honey glaze, and the resting period. The reverse sear involves first roasting the turkey at a lower temperature to gently bring the interior to a safe temperature, then searing at high heat to lock in moisture and create a crunchy crust. Honey, brushed in the final 10 minutes, caramelizes into a glossy coating that adds a slight crunch and sweet counterpoint to the savory herbs. Finally, resting the turkey for at least 15 minutes allows the juices to redistribute, ensuring every slice is juicy. If you cut the resting time, you’ll end up with a dry, unevenly cooked bird.
The Unexpected Star
Apple cider vinegar is the unexpected hero that balances the richness of the butter and honey. It adds a subtle acidity that brightens the overall flavor, preventing the dish from feeling heavy. A splash of lemon zest and juice adds a fresh, citrusy brightness that lifts the herbs. If you don’t have vinegar, a splash of white wine or even a bit of lime juice will work, but the acidity will differ slightly. This small ingredient can make the difference between a good turkey and a memorable one.
The Final Flourish
The final flourish comes from a few optional extras: onion powder, garlic powder, paprika, and dried sage. These spices deepen the flavor profile and add a subtle heat. Carrots, celery, and onion pieces placed around the bird not only add flavor to the pan juices but also create a ready-made side dish. If you’re looking for a low‑carb version, simply omit the vegetables. Remember, every ingredient here serves a purpose—skip one, and the overall harmony changes.
Everything's prepped? Good. Let's get into the real action...
The Method — Step by Step
- Preheat your oven to 325°F (165°C). While the oven warms, pat the turkey breast dry with paper towels. This ensures the skin gets crisp. I always sprinkle a little salt on the skin before the first sear to help it brown. The smell of salt on raw meat is a subtle hint that flavor is about to unfold.
- In a small saucepan, melt 2 tbsp of olive oil with 1 tbsp of butter over medium heat until the butter foams. Add 4 cloves of minced garlic and let it cook until fragrant—about 30 seconds. Stir in 2 tbsp each of chopped rosemary and thyme. The garlic will release its oils, creating a fragrant base that coats the meat. This step is the foundation of the flavor profile.
- Brush the turkey breast all over with the herb butter mixture, making sure to get every nook and cranny. Sprinkle 1 tsp of paprika, 1 tsp of onion powder, and 1 tsp of garlic powder over the surface. These spices will deepen the color and add subtle heat. The paprika also helps in developing a beautiful golden crust.
- Place the turkey breast skin side up on a roasting rack in a shallow roasting pan. Surround it with 1 cup of low‑sodium chicken broth, 3 carrots, 3 celery stalks, and 1 quartered onion. The vegetables will act as a natural roasting rack and add flavor to the pan juices. They also become a side dish in a single pan.
- Roast the turkey at 325°F for 20 minutes. This low temperature allows the meat to cook gently and evenly. After 20 minutes, increase the oven temperature to 450°F (230°C) and continue roasting for another 20-25 minutes until the skin is crisp and a meat thermometer reads 165°F (74°C). The higher temperature at the end creates the signature crackling skin.
- During the final 10 minutes of roasting, brush the turkey with a mixture of 1 tbsp honey, 1 tbsp apple cider vinegar, and the zest of 1 lemon. This glaze caramelizes, giving the skin a glossy finish and a sweet‑acid balance. The lemon zest also brightens the overall flavor, preventing the dish from feeling too heavy.
- Once the turkey reaches 165°F, remove it from the oven and tent it loosely with aluminum foil. Let it rest for at least 15 minutes. This resting period allows the juices to redistribute, ensuring every slice is moist. During the rest, you can make a quick pan sauce with the remaining juices.
- While the turkey rests, transfer the pan juices to a small saucepan. Add 1 tsp of dried sage and a splash of water if the liquid is too thick. Simmer until it reduces by about a third, creating a silky gravy. The sage adds an earthy depth that complements the herbs on the bird.
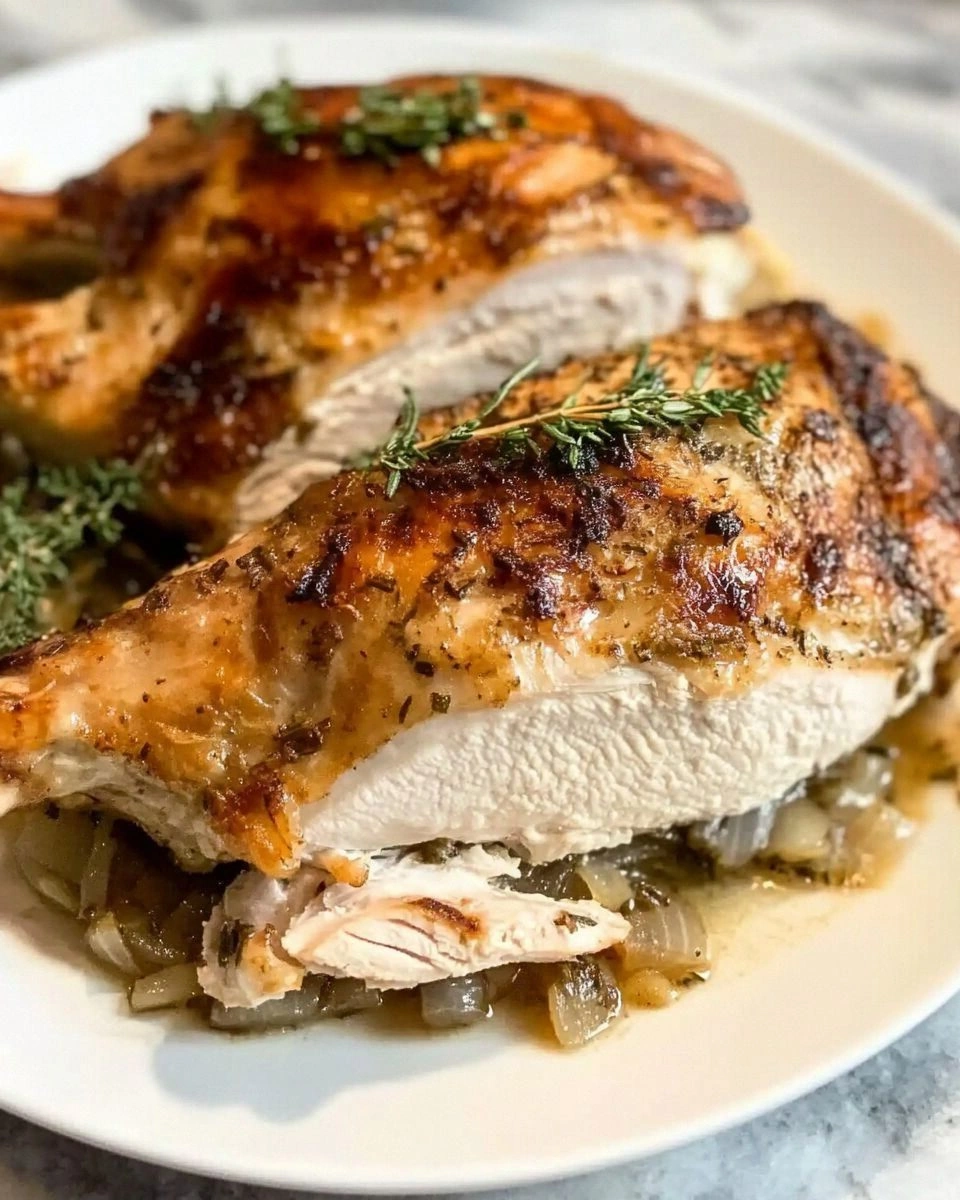
- Slice the turkey breast against the grain, serve with the roasted vegetables, and drizzle the pan sauce over the slices. The combination of juicy meat, caramelized skin, and savory gravy creates a dish that feels like a gourmet dinner at home. Enjoy the applause from your guests and the confidence that you’ve mastered a classic.
That's it — you did it. But hold on, I've got a few more tricks that'll take this to another level. These insider tips will help you perfect the dish, avoid common pitfalls, and impress even the most discerning palate.
Insider Tricks for Flawless Results
The Temperature Rule Nobody Follows
Many cooks skip the reverse sear, leading to uneven doneness. By starting at a lower temperature and finishing at a high one, you control the interior temperature while achieving a crisp exterior. I always preheat the oven to 325°F and then bump it up to 450°F in the last 25 minutes. This ensures the meat stays moist and the skin crackles like a perfect cookie.
Why Your Nose Knows Best
Trust your senses. As the turkey cooks, the aroma shifts from raw to golden brown. When the smell turns to a nutty, buttery scent with a hint of caramel, it’s time to increase the heat. A good rule of thumb: when the skin is a deep amber and the smell is sweet, you’re ready for the final sear.
The 5-Minute Rest That Changes Everything
Many chefs underestimate the importance of resting. A 5‑minute rest is not enough; aim for at least 15 minutes. During this time, the juices redistribute, making the meat tender and flavorful. Skipping this step results in a dry, unremarkable turkey.
The Honey Glaze Trick
Honey caramelizes faster than sugar, so brush it in the last 10 minutes of roasting. If you add it too early, the honey will burn and give a bitter taste. The quick glaze creates a glossy, slightly crunchy coating that adds texture and visual appeal.
The Resting Plate Trick
Place the turkey on a warm plate or a heat‑resistant platter while it rests. This keeps the meat from cooling too quickly and helps maintain the crispness of the skin. A simple trick: preheat your serving platter in the oven for 5 minutes before placing the turkey on it.
The Pan Sauce Finale
Don’t discard the pan juices. They’re full of flavor. After removing the turkey, add a splash of water to the pan, scrape up any browned bits, and reduce the liquid to a silky sauce. This final touch ties all the flavors together and elevates the dish from good to unforgettable.
Creative Twists and Variations
This recipe is a playground. Here are some of my favorite ways to switch things up:
Spicy Cajun Kick
Replace the paprika with a mix of cayenne, smoked paprika, and garlic powder. Add a tablespoon of Cajun seasoning to the herb butter. The result is a bold, spicy crust that pairs well with a cool yogurt sauce.
Mediterranean Flair
Swap rosemary for oregano and thyme for basil. Add 1/4 cup of sun‑dried tomatoes to the roasting pan. The tomato brings a sweet tang that complements the herbs, creating a Mediterranean‑inspired flavor profile.
Herb‑Crusted Turkey
Mix chopped parsley, dill, and chives into the herb butter. Press the mixture onto the skin before roasting. The herb crust adds a fresh, green flavor that brightens the dish.
Maple‑Glazed Turkey
Swap honey for maple syrup and add a pinch of cinnamon. The maple glaze gives the turkey a sweet, caramelized crust with a subtle warmth from the cinnamon. It’s perfect for fall gatherings.
Asian‑Inspired Glaze
Replace honey with 2 tbsp of hoisin sauce, add 1 tbsp soy sauce, and brush with the mixture during the last 10 minutes. Sprinkle sesame seeds on top after roasting. The glaze adds a sweet, umami kick that pairs well with steamed rice.
Low‑Carb Option
Omit the carrots, celery, and onion from the roasting pan. Replace them with a medley of zucchini, bell peppers, and mushrooms. The veggies stay low in carbs while still absorbing the pan juices and adding color.
Storing and Bringing It Back to Life
Fridge Storage
Cool the turkey completely before slicing. Store slices in an airtight container or wrap tightly in foil. Keep in the refrigerator for up to 4 days. The meat stays juicy, and the flavor intensifies over time.
Freezer Friendly
Wrap individual slices in plastic wrap, then place them in a freezer bag. Label with the date. Freeze for up to 3 months. When ready to use, thaw overnight in the refrigerator.
Best Reheating Method
Reheat slices in a skillet over medium heat, adding a splash of water or broth to keep them moist. Alternatively, microwave on medium power for 2 minutes, then finish in a preheated oven at 350°F for 5 minutes. A tiny splash of water before reheating steams the meat back to perfection.