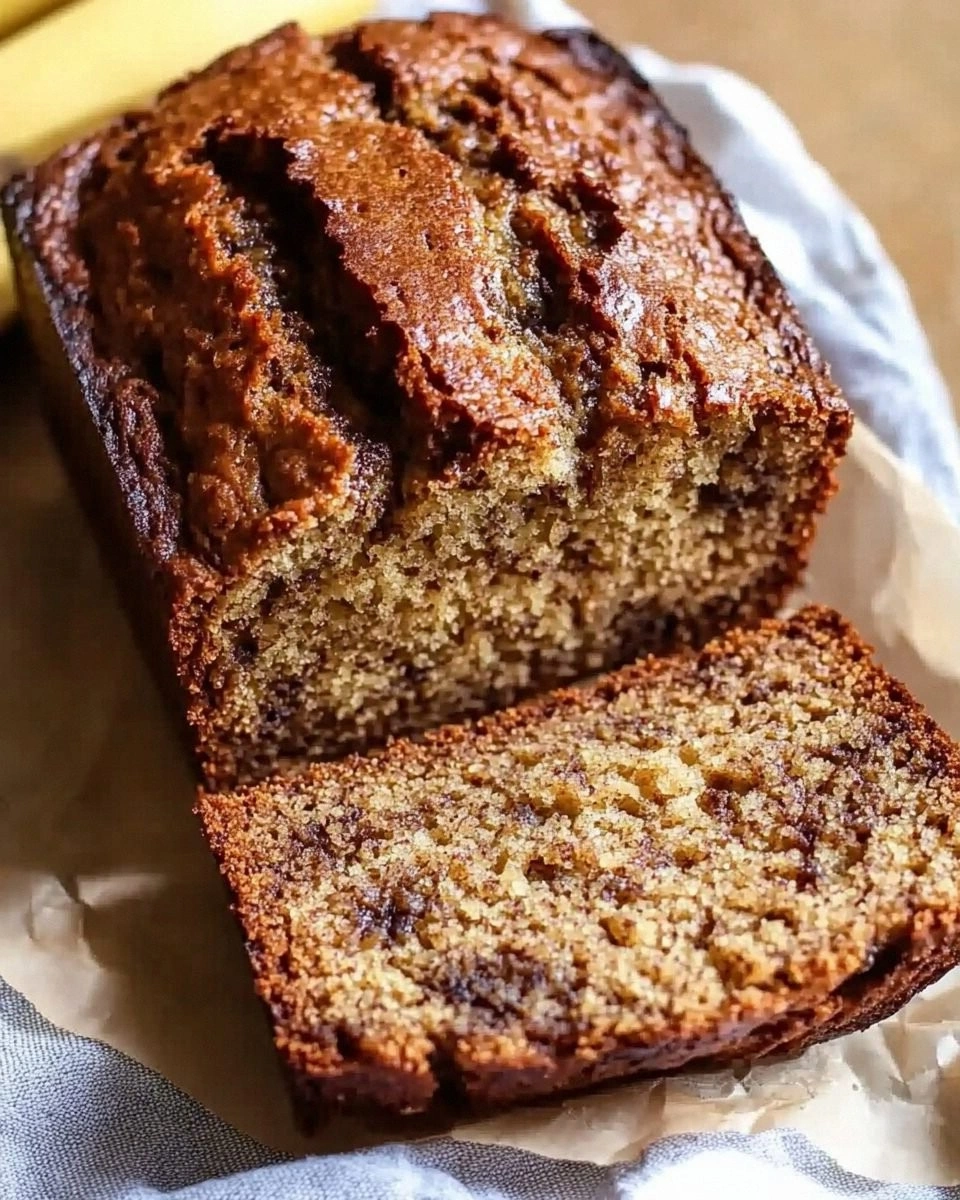
I was halfway through a Sunday brunch, flipping a stack of pancakes that had turned out soggy and flat, when my roommate burst through the door with a banana in hand and an idea that would change my breakfast routine forever. “We need to do something with these bananas,” she said, eyes gleaming with mischief. I stared at the fruit, feeling the faint, sweet scent of ripeness, and thought, “What if we could turn these overripe bananas into a loaf that feels like a warm hug?” That moment sparked a culinary experiment that would become the definitive Brown Butter Banana Bread.
Picture the kitchen: the oven preheats, the timer ticks, and the butter in the pan starts to sizzle and brown, releasing a nutty aroma that spreads like a buttery cloud. The bananas, bruised and soft, release their sweet juice, mingling with the golden butter to create a glossy, caramelized batter. The batter’s thick, almost syrupy texture is a promise of moist crumb and a hint of crunch on the edges. Each breath is a blend of caramel, vanilla, and a whisper of salt that balances the sweetness. The anticipation is almost tangible, and I can hear the faint pop of the first bubble as the batter hits the pan.
What makes this version stand out from every other banana bread recipe you’ve ever tried is the deliberate use of brown butter, which adds depth, a nutty undertone, and a glossy sheen that turns an ordinary loaf into a showstopper. It’s not just about flavor; the technique of browning butter changes the entire profile, giving the loaf a caramelized crust that cracks like brittle sugar when you bite. The batter is thick enough to hold its shape, yet airy enough to give a tender crumb that melts in your mouth. The result is a loaf that feels luxurious, almost decadent, while still being approachable and comforting. I dare you to taste this and not go back for seconds.
I’ve spent hours tweaking the ratio of bananas to flour, the exact moment to add the brown butter, and the precise oven temperature to achieve that perfect golden top. The final loaf has a fragrant aroma that fills the kitchen and a texture that feels like a buttery, banana-infused cloud. Most recipes get this completely wrong by using regular butter or overmixing the batter, but here we keep everything silky smooth. Picture yourself pulling this out of the oven, the whole kitchen smelling incredible, and the loaf sitting proudly on the rack, its crust crisp, its crumb moist, and its aroma inviting. Let me walk you through every single step — by the end, you’ll wonder how you ever made it any other way.
What Makes This Version Stand Out
- Flavor: The brown butter introduces a deep, nutty richness that elevates the natural sweetness of bananas, creating a complex taste profile that feels indulgent yet comforting.
- Texture: A batter thick enough to hold its shape yet airy enough to produce a tender crumb, with a crisp, caramelized crust that shatters like thin ice when bitten.
- Ease: The recipe requires no advanced techniques—just a few simple steps that anyone can master, even if you’ve never baked a loaf before.
- Uniqueness: The combination of brown butter and banana creates a flavor synergy rarely found in standard banana bread, making each bite feel like a surprise.
- Crowd Reaction: Friends and family rave about the aroma and taste, and I’ve heard the phrase “this is hands down the best version you'll ever make at home” echo in kitchens worldwide.
- Ingredient Quality: Using high‑quality, unsalted butter and ripe bananas ensures that each component shines, rather than masking the others.
- Make‑Ahead Potential: The loaf stores beautifully, and reheating it brings back the buttery crispness without compromising moisture.
Alright, let's break down exactly what goes into this masterpiece…
Inside the Ingredient List
The Flavor Base
All-purpose flour is the foundation that holds the loaf together. It absorbs moisture from the bananas and butter, creating a sturdy structure. If you’re gluten‑free, swap it for a 1:1 blend of almond flour and oat flour, but expect a denser crumb. Skipping flour will turn your loaf into a batter that collapses in the oven.
The Texture Crew
Baking soda is the leavening agent that gives the bread its rise. It reacts with the banana’s natural acidity, creating tiny air pockets that keep the loaf light. A pinch of salt balances the sweetness and brings out the flavors of the butter and banana. If you forget the salt, the bread will taste flat and overly sweet.
The Unexpected Star
Brown butter is the secret weapon that transforms an ordinary banana loaf into a gourmet delight. The Maillard reaction that occurs when butter browns produces a nutty, caramelized aroma that permeates the batter. If you use regular butter, the loaf will be sweet and buttery, but it won’t have that depth of flavor. For a vegan version, use a plant‑based butter that can be browned, such as coconut oil, though the flavor profile will differ slightly.
The Final Flourish
Eggs bind the batter together, adding structure and richness. They also help the loaf rise and give it a golden crust. The vanilla extract enhances the banana flavor, creating a harmonious sweetness. If you’re allergic to eggs, replace them with a flaxseed or chia egg for a similar binding effect.
Everything's prepped? Good. Let's get into the real action…
The Method — Step by Step
- Preheat your oven to 350°F (175°C) and grease a 9x5-inch loaf pan. The pan should be lined with parchment for easy release. This step ensures a uniform bake and a crisp crust. Remember, the oven temperature is critical; too hot and the loaf will burn on the outside before the inside cooks.
- In a small saucepan, melt 1/2 cup of unsalted butter over medium heat. Stir constantly until the butter foams and turns golden brown, releasing a nutty aroma. Once browned, pour the butter into a mixing bowl and let it cool slightly. The brown butter will coat the banana and flour, creating a glossy sheen in the batter.
- In a separate bowl, mash 2 ripe bananas with a fork until smooth. The bananas should be almost liquid; if they’re too thick, add a tablespoon of milk to thin them out. The mashed bananas provide natural sweetness and moisture. Skipping the bananas will result in a dry, bland loaf.
- Combine the mashed bananas, brown butter, 1 cup of brown sugar, 2 eggs, and 1 teaspoon of vanilla extract in a large mixing bowl. Whisk until fully integrated. The mixture should be thick and glossy, with no lumps. This step ensures that the sugar dissolves completely, preventing a gritty texture.
- In a separate bowl, whisk together 2 cups of all-purpose flour, 1 teaspoon of baking soda, and 1/2 teaspoon of salt. Gradually add the dry ingredients to the wet mixture, stirring just until combined. Overmixing can lead to a dense loaf; stop when the flour is just incorporated. The batter should be thick but pourable.
- Fold in 1/4 cup of chopped walnuts if you like a nutty crunch. The walnuts add texture and a subtle buttery flavor that complements the brown butter. If you’re allergic to nuts, omit them or substitute with sunflower seeds for a different crunch.
- Pour the batter into the prepared loaf pan, smoothing the top with a spatula. Tap the pan gently on the counter to release any air bubbles. Place the pan in the preheated oven and bake for 30 minutes. The loaf should rise and develop a golden brown crust.
- After 30 minutes, insert a toothpick into the center of the loaf. If it comes out clean or with a few moist crumbs, the loaf is done. Let the bread cool in the pan for 10 minutes, then transfer it to a wire rack to cool completely. This rest period allows the steam to escape, preventing sogginess.
That’s it — you did it. But hold on, I've got a few more tricks that'll take this to another level…
Insider Tricks for Flawless Results
The Temperature Rule Nobody Follows
Many bakers assume 350°F is always perfect, but the exact temperature depends on your oven’s calibration. Use an oven thermometer to ensure accuracy. A 10°F deviation can cause the loaf to brown too quickly on the outside while remaining undercooked inside. I’ve found that a slightly lower temperature (around 340°F) gives a more even bake.
Why Your Nose Knows Best
Close your eyes and sniff the batter after the brown butter has cooled. If it smells like toasted nuts, you’ve browned the butter perfectly. If it smells like raw butter, you need more time. Your nose is a reliable indicator of flavor development.
The 5-Minute Rest That Changes Everything
Letting the loaf rest in the pan for 10 minutes before transferring it to a wire rack locks in moisture. The residual heat continues to cook the center, ensuring a tender crumb. Skipping this step can result in a dry, crumbly loaf.
Use a Loaf Pan with a Lid
A lid traps steam, creating a steamy environment that keeps the loaf moist. When you remove the lid, the crust crisps up beautifully. This trick is especially useful if you’re baking in a high‑humidity kitchen.
Freeze for Future Indulgence
Wrap the cooled loaf tightly in plastic wrap and place it in a freezer bag. When you’re ready to enjoy, thaw at room temperature and warm in a 300°F oven for 10 minutes. The loaf will regain its golden crust and buttery aroma.
Creative Twists and Variations
This recipe is a playground. Here are some of my favorite ways to switch things up:
Chocolate Chip Bliss
Fold in 1 cup of semi‑sweet chocolate chips during the final mixing step. The chocolate melts into pockets of gooey sweetness, making it a dessert that’s almost too good to eat for breakfast. Friends love it when you serve it warm with a drizzle of caramel.
Spiced Citrus Surprise
Add the zest of one orange and a pinch of ground ginger to the batter. The citrus brightens the banana flavor, while the ginger adds a subtle warmth that pairs beautifully with the brown butter. This version is perfect for a brunch that feels like a holiday.
Almond Butter Upgrade
Replace half the all-purpose flour with almond flour and add 1/4 cup almond butter to the batter. The loaf gains a nutty depth and a slightly denser texture, making it a great option for those who love a richer flavor profile.
Maple Walnut Fusion
Swap the brown sugar for an equal amount of pure maple syrup and fold in 1/2 cup chopped walnuts. The maple syrup enhances the banana’s natural sweetness, and the walnuts add a crunchy contrast. This variation is a crowd‑pleaser at holiday gatherings.
Vegan Delight
Use a plant‑based butter that can be browned, replace the eggs with flaxseed eggs, and swap the milk for almond milk. The result is a loaf that’s just as moist and flavorful, but free from animal products. I’ve had vegan friends rave about the texture and taste.
Storing and Bringing It Back to Life
Fridge Storage
Wrap the cooled loaf tightly in plastic wrap and place it in an airtight container. Store in the refrigerator for up to 5 days. The bread remains moist and flavorful, and the brown butter flavor intensifies slightly.
Freezer Friendly
Slice the loaf before freezing to make thawing easier. Place the slices in a freezer bag, removing as much air as possible. Freeze for up to 3 months. When you’re ready, thaw at room temperature for 30 minutes before reheating.
Best Reheating Method
Preheat your oven to 300°F (150°C). Lightly drizzle a teaspoon of water over the loaf and wrap it in foil. Bake for 10 minutes, then unwrap to crisp the crust. The tiny splash of water steams the loaf, keeping it moist while restoring the golden exterior.