Picture this: I’m standing in a kitchen that smells like a Christmas tree and a candy shop collided, the air thick with peppermint and chocolate. I had just pulled a batch of chocolate wafer cookies from the oven—crusty, buttery, and utterly irresistible. My friends were begging for a bite, but I was on a mission: to turn that cookie crumble into something even more decadent. The result? No-Bake Candy Cane Cookies (La) that are so addictive, I’ll be honest—I ate half the batch before anyone else got a chance to taste a single piece.
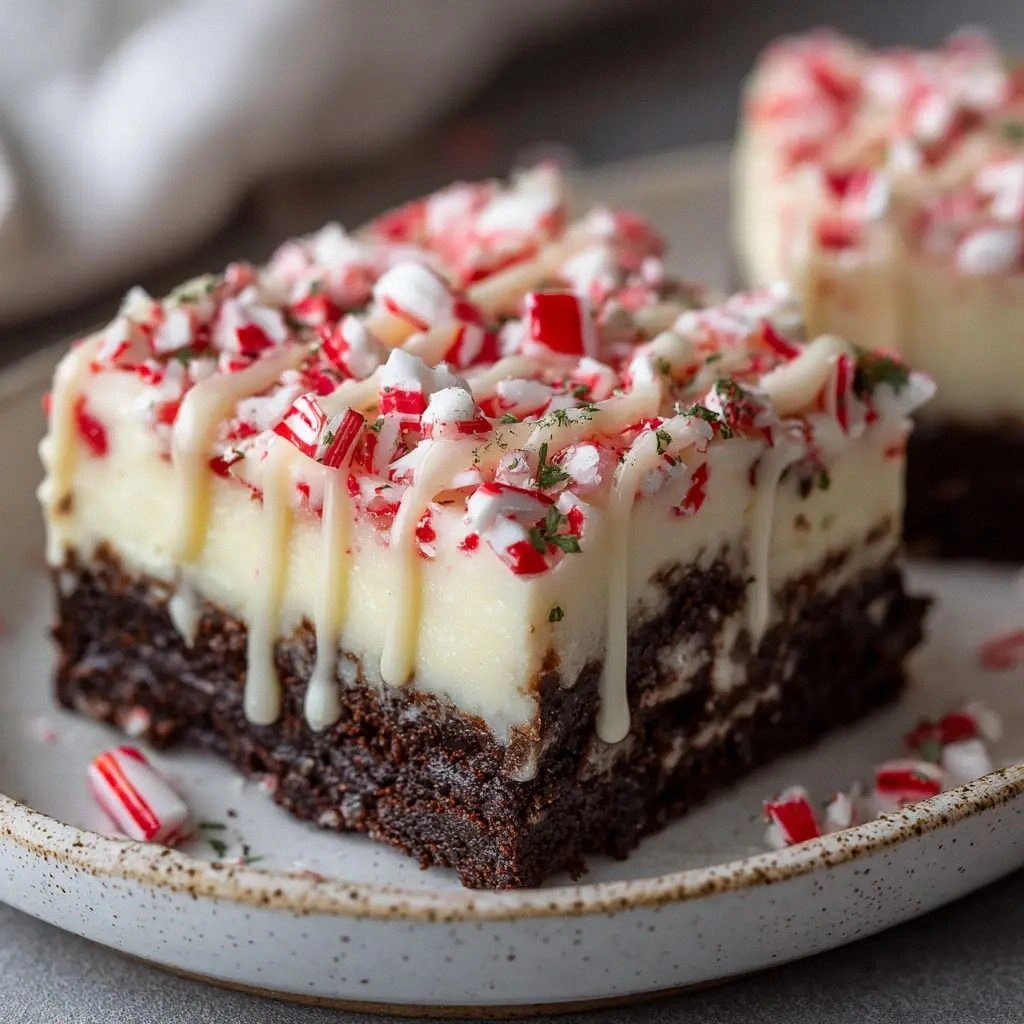
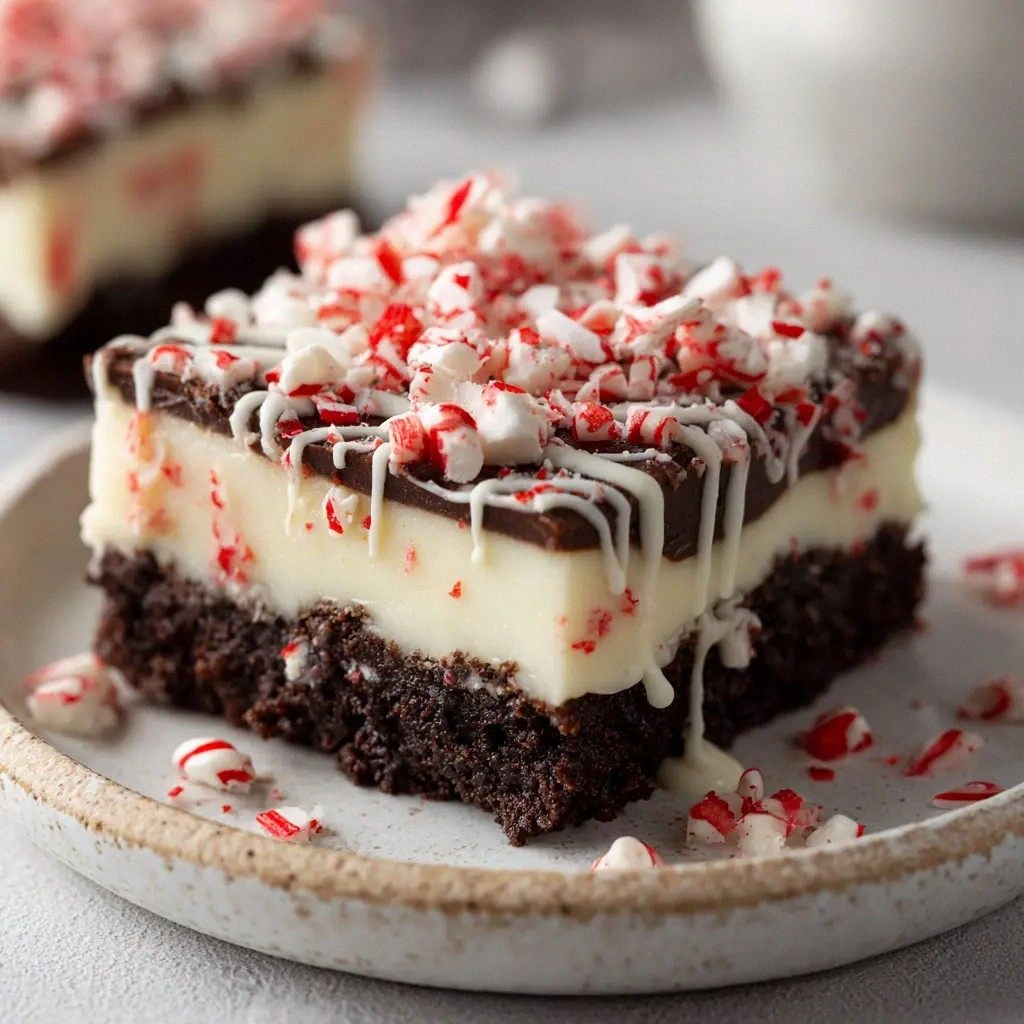
The first bite is a paradox of textures: the crisp wafer base gives way to a silky, molten cream cheese filling, and then the candy cane shards pop like tiny fireworks of mint. The aroma is a comforting blend of vanilla, chocolate, and that unmistakable holiday punch that makes you feel like you’ve stepped into a holiday movie set. The sound—no, the silence—is the gentle clink of a spoon against the glass pan, a subtle reminder that this is a no-bake treat that doesn’t need a timer. I dare you to taste this and not go back for seconds.
What makes this version stand out from every other recipe out there is the meticulous balance of flavors and textures, the use of quality ingredients, and the sheer simplicity that makes it a crowd-pleaser at parties, potlucks, or a quiet Sunday afternoon. Most recipes get this completely wrong, but here’s what actually works: the chocolate wafer crumbs provide a crunchy backbone, the cream cheese adds creaminess, and the peppermint candy canes inject that crisp minty zing. The white chocolate chips melt into a glossy glaze that coats the edges like velvet. Picture yourself pulling this out of the fridge, the whole kitchen smelling incredible, and watching the bars set into glossy, bite-sized perfection.
And that’s just the beginning. Let me walk you through every single step—by the end, you’ll wonder how you ever made it any other way. We’re about to dive into a recipe that feels like a holiday tradition, but with a modern twist that will have your friends begging for the recipe card.
What Makes This Version Stand Out
- Flavor: The combination of rich chocolate, silky cream cheese, and bright peppermint creates a symphony of taste that feels festive yet sophisticated. The white chocolate adds a subtle sweetness that balances the sharpness of the candy cane.
- Texture: Crunch from the wafer crumbs, melt-in-your-mouth creaminess from the cheese, and a satisfying snap from the peppermint shards. The bars hold together without baking, yet they set into a firm yet tender bite.
- Simplicity: No oven, no complicated steps—just mix, chill, and serve. Even the most novice cook can nail this with minimal fuss.
- Uniqueness: The use of instant vanilla pudding mix as a binding agent is a secret weapon that ensures a smooth, cohesive texture without the need for heat.
- Make‑ahead: These bars can be prepared a day in advance, making them perfect for holiday parties or last-minute gift ideas.
- Ingredient Quality: Each component—from the chocolate wafer crumbs to the fresh peppermint candy canes—has been chosen for its flavor depth and textural contribution.
- Visual Appeal: The bars have a glossy, almost glass-like finish that makes them Instagram-worthy and irresistible to the eye.
- Health Angle: While indulgent, the recipe uses real cream cheese and white chocolate, offering a more wholesome alternative to store-bought candy bars.
Alright, let's break down exactly what goes into this masterpiece…
Inside the Ingredient List
The Flavor Base
At the heart of these bars lies the chocolate wafer crumb layer, which provides a buttery, slightly sweet foundation. The crumbs act as the “glue” that holds the bars together, giving them a subtle crunch that contrasts beautifully with the creamy interior. If you skip the crumbs, the bars will fall apart and lack that satisfying snap that makes each bite memorable.
The Texture Crew
The cream cheese, melted butter, and instant vanilla pudding mix form the smooth, velvety core of the bars. The cream cheese brings a tangy richness that offsets the sweetness, while the butter adds silky mouthfeel. The pudding mix is the secret binding agent that ensures the mixture sets into a firm yet tender slab. Should you omit the pudding mix, the bars will remain too loose and might crumble when cut.
The Unexpected Star
Crushed peppermint candy canes are the showstopper—each bite delivers a burst of minty freshness that lingers on the palate. They also add a delightful crunch and a visual pop of red and white. If you can’t find peppermint candy canes, a small amount of peppermint extract can mimic the flavor, but the texture will be missing.
The Final Flourish
White chocolate chips or chopped white chocolate provide a glossy finish and a sweet counterbalance to the mint. The coconut oil or neutral vegetable oil prevents the white chocolate from seizing and ensures a smooth melt. If you prefer a darker finish, you can substitute dark chocolate chips, but the flavor profile will shift toward a bittersweet note.
Everything's prepped? Good. Let's get into the real action…
The Method — Step by Step
- Prepare the Pan: Line a 9x13-inch baking dish with parchment paper, leaving an overhang on two sides for easy removal. The parchment will keep the bars from sticking and make cleanup a breeze. I always fold the parchment into a neat rectangle; it’s a small step that saves me from a sticky mess later.
- Mix the Crumbs: In a large bowl, combine the chocolate wafer crumbs, powdered sugar, and a pinch of salt. Stir until the mixture is uniformly sweet and free of clumps. If the crumbs seem too dry, add a splash of milk to bind them slightly—just enough to moisten.
- Add Butter: Gently fold in the melted unsalted butter until the crumbs look like damp sand. The butter not only adds flavor but also helps the crumbs adhere together. Watch the mixture; it should be moist enough to hold shape when pressed.
- Press the Base: Transfer the crumb mixture to the prepared pan, pressing firmly into an even layer. Use the back of a spoon or a flat-bottomed glass to smooth the surface. This step is crucial—if the base is uneven, the bars will crack when you cut them later.
- Refrigerate: Place the pan in the fridge for 10 minutes to set the base. This chilling step allows the butter to firm up, making it easier to handle the bars when they’re ready.
- Prepare the Creamy Filling: In a medium saucepan, combine the softened cream cheese, instant vanilla pudding mix, and whole milk. Cook over medium-low heat, whisking constantly, until the mixture thickens and becomes silky. This is the moment of truth—if the mixture is too thin, the bars will be soggy; if it’s too thick, they’ll be difficult to spread.
- Add Sugar and Vanilla: Stir in the powdered sugar and vanilla extract until fully incorporated. The sugar should dissolve completely, leaving no gritty texture. The vanilla enhances the overall flavor profile, adding warmth and depth.
- Fold in Peppermint: Gently fold in the crushed peppermint candy canes, ensuring they’re evenly distributed. The peppermint should be visible throughout the mixture, creating a speckled, festive look. The crunch will add a delightful contrast to the creamy base.
- Incorporate White Chocolate: Add the chopped white chocolate and coconut oil, stirring until the chocolate melts and blends seamlessly. The coconut oil keeps the chocolate from seizing, giving the bars a glossy finish. This step is optional but highly recommended for that silky sheen.
- Pour Over the Base: Remove the pan from the fridge and pour the creamy mixture over the pressed crumb base. Spread it evenly with a spatula, smoothing the top. The mixture should be thick enough to hold its shape but still spreadable.
- Chill Again: Return the pan to the refrigerator for at least 4 hours, preferably overnight, to allow the bars to set completely. This cooling period is essential for the bars to firm up and for the flavors to meld.
- Cut and Serve: Once set, lift the bars out of the pan using the parchment overhang. Place on a cutting board and slice into squares or bars. Serve chilled or at room temperature for a delightful treat.
That's it — you did it. But hold on, I've got a few more tricks that'll take this to another level…
Insider Tricks for Flawless Results
The Temperature Rule Nobody Follows
Keeping the cream cheese mixture at the right temperature is vital. If it’s too cold, it won’t mix well; too hot, and it will split. Aim for a gentle heat—medium-low—and stir constantly. A friend tried skipping this step once, and the bars turned out soggy and uneven.
Why Your Nose Knows Best
Smell the mixture as you cook. It should emit a warm vanilla scent with hints of peppermint. If the aroma lingers too much in the butter, let it sit for a minute to mellow; this prevents a buttery overpowering taste.
The 5-Minute Rest That Changes Everything
After pouring the creamy filling, let it rest for five minutes before chilling. This brief pause allows the mixture to thicken slightly, making it easier to spread and ensuring a smoother finish.
Use a Silicone Spatula
A silicone spatula is perfect for scraping every last crumb from the bowl. It’s heat-resistant and won’t damage the pan, ensuring you don’t waste any of that delicious mixture.
Freeze for a Quick Chill
If you’re in a hurry, place the pan in the freezer for 30 minutes after the first chill. This quick snap helps the bars set faster and keeps them from sticking.
Creative Twists and Variations
This recipe is a playground. Here are some of my favorite ways to switch things up:
Chocolate Chip Delight
Swap the white chocolate for dark chocolate chips. The bittersweet flavor pairs wonderfully with the peppermint, creating a richer, deeper taste that’s perfect for chocolate lovers.
Almond Crunch
Add a handful of chopped toasted almonds to the crumb base. The nutty crunch adds texture and a subtle flavor that complements the mint.
Nutella Swirl
Stir in a couple of tablespoons of Nutella into the creamy filling. The hazelnut chocolate adds a decadent twist that’s sure to wow.
Raspberry Burst
Fold in a handful of fresh raspberries into the cream cheese mixture for a fruity surprise. The tartness cuts through the sweetness, giving the bars a refreshing lift.
Orange Zest
Grate a teaspoon of fresh orange zest into the filling. The citrus note brightens the flavor profile and pairs beautifully with the peppermint.
Salted Caramel
Drizzle a thin layer of salted caramel over the top before chilling. The salty-sweet combo adds a luxurious finish that’s both indulgent and sophisticated.
Storing and Bringing It Back to Life
Fridge Storage
Store the bars in an airtight container in the refrigerator for up to one week. The crispness of the wafer base and the creaminess of the filling are preserved best when kept cold.
Freezer Friendly
For longer storage, place the bars in a freezer-safe container and freeze for up to two months. When ready to enjoy, let them thaw in the refrigerator overnight.
Best Reheating Method
If the bars have become a bit firm, warm them in a 175°F oven for 5 minutes, or microwave on low for 15 seconds. Add a tiny splash of water before reheating to create steam, which helps restore the bars to their original, luscious texture.