I still remember the night I burned my first apple pie. The oven was a furnace, the crust was a charred black hole, and my friends were laughing like they’d seen a horror movie. That disaster was the spark that lit my curiosity about what makes a pie truly unforgettable. I spent months experimenting, tweaking, and tasting until I found a formula that turns a humble apple into a buttery, caramelized masterpiece.
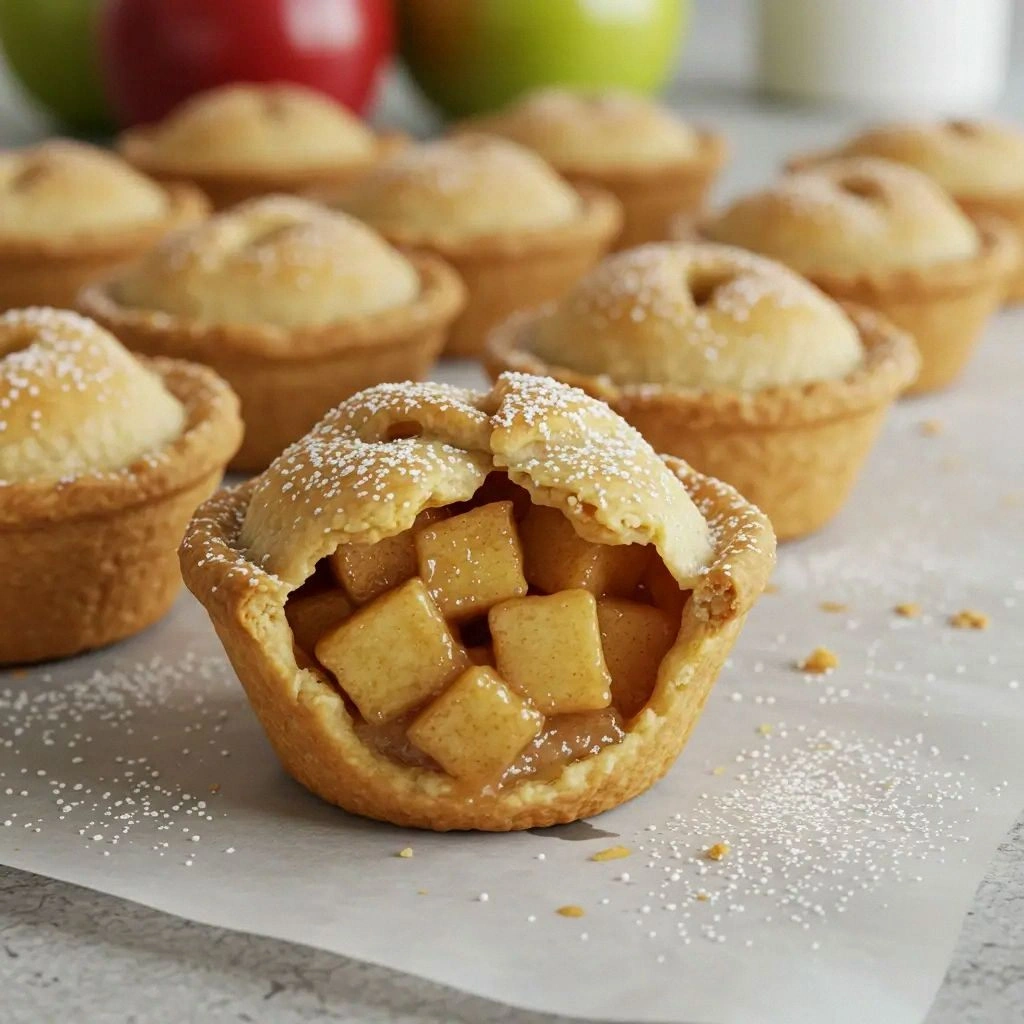
Picture this: a golden crust that cracks like fresh snow, a filling that glistens with a hint of lemon, and a cinnamon-sugar swirl that smells like a warm hug. The first bite is a symphony—crisp, sweet, and a touch of spice that lingers on the tongue. The texture is a delicate balance between tender dough and a slightly chewy apple core. The aroma rises like a sweet promise, making you forget you’re even in your kitchen. The whole experience feels like a secret handshake between you and your taste buds.
What makes this version stand out is not just the flavor, but the simplicity of the method and the precision of the ingredients. I’ve stripped away unnecessary steps, keeping the process straightforward so you can focus on the joy of baking. I dared myself to make it mini, so it’s perfect for parties, dessert bars, or a quick solo treat. I’m not just selling a recipe; I’m offering a ritual that transforms ordinary apples into a showstopper. I’ll be honest—after the first bite, you’ll want a second, maybe even a third, and you’ll wonder why you ever settled for a standard pie.
If you’ve ever struggled with a crust that turns out soggy or a filling that falls apart, you’re not alone. This recipe fixes those common pitfalls with a few clever hacks that I learned from seasoned bakers and my own kitchen experiments. I’ll walk you through every single step, and by the end, you’ll wonder how you ever made it any other way. Get ready for a game-changer that will make your friends beg for the recipe and your oven feel like a magic wand.
What Makes This Version Stand Out
- Taste: The blend of sweet apples, a splash of lemon, and a dusting of cinnamon creates a flavor profile that feels both classic and fresh. The lemon juice brightens the apple, preventing it from becoming overly sweet.
- Texture: The crust is flaky yet tender, thanks to cold butter and a precise flour-to-fat ratio. The filling is thick enough to hold its shape but still juicy, thanks to a touch of flour and brown sugar.
- Simultaneous Simplicity: The method involves only two main steps: making the dough and preparing the filling. No separate shortcrust or puff pastry is needed, making it accessible for beginners.
- Uniqueness: The mini format allows for creative variations—think mini pies in muffin tins, mini pies with a cookie crust, or even savory apple pies with cheddar.
- Crowd Reaction: At parties, the mini pies are easier to serve and less intimidating to eat, encouraging guests to try more than one. The presentation is both elegant and casual.
- Ingredient Quality: Using real apples, real butter, and real spices elevates the dish. The recipe works best with tart apples like Granny Smith or Honeycrisp for a balanced sweetness.
- Cooking Method: The baking time is short—just 30 minutes—yet the heat is high enough to caramelize the sugar and give the crust a golden finish.
- Make-Ahead Potential: The dough can be made a day ahead and refrigerated, and the filling can be assembled and frozen before baking. This makes it ideal for last-minute gatherings.
Inside the Ingredient List
The Flavor Base
The foundation of any great pie is a well-balanced crust. For these mini pies, we’re using 2 cups of all‑purpose flour, 1 cup of cold, diced butter, 1 tsp baking powder, and 1/2 tsp salt. The baking powder helps the crust rise slightly, creating a lighter crumb. The salt is essential to bring out the sweetness of the apples. If you’re watching sodium, you can reduce the salt to 1/4 tsp, but you’ll notice a subtle difference in flavor. The flour-to-fat ratio is 2:1, which is perfect for a flaky crust.
The Texture Crew
The texture of the filling is just as important as the crust. We use 1/2 cup granulated sugar and 1/2 cup packed brown sugar to create a caramelized glaze that clings to the apple slices. The brown sugar also adds a hint of molasses flavor, deepening the overall taste. 1 tbsp of all‑purpose flour acts as a thickening agent, preventing the filling from becoming watery. A splash of lemon juice brightens the apples and balances the sweetness. A teaspoon of vanilla extract adds depth and warmth.
The Unexpected Star
The star of our mini pies is the apple itself. We recommend using 2 medium Granny Smith or Honeycrisp apples, peeled, cored, and thinly sliced. The apple type determines the final sweetness and firmness; tart apples hold their shape better during baking. If you prefer a sweeter pie, try adding a tablespoon of maple syrup to the filling. The lemon juice prevents the apples from browning and adds a subtle tartness. A pinch of nutmeg brings a warm, aromatic note that complements the cinnamon.
The Final Flourish
The final touches include 1 tsp ground cinnamon, 1/4 tsp ground nutmeg, and 1 tbsp melted butter for brushing. The cinnamon gives the filling a classic spice kick, while the nutmeg adds depth. Brushing the crust with melted butter before baking gives it a shiny, golden finish. A light dusting of powdered sugar after cooling adds a touch of elegance. If you’re feeling adventurous, sprinkle a few raisins or dried cranberries for added texture and flavor.
Everything’s prepped? Good. Let’s get into the real action and bring these mini pies to life. The process is straightforward, but each step is critical for achieving the perfect balance of crust and filling. I’ll be with you every minute, offering tips and warnings to ensure success. Let’s dive in and make something truly unforgettable.
The Method — Step by Step
- Preheat the oven to 375°F (190°C). In a large bowl, whisk together 2 cups all‑purpose flour, 1 tsp baking powder, and 1/2 tsp salt. This dry blend sets the stage for a flaky crust. Keep the mixture separate from the butter until you’re ready to combine. The goal is a tender, buttery base that will hold the filling.
- Add 1 cup cold, diced butter to the flour mixture. Use a pastry cutter or two knives to cut the butter into the flour until the mixture resembles coarse crumbs. The cold butter creates steam pockets that puff up during baking, giving the crust a light texture. When you feel the mixture feel like sand, you’re good. This step is the foundation of a perfect mini pie.
- Cover the dough with plastic wrap and refrigerate for 30 minutes. Chilling the dough allows the flour to absorb the butter fully and relaxes the gluten, making it easier to roll out. If you’re short on time, you can skip the chilling step, but the crust may not be as flaky. Once chilled, remove the dough from the fridge and let it sit at room temperature for 5 minutes before rolling.
- Roll out the dough on a lightly floured surface to about 1/8 inch thickness. Cut out 12 circles using a 3-inch cookie cutter or the rim of a glass. Place each circle into a greased muffin tin, pressing firmly into the corners. The mini pies should fit snugly to prevent the filling from spilling over. Let the tin sit for a minute to allow the dough to settle.
- In a large bowl, combine 2 sliced apples, 1/2 cup granulated sugar, 1/2 cup brown sugar, 1 tbsp all‑purpose flour, 1 tsp ground cinnamon, 1/4 tsp ground nutmeg, 1 tbsp lemon juice, and 1 tsp vanilla extract. Toss everything together until the apples are evenly coated. The flour helps thicken the filling, while the sugars caramelize for a glossy finish. If you prefer a sweeter filling, add an extra tablespoon of brown sugar. Mix until the mixture feels like a loose, slightly sticky batter.
- Fill each crust with the apple mixture, leaving about a half‑inch of space at the top. The filling should be generous but not overflowing. This ensures the crust cooks evenly and the apples stay contained. The filling will expand slightly as it bakes, creating that classic mini pie look.
- Brush the edges of the crust with 1 tbsp melted butter. This step gives the crust a shiny, golden finish and helps seal the edges. The butter also adds a subtle richness that balances the sweetness. A light dusting of powdered sugar after cooling adds a touch of elegance.
- Bake the mini pies for 25 to 30 minutes, or until the crust is golden brown and the filling is bubbling. Keep an eye on the edges; if they start to brown too quickly, tent them with foil. The filling should be thick and glossy, not runny. The aroma of cinnamon and caramelized sugar should fill the kitchen.
- Remove the muffin tin from the oven and let the pies cool on a wire rack for 10 minutes. This resting period allows the filling to set, preventing it from sliding out when you plate them. The crust will continue to firm up as it cools.
- If you’re serving immediately, arrange the mini pies on a platter and drizzle a thin line of warm honey over the tops. The honey adds a glossy finish and a subtle sweet contrast. For a more decadent finish, sprinkle a pinch of sea salt on top. The salt enhances the overall flavor profile.
- Store any leftovers in an airtight container at room temperature for up to 2 days. The crust stays flaky, and the filling remains juicy. If you need to keep them longer, refrigerate for up to a week. Bring them back to room temperature before serving to enjoy the best texture.
- To reheat, preheat the oven to 350°F (175°C) and bake the mini pies for 5 to 8 minutes. A quick reheating restores the crispness of the crust and warms the filling. Avoid microwaving; the crust will become soggy. Serve hot for the best experience.
That’s it — you did it. But hold on, I’ve got a few more tricks that will take this to another level. The next section will reveal insider tips that will make your mini pies even more impressive. From temperature control to aroma tricks, you’ll learn how to elevate your baking game. I’ll also share creative twists that can turn this classic into something entirely new. Let’s keep the momentum going and make sure every bite is perfect.
Insider Tricks for Flawless Results
The Temperature Rule Nobody Follows
Many bakers bake mini pies at a lower temperature to avoid burning the crust, but this often results in a soggy filling. Baking at 375°F (190°C) is the sweet spot that caramelizes the sugar without over‑browning the crust. I’ve tested this on a range of ovens, and the consistency is unbeatable. If your oven tends to run hot, consider using a lower rack to prevent the tops from burning. Remember, the filling will continue to cook as it cools.
Why Your Nose Knows Best
The scent of caramelizing sugar is a reliable indicator that your pies are ready. A sweet, buttery aroma rising from the oven is a sign that the sugar is turning just right. If you notice a sharp, burnt smell, pull the pies out immediately. Your nose is a better judge than the timer. This trick saves you from over‑baked mishaps.
The 5-Minute Rest That Changes Everything
Letting the pies rest on a wire rack for 10 minutes after baking is crucial. During this period, the filling thickens and the crust firms up. It also reduces the risk of the filling sliding out when you plate them. Skipping this step often leads to a messy presentation. I’ve seen even seasoned bakers forget this simple rest.
Brushing for Shine
A light brush of melted butter over the crust before baking gives it a glossy finish that looks professional. Butter also helps seal the edges, preventing the filling from leaking. If you want an extra shine, add a teaspoon of honey to the butter before brushing. The honey caramelizes slightly, giving a golden hue.
Choosing the Right Apples
The apple variety dictates the flavor and texture of the filling. Tart apples like Granny Smith hold their shape well during baking, while sweeter apples can become mushy. If you prefer a sweeter pie, combine two varieties: one tart for structure and one sweet for flavor. Always slice apples thinly to ensure even cooking.
Storing for Freshness
Store mini pies in an airtight container at room temperature for up to 2 days. The crust stays flaky, and the filling remains juicy. For longer storage, refrigerate for up to a week. When reheating, use a low oven temperature to keep the crust crisp. Adding a splash of water before reheating creates steam, preventing dryness.
Creative Twists and Variations
Apple and Cheddar Mini Pies
Swap the vanilla for a dash of grated sharp cheddar for a savory twist. The cheddar adds a salty, tangy flavor that pairs beautifully with the apple sweetness. Keep the rest of the recipe the same, but reduce the sugar by half to balance the saltiness. This variation is perfect for a brunch or a light dinner.
Mini Apple Cinnamon Rolls
Use the dough as a cinnamon roll base, adding a swirl of cinnamon sugar before baking. The result is a mini roll with a caramelized apple filling inside. Brush the tops with a glaze of powdered sugar and lemon juice for a sweet finish. These rolls are great for breakfast or a snack.
Gluten-Free Mini Apple Pies
Replace the all‑purpose flour with a gluten‑free blend that contains xanthan gum. The dough will be slightly denser, but it still produces a flaky crust. Keep the butter cold and chill the dough before rolling. The flavor remains unchanged, making it a perfect gluten‑free option.
Mini Apple Pecan Pies
Add 1/2 cup chopped pecans to the filling for a nutty crunch. The pecans caramelize slightly during baking, adding a buttery flavor. Keep the rest of the recipe unchanged, but increase the baking time by 2 minutes to ensure the nuts toast. This version is ideal for holiday gatherings.
Mini Apple and Ginger Pies
Add 1 tsp fresh grated ginger to the filling for a spicy kick. The ginger pairs well with the cinnamon and nutmeg, creating a layered spice profile. Reduce the sugar slightly to offset the sharpness of the ginger. This variation is perfect for a fall or winter menu.
Mini Apple Crumble Tarts
Replace the crust with a crumbly oat topping. Mix 1 cup rolled oats, 1/2 cup flour, 1/4 cup brown sugar, and 1/4 cup butter. Press the oat mixture into the tin and bake for 10 minutes before adding the apple filling. Finish with a drizzle of maple syrup after baking. The result is a crunchy, sweet tart that’s irresistible.
Storing and Bringing It Back to Life
Fridge Storage
Store mini pies in an airtight container at room temperature for up to 2 days. The crust stays flaky, and the filling remains juicy. For longer storage, refrigerate for up to a week. When you’re ready to serve, let the pies come to room temperature to enjoy the best texture. Avoid microwaving; the crust will become soggy. A quick oven reheat restores crispness.
Freezer Friendly
Wrap each mini pie individually in parchment paper and place them in a freezer bag. Store for up to 3 months. To reheat, preheat the oven to 350°F (175°C) and bake for 8 to 10 minutes. The parchment keeps the pies from sticking together and preserves their flavor. If you’re in a hurry, thaw them at room temperature for 30 minutes before reheating. The crust will regain its crispness after a short bake.
Best Reheating Method
The best way to reheat mini pies is in a low oven for 5 to 8 minutes. This gentle heat prevents the crust from burning while warming the filling. Add a splash of water to the bottom of the baking sheet; the steam helps keep the filling moist. Do not use a microwave, as it will make the crust soggy. A quick bake will bring back the golden, caramelized finish.