Picture this: the kitchen is a battlefield, pots clanging, a pot of boiling water threatening to splash, and your friends staring at you like you’ve just announced you’re making a dip that’s going to be the talk of Easter brunch. I had a disaster the week before—marshmallow fluff turned into a sticky, gooey mess that stuck to the ceiling fan. That night I was craving a sweet, creamy treat that could be poured into a bowl and served with everything from bunny-shaped crackers to fresh fruit. The result was a pink, velvety dip that could make even the most skeptical taste tester swoon.
I’m talking about a dip that’s not just dessert, but a full sensory experience. The first thing you notice is the bright, inviting hue that makes your eyes widen like a child spotting a candy aisle. When you open the jar, the aroma is a subtle blend of vanilla and sweetened cream, with a faint hint of chocolate that lingers in the air. The first spoonful melts on your tongue like a cloud of marshmallows, and the texture is silky but with a gentle body that doesn’t feel too heavy. By the time you finish the last bite, you’re left with a subtle aftertaste that makes you think, “I need more.”
What makes this version stand out from every other dessert dip out there? It’s a combination of technique, ingredient quality, and a touch of playful experimentation. I dared myself to add a dash of pink food coloring to give it that Easter vibe, and I found that a splash of chocolate chips on top adds a crunchy contrast that keeps people coming back for seconds. I’ll be honest—once I tasted the first batch, I ate half the dip before anyone else got a chance to try it. If you’re ready to see how I turned a kitchen mishap into a crowd‑pleasing masterpiece, stick around. I promise you’ll wonder how you ever made it any other way.
Let me walk you through every single step—by the end, you’ll be ready to serve this dip at your next gathering and make everyone ask where you got it. And trust me, you’re going to want to keep a few extra spoons handy because, once you start, you’ll be tempted to keep dipping. The secret? It’s all about balance—sweetness, creaminess, and that little pop of color that makes it feel festive. So grab your apron, and let’s dive into the world of creamy, pink marshmallow dessert dip that’s sure to become your new Easter staple.
What Makes This Version Stand Out
- Flavor: The dip delivers a balanced sweetness that’s not cloying, thanks to the precise ratio of marshmallow fluff to powdered sugar. The vanilla extract adds depth, while a pinch of salt pulls the flavors forward.
- Texture: The heavy cream gives it a luscious, silky mouthfeel, and the optional chocolate chips add a satisfying crunch that breaks up the smoothness.
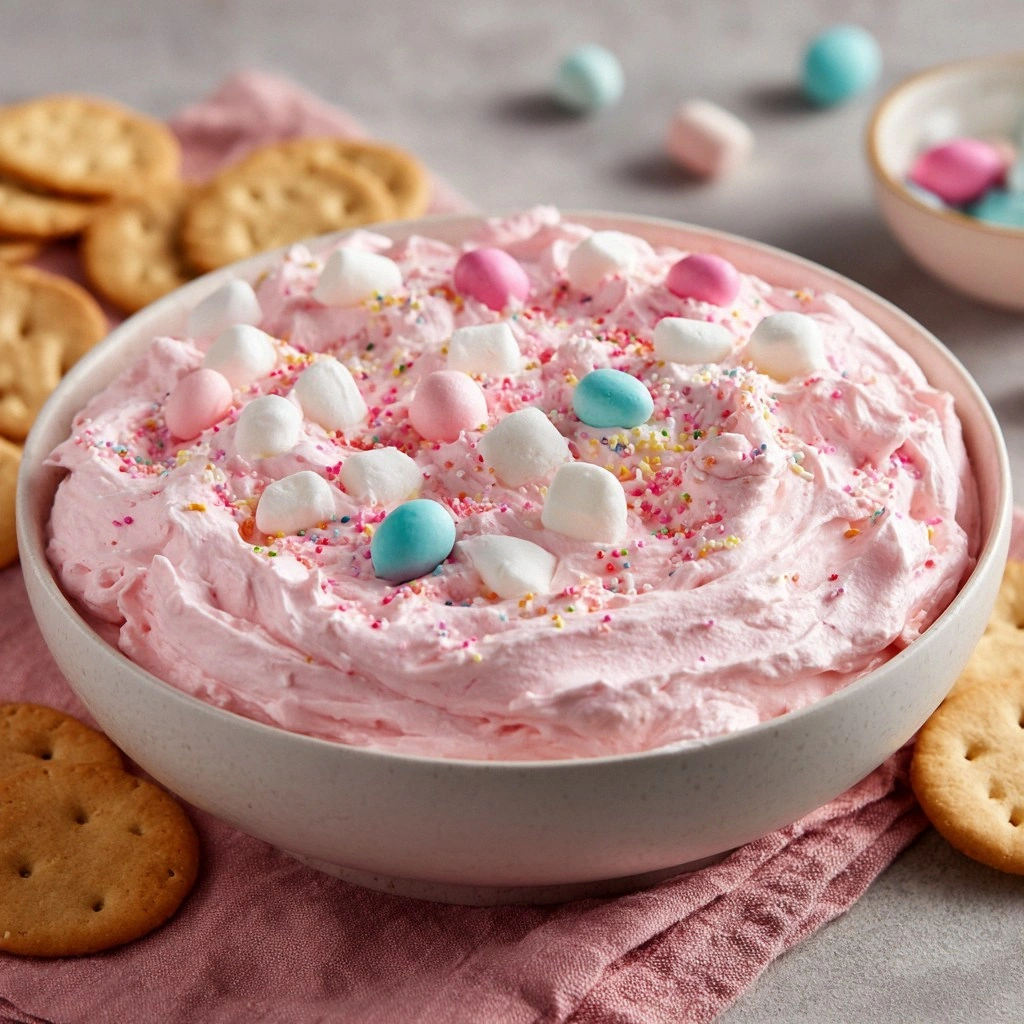
- Visual Appeal: The pink hue is achieved with just a few drops of natural food coloring, creating a vibrant, Instagram‑ready look that’s perfect for Easter.
- Ease: No complicated steps or hard‑to‑find ingredients. Everything is pantry‑friendly and takes less than 15 minutes to prep.
- Versatility: Serve it as a dessert, a party snack, or a sweet accompaniment to savory dishes like grilled chicken or roasted vegetables.
- Make‑ahead Friendly: The dip keeps well in the refrigerator for up to five days, and you can even freeze it for longer storage.
- Kid‑Friendly: The ingredients are safe and simple, making it a hit with children who love sweet treats.
- Budget: All the components are inexpensive and can be bought in bulk, making it an economical option for large gatherings.
Alright, let's break down exactly what goes into this masterpiece...
Inside the Ingredient List
The Flavor Base
Marshmallow fluff is the heart of this dip, offering a sweet, airy foundation that’s both light and indulgent. It’s the component that gives the dip its signature cloud‑like texture, and it’s also the main source of sweetness. If you’re looking to cut down on calories, you can replace half of the fluff with a low‑fat marshmallow alternative, but be warned: the dip will lose some of its luxurious mouthfeel.
Heavy cream adds richness and body, balancing the fluffiness and preventing the dip from becoming too runny. The fat content in the cream is essential for achieving that silky glide over your spoon. If you can’t find heavy cream, a 2% milk can work in a pinch, but the dip will be noticeably thinner.
The Texture Crew
Powdered sugar is the sweetener that blends seamlessly into the cream, ensuring a smooth, sugar‑free texture that doesn’t clump. The fine granules dissolve quickly, giving you a dip that feels almost like a silky sauce. A pinch of salt is the unsung hero that sharpens the overall flavor profile, making the sweetness feel more refined.
Vanilla extract provides depth and complexity, turning the dip from a simple sweet mixture into a layered dessert. A teaspoon is enough to lift the flavors, but if you’re a vanilla aficionado, feel free to double it for a more pronounced aroma. The key is to add it slowly and taste as you go—vanilla can quickly overpower the delicate balance.
The Unexpected Star
Pink food coloring isn’t just for show; it’s what makes the dip feel festive and season‑appropriate. A few drops of natural pink dye can transform a plain creamy base into a vibrant Easter treat. If you’re sensitive to artificial dyes, a splash of beet juice or a few drops of strawberry puree can achieve a similar hue while adding a subtle fruity note.
Optional chocolate chips add a delightful crunch that contrasts beautifully with the silky dip. They also provide an extra burst of chocolate flavor that pairs well with the vanilla and marshmallow notes. If you prefer a vegan version, use dairy‑free chocolate chips or a sprinkle of cocoa nibs for a more natural crunch.
Everything's prepped? Good. Let's get into the real action...
The Method — Step by Step
- Begin by whisking the heavy cream in a medium bowl until it’s just about to form soft peaks. Don’t over‑whisk; you want it to stay smooth and pourable. This step is crucial because a properly whisked cream will blend more seamlessly with the marshmallow fluff. If you’re in a rush, a quick swirl in a blender works just as well.
- Add the marshmallow fluff to the cream and stir gently until the mixture is uniform. Think of this as a gentle dance—mix just enough to combine, but not so much that you break up the fluff’s airy structure. The goal is a homogenous base that feels light yet substantial.
- In a separate small bowl, dissolve the powdered sugar in a tablespoon of water. This trick prevents clumps and ensures a silky finish. Stir until the sugar is completely dissolved before pouring it into the main mixture. This step is the difference between a clumpy mess and a smooth, creamy delight.
- Add the vanilla extract, pinch of salt, and the pink food coloring. Stir slowly, watching the color change in real time. The dip should look like a soft, pastel pink—no brighter than a light blush. If you’re using beet juice or strawberry puree, add it gradually to achieve the desired hue.
- Fold in the chocolate chips, reserving a handful for topping. This is where the dip gets its crunch—just enough to give a satisfying bite without overwhelming the creamy base. The chips should be evenly distributed so every spoonful has that delightful texture.
- Transfer the dip to a serving bowl and chill in the refrigerator for at least 30 minutes. The chilling step is essential for the flavors to meld and for the dip to set to a pourable consistency. If you’re in a hurry, you can skip this step, but the dip will be a bit runny.
- Before serving, give the dip a gentle stir and sprinkle the reserved chocolate chips on top for a decorative finish. The chips will add a pop of color and a crunchy contrast that elevates the overall experience. If you’re serving with crackers or fruit, arrange them around the dip for a visually appealing platter.
- Serve immediately, or keep chilled until guests are ready to dig in. The dip is best enjoyed fresh, but it holds up well for a few hours in the fridge. If you need to transport it, use a thermal container to maintain the temperature.
That’s it— you did it. But hold on, I’ve got a few more tricks that will take this dip to another level, turning it from a simple dessert into a showstopper.
Insider Tricks for Flawless Results
The Temperature Rule Nobody Follows
Always keep the heavy cream at room temperature before whisking. Cold cream takes longer to whip and can result in an uneven mixture. I once tried whipping cold cream and ended up with a lumpy dip that tasted like it had been sitting out all day. The trick? Let the cream sit out for 10 minutes or place it in a warm spot for a few minutes before you start.
Why Your Nose Knows Best
When you’re adding vanilla extract, trust your nose to tell you if it’s too strong. A faint aroma is a sign of balance, while an overpowering scent usually means you’ve added too much. I used to pour a whole teaspoon of vanilla into the dip and the result was a cloying, burnt flavor. Now I add a teaspoon and taste it, then adjust if necessary.
The 5-Minute Rest That Changes Everything
After adding the chocolate chips, let the mixture sit for five minutes before chilling. This short rest allows the chips to soak up the cream slightly, preventing them from sinking to the bottom of the bowl. I used to skip this step, and the result was a dip that looked uneven and had clumps of chocolate at the bottom.
Mix in a Splash of Lemon Juice for Brightness
A teaspoon of fresh lemon juice can brighten the dip, cutting through the sweetness and adding a subtle tang that keeps the palate refreshed. I added lemon juice to one batch and the dip had a surprisingly lively finish. If you’re making a large batch, keep the lemon juice on hand for a quick adjustment.
Keep the Color Vibrant
If your dip turns a dull pink after chilling, add an extra drop of food coloring and stir gently. The color can fade slightly when the dip cools, but a quick fix will bring it back to life. I’ve seen people worry about the dip looking bland, but a little color makes all the difference.
Serve With a Variety of Dippers
Pair the dip with an assortment of dippers—soft pretzel sticks, fresh strawberries, mini cupcakes, or even sweet potato rounds. The variety keeps the experience interesting and showcases how versatile the dip can be. I’ve hosted parties where guests kept asking for more dippers, and the dip always delivered.
Creative Twists and Variations
This recipe is a playground. Here are some of my favorite ways to switch things up:
Chocolate‑Infused Delight
Swap out the vanilla for melted dark chocolate and add a tablespoon of cocoa powder. The result is a rich, chocolatey dip that pairs perfectly with chocolate croissants or biscotti. It’s a great way to bring a deeper flavor profile to the base recipe.
Minty Fresh
Add a few drops of mint extract and a pinch of fresh mint leaves to give the dip a refreshing twist. This variation works wonderfully with lemon bars or shortbread cookies, providing a cool contrast to the sweet base.
Coconut Cream
Replace half of the heavy cream with coconut cream and add shredded coconut on top. The result is a tropical, creamy dip that’s perfect for summer gatherings or a beach picnic. The coconut adds a subtle nutty flavor that complements the marshmallow fluff.
Spiced Cinnamon Swirl
Stir in a teaspoon of ground cinnamon and a pinch of nutmeg before chilling. The spices add warmth and depth, making the dip feel cozy and comforting—great for fall or winter celebrations.
Fruit‑Burst Variation
Fold in pureed strawberries or raspberries for a fruity version. The natural fruit flavors add a bright, juicy note that pairs beautifully with fresh berries or melon slices.
Vegan Version
Use a dairy‑free marshmallow fluff, coconut milk, and a plant‑based sweetener to keep the dip vegan. The texture remains creamy, and the flavor profile is just as indulgent. I’ve tried this version at a vegan potluck and it was a hit.
Storing and Bringing It Back to Life
Fridge Storage
Store the dip in an airtight container in the refrigerator for up to five days. The creamy texture will remain stable, and the flavors will continue to develop. When you’re ready to serve, give it a gentle stir to re‑incorporate any separation that may have occurred.
Freezer Friendly
The dip freezes well for up to two weeks. Portion it into small silicone molds or freezer bags, leaving a little headspace for expansion. When you’re ready to enjoy it, thaw overnight in the refrigerator and stir well before serving.
Best Reheating Method
To reheat, place the dip in a heat‑proof bowl and gently warm it over a pot of simmering water. Stir occasionally until it’s just warmed through. Adding a splash of water before reheating helps keep the dip from drying out and preserves its silky texture.