Picture this: I’m standing in a cramped kitchen, the stove humming like a tired old friend, when suddenly the pot I’ve been simmering for hours explodes into a sticky, caramelized mess. I stared at the charred surface, feeling the heat of disappointment. Then, a memory of my grandmother’s Sunday brunch flashed across my mind – the way she’d layer ripe bananas, silky pudding, and crunchy vanilla wafers to create a dessert that smelled like childhood. That was the spark that turned a kitchen disaster into a mission: to craft the ultimate copycat Magnolia Banana Pudding that would make even my skeptical friends swoon.
I’ve spent the last week hunting down the secrets behind that iconic Magnolia brand. I tasted dozens of copycat versions, from the overly sweet to the oddly dry. None of them captured the balance of creamy, fruity, and crunchy in one bite. That’s why I’m so excited to share this version – it’s a symphony of textures, a dance of flavors, and a recipe that’s both approachable and indulgent. The aroma alone will have you walking into the kitchen and feeling like you’re stepping into a nostalgic kitchen of your own.
What sets this recipe apart isn’t just the ingredients. It’s the technique: we gently fold in the banana slices to preserve their shape, we toast the vanilla wafers just enough to bring out their nutty sweetness, and we finish the pudding with a delicate dusting of powdered sugar that melts into a silky glaze. The result? A dessert that’s thick enough to hold its own on a spoon but light enough to feel like a cloud. I dare you to taste this and not go back for seconds.
If you’re ready to replace that bland, store‑bought pudding with something that feels like a hug in a bowl, then let’s dive in. By the end of this post, you’ll know the exact steps, the hidden hacks, and the little tricks that make this banana pudding hands down the best version you’ll ever make at home.
What Makes This Version Stand Out
- Richness: The combination of whole milk, heavy cream, and butter creates a pudding that’s luxuriously smooth without feeling heavy.
- Texture: Fresh banana slices stay firm, and the toasted vanilla wafers add a satisfying crunch that contrasts the silky base.
- Flavor Depth: A splash of vanilla extract and a pinch of sea salt enhance the natural sweetness of the bananas, turning each bite into a layered experience.
- Authenticity: The recipe mirrors the commercial Magnolia pudding’s creamy consistency and caramelized edges, so you’ll get the exact same indulgence.
- Make‑Ahead Friendly: It can be assembled the night before and chilled, making it perfect for parties or a quick dessert after a long day.
- Ingredient Quality: Using fresh ripe bananas and high‑quality vanilla wafers ensures the flavor profile stays true and never feels artificial.
- Versatility: Swap vanilla wafers for chocolate cookies or add a sprinkle of cinnamon for a seasonal twist.
Alright, let’s break down exactly what goes into this masterpiece…
Inside the Ingredient List
The Flavor Base
The foundation of our pudding is the dairy blend: whole milk, heavy cream, and butter. The milk provides the body, the cream adds richness, and the butter lends a subtle sheen that makes the pudding feel indulgent. Skipping any of these will thin the texture, turning a luscious dessert into a watery mess. For a lighter version, substitute the heavy cream with half‑and‑half, but be prepared for a slightly less velvety mouthfeel.
The Sweetness Quotient
Sugar is the unsung hero that balances the tartness of bananas and the bitterness of toasted wafers. We use granulated sugar because it dissolves cleanly into the milk. If you’re watching your sugar intake, try a 1:1 blend of honey and white sugar; the honey will add a subtle floral note that complements the bananas.
The Texture Crew
Cornstarch is the secret agent that turns the milk mixture into a thick pudding. It’s essential for that silky mouthfeel. If you’re allergic to gluten, cornstarch is naturally gluten‑free, making this recipe safe for most diets. Remember, the cornstarch must be whisked into a cold liquid first to avoid clumping.
The Unexpected Star
Vanilla extract is the subtle star that ties all flavors together. A teaspoon is enough to fill the air with warm, aromatic sweetness. If you’re a fan of a stronger vanilla punch, swap the extract for a vanilla bean, splitting the seed and scraping it into the mixture. This adds a speckled, natural flavor that feels more authentic.
Everything's prepped? Good. Let's get into the real action…
The Method — Step by Step
- Begin by whisking together 2 cups of whole milk, 1 cup of heavy cream, and 1/2 cup of unsalted butter in a medium saucepan over medium heat. The butter should melt completely, creating a glossy base. This step is crucial; a dull base will lead to a flat pudding. When the mixture starts to steam, reduce the heat to low.
- In a separate bowl, combine 1 cup of granulated sugar, 3 tablespoons of cornstarch, and a pinch of sea salt. Gradually whisk in 1/2 cup of cold milk to make a smooth slurry. This pre‑mix ensures your pudding will be lump‑free. I dare you to taste this slurry; it should feel silky and free of grit.
- Slowly pour the cornstarch slurry into the warm milk mixture while whisking vigorously. The mixture should begin to thicken almost immediately. Keep whisking until the pudding reaches a thick, glossy consistency. If it’s still runny, let it simmer for an additional minute.
- Add 1 teaspoon of vanilla extract and 4 large eggs, one at a time, whisking after each addition. The eggs bind the pudding, giving it a silky texture. Watch for the pudding to become glossy and slightly thickened after each egg. This is the moment of truth.
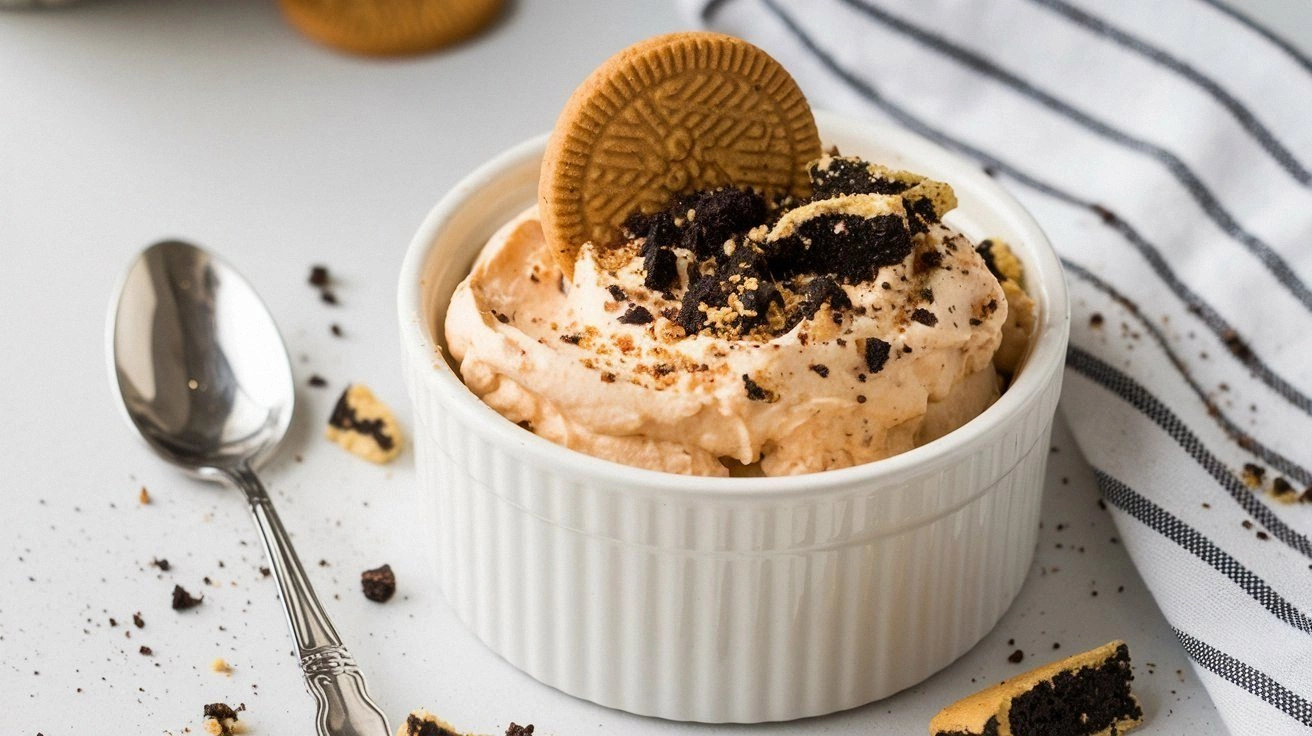
- Fold in 3 ripe banana slices, keeping them whole to maintain their shape. The bananas will soften slightly but retain a firm bite, creating a delightful contrast. The aroma at this point will be intoxicating – sweet, creamy, and buttery.
- Remove the saucepan from heat and let the mixture cool for about 5 minutes. This prevents the eggs from cooking in residual heat, which could give the pudding a rubbery texture. While cooling, toast 1 cup of vanilla wafers in a dry skillet over medium heat until golden brown, stirring constantly. This step caramelizes the sugars and brings out a nutty flavor.
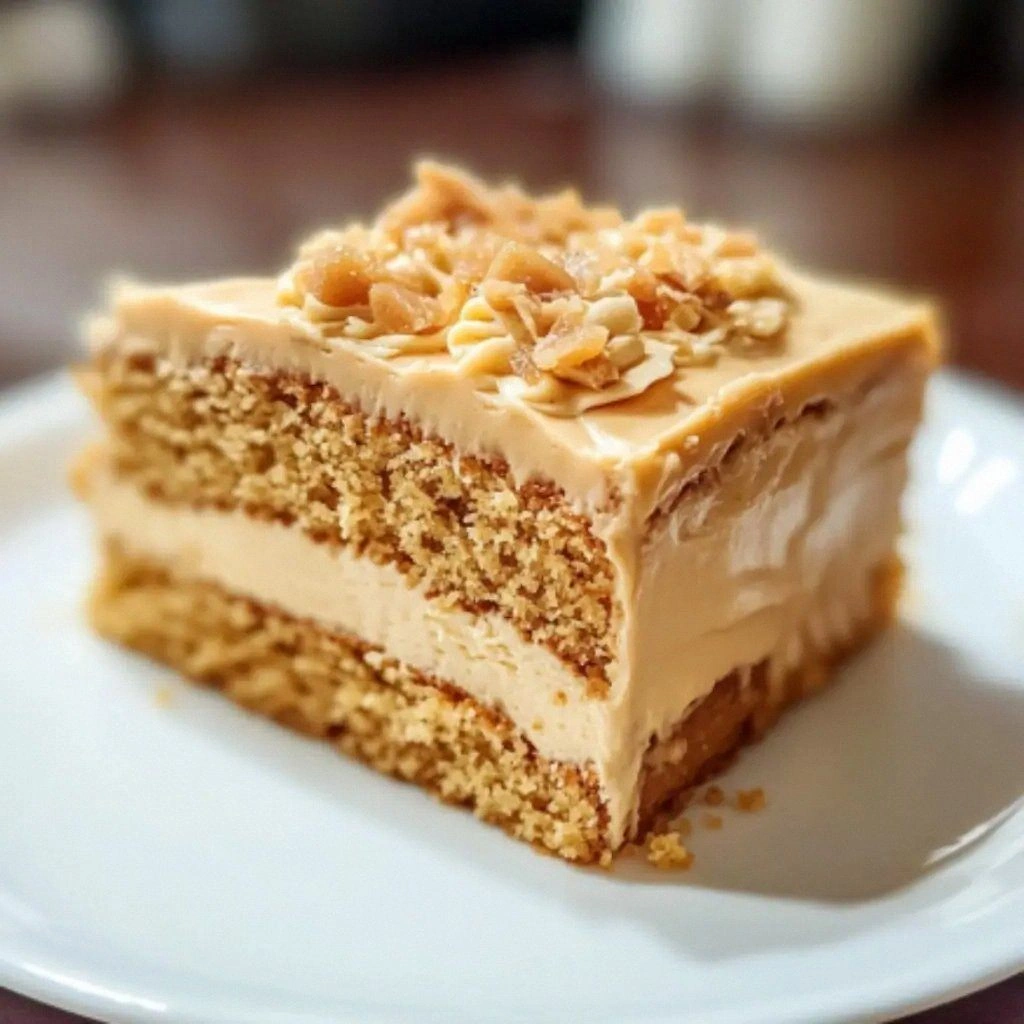
- Once the pudding has cooled, pour it into a 9x9 inch baking dish. Sprinkle the toasted wafers evenly over the top. The wafers should sink slightly into the pudding, creating layers of crunch.
- Refrigerate the pudding for at least 2 hours, or overnight if you’re planning a party. The chilling process allows the flavors to meld and the wafers to soften just enough to stay crunchy. The final product should look glossy and have a slight sheen from the butter.
- Before serving, dust the top with powdered sugar. This final touch adds a delicate sweetness and a visual appeal that makes the pudding look like a dessert from a high‑end bakery.
That's it — you did it. But hold on, I've got a few more tricks that'll take this to another level…
Insider Tricks for Flawless Results
The Temperature Rule Nobody Follows
The key to a silky pudding is maintaining a low simmer. If the mixture boils, the proteins in the eggs will seize, giving you a lumpy, rubbery texture. Keep the heat low and stir constantly. A good rule of thumb is to aim for a gentle bubble at the edges of the pot.
Why Your Nose Knows Best
Before adding the eggs, give the pudding a quick sniff. It should smell like warm milk and butter. If it smells off or has a raw eggy undertone, let it cool a bit. Your nose is a reliable indicator of the pudding’s readiness.
The 5-Minute Rest That Changes Everything
After pouring the pudding into the dish, let it sit for 5 minutes before refrigerating. This brief rest allows the surface to set slightly, preventing the wafers from sinking too deeply and creating a layered look.
The Perfect Dusting Technique
When dusting powdered sugar, use a fine sieve to avoid clumps. Hold the sieve over the top of the pudding and shake gently. The fine sugar will coat the surface evenly, giving a subtle sparkle.
The Secret to a Crispy Waffle Layer
If you prefer a crunchier wafer layer, toast them longer in the skillet, watching carefully to avoid burning. The extra toasting brings out a deeper caramel flavor that pairs beautifully with the creamy pudding.
Creative Twists and Variations
This recipe is a playground. Here are some of my favorite ways to switch things up:
Chocolate Chip Banana Bliss
Add 1/2 cup of semi‑sweet chocolate chips into the pudding mixture before pouring it into the dish. The chocolate melts into pockets of gooey delight, giving each spoonful a new dimension.
Cinnamon Swirl Surprise
Stir in 1 teaspoon of ground cinnamon with the sugar before whisking the slurry. The warm spice complements the banana’s sweetness and adds a cozy, autumnal feel.
Nutty Crunch Upgrade
Replace vanilla wafers with crushed pecans or toasted almonds. The nuts add a buttery crunch and a nutty aroma that pairs wonderfully with the creamy base.
Tropical Twist
Swap out the bananas for diced mango or pineapple chunks. The tropical fruit adds a bright, juicy contrast to the rich pudding.
Lemon‑Zest Refresh
Grate a teaspoon of lemon zest into the pudding mixture. The citrus brightness cuts through the sweetness, giving the dessert a fresh, lively finish.
Vegan Delight
Use coconut milk instead of dairy, and replace the eggs with flaxseed meal as described earlier. The result is a creamy, dairy‑free pudding that still delivers on flavor.
Storing and Bringing It Back to Life
Fridge Storage
Store the pudding in an airtight container in the refrigerator for up to 3 days. The wafers will stay crisp, and the pudding will remain silky. Before serving, give it a quick stir to re‑integrate any separation that may have occurred.
Freezer Friendly
For longer storage, place the pudding in a freezer‑safe container, leaving a little headspace. Freeze for up to 2 weeks. Thaw overnight in the refrigerator, then let it sit at room temperature for 10 minutes before serving to restore its creamy texture.
Best Reheating Method
If the pudding has hardened after refrigeration, gently warm it in a microwave on low power for 15–20 seconds, stirring halfway through. Alternatively, place the container in a bowl of warm water for a few minutes. Add a tiny splash of water before reheating to create steam, which keeps the pudding from drying out.