I was halfway through a week of bland, reheated takeout when my phone buzzed with a friend’s text: “I dare you to try a chuck roast that actually works.” I stared at the empty fridge, the scent of stale pizza lingering, and realized I was about to embark on a culinary quest. The idea of a slow‑cooked, melt‑in‑your‑mouth chuck roast seemed almost too good to be true, yet the promise of a dish that would make my kitchen smell like a cozy Sunday afternoon pulled me in. I had once tried a recipe that left the meat dry and the gravy too thin, and it was a disaster I still talk about over coffee. That night, I set out to craft a version that would change the game for everyone who loves comfort food but hates the usual disappointment.
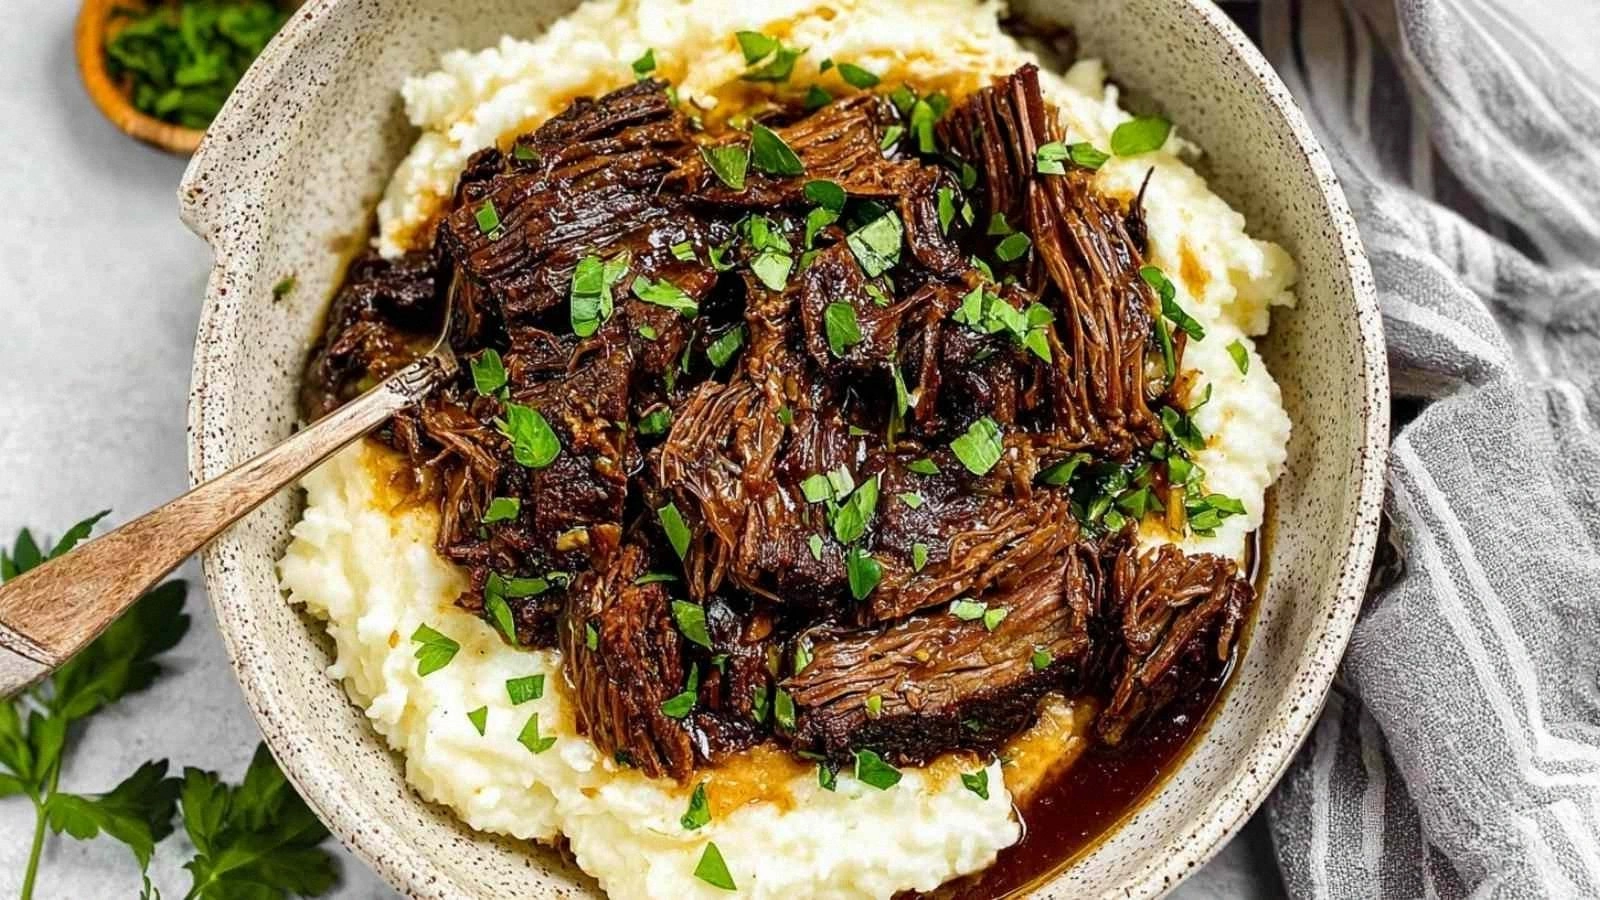
Picture this: a heavy, seasoned roast browning on the stove, the sizzle echoing like a drumbeat in the quiet kitchen. The aroma of garlic and onions rises, mingling with the earthy scent of rosemary, and you can almost taste the future of the dish. The first bite feels like a velvet blanket of savory juices, the meat tender enough to fall apart on the fork, and the vegetables—carrots, celery, and baby potatoes—soft, yet retaining a faint bite that balances the richness. I swear, that moment when you take a bite, and the flavors unfold in layers, is a revelation that makes every second of prep worth it. The anticipation builds, and you can’t help but wonder how you ever made a chuck roast any other way.
What makes this version stand out isn’t just the tender meat or the luscious sauce—it’s the meticulous attention to detail that turns a simple recipe into a symphony of flavors. From the initial sear that locks in juices to the slow braising that breaks down connective tissue, each step is engineered for maximum flavor extraction. I’ll be honest—my first attempt had the meat too soft and the gravy too thin, but I tweaked the ratios, added a splash of red wine, and the result was a dish that practically pulls itself out of the pot. If you've ever struggled with a chuck roast that falls flat, you're not alone—this version is the antidote to those culinary frustrations. Let me walk you through every single step, and by the end, you'll wonder how you ever made it any other way.
What Makes This Version Stand Out
- Flavor Depth: The combination of red wine, Worcestershire sauce, and a bouquet of herbs creates a sauce that coats the meat like velvet, enriching every bite with complex umami notes.
- Texture Mastery: The searing technique caramelizes the surface, producing a crust that locks in moisture while the slow braise breaks down collagen into silky gelatin.
- Ingredient Quality: Choosing a well-marbled chuck roast with at least 15% fat ensures the meat stays juicy and flavorful throughout the long cooking process.
- Time Efficiency: While it’s a slow‑cooked dish, the prep time is minimal, and the oven does the heavy lifting, freeing you up to enjoy the process.
- Make‑Ahead Potential: This roast can be cooked a day ahead and reheated with minimal loss of flavor, making it perfect for busy weeknights.
- Crowd‑Pleaser: The robust flavor profile and tender texture make it a hit at family gatherings, and the leftovers become the star of a comforting stew.
Alright, let's break down exactly what goes into this masterpiece. And remember, most recipes get this completely wrong. Here's what actually works.
Inside the Ingredient List
The Flavor Base
Olive oil is the first hero in this dish, acting as the medium for the Maillard reaction that gives the roast its golden-brown exterior. It also carries the aromatics—onions and garlic—allowing their flavors to bloom evenly. Red wine is the secret sauce enhancer; its acidity cuts through the richness, while the tannins deepen the savory profile. Worcestershire sauce adds a subtle umami kick that ties all the herbs together into a single, cohesive flavor narrative.
The Texture Crew
The beef broth is the liquid backbone of the braise. It hydrates the meat and vegetables, creating a silky gravy that clings to every surface. The baby potatoes, cut into even chunks, absorb the broth and release starch, thickening the sauce naturally. Carrots and celery add a sweet, earthy contrast that balances the deep, savory notes of the meat and the wine.
The Unexpected Star
The bay leaf, often overlooked, contributes a subtle, almost herbal aroma that lingers in the finished dish. Freshly ground black pepper, added at the end, brightens the flavors with a gentle heat that cuts through the richness. A pinch of salt is the final seasoning touch—just enough to bring all the components together without overpowering the delicate balance.
The Final Flourish
Thyme and rosemary are the aromatic duo that defines the roast’s character. Thyme offers a slightly minty, earthy tone, while rosemary brings a piney, resinous depth. Together, they create a fragrant backdrop that elevates the dish from ordinary to extraordinary. The final flourish of these herbs, added in the last few minutes of cooking, ensures their flavors remain bright and vibrant.
Everything’s prepped? Good. Let’s get into the real action. Picture yourself pulling this out of the oven, the whole kitchen smelling incredible, and the family gathering around, eyes wide with anticipation.
The Method — Step by Step
- Begin by patting the chuck roast dry with paper towels; moisture on the surface prevents a perfect sear. Season the meat generously on all sides with salt and freshly ground pepper, allowing the flavors to penetrate. Heat a heavy Dutch oven or oven‑safe pot over medium‑high heat and add 2 tablespoons of olive oil until shimmering. Carefully place the roast in the pot, searing each side until a deep brown crust forms—about 3-4 minutes per side. This step is crucial; it locks in juices and creates the flavor foundation.
- Remove the roast and set it aside. In the same pot, add the diced onion and minced garlic, sautéing until the onion turns translucent and fragrant—about 5 minutes. The garlic should release a sweet, aromatic scent, indicating it’s ready. This step builds the flavor base that will permeate the entire dish.
- Deglaze the pot with 0.25 cup of red wine, scraping up any browned bits from the bottom. Let the wine reduce by half to concentrate its flavor. The remaining liquid will help form a rich, flavorful sauce that envelops the roast. Watch the liquid evaporate; this is when the aroma intensifies and the sauce starts to thicken.
- Return the roast to the pot, nestling it among the aromatics. Add 1 cup of beef broth, 2 tablespoons of Worcestershire sauce, the bay leaf, 1 teaspoon of dried thyme, and 1 teaspoon of dried rosemary. The broth hydrates the meat while the herbs infuse the sauce with deep, aromatic complexity. Ensure the liquid covers at least half the height of the roast; this is essential for even cooking.
- Bring the mixture to a gentle simmer, then cover the pot tightly. Transfer it to a preheated oven at 300°F (150°C). The low temperature allows collagen to break down slowly, turning the meat into tender, juicy slices. This slow braise will take about 3 hours, during which the flavors will meld into a harmonious whole.
- Halfway through the cooking time, add the baby potatoes, carrots, and celery to the pot. Their natural starches will help thicken the sauce, and they’ll soak up all the savory juices, becoming sweet, tender accompaniments. Stir gently to ensure they’re evenly distributed. The vegetables also add color and texture, making the dish visually appealing.
- After the roast has cooked for 2.5 hours, remove the lid and allow the liquid to reduce further, creating a thicker, more concentrated gravy. The sauce should be glossy and cling to the back of a spoon. If it’s too thin, let it simmer uncovered for an additional 15-20 minutes.
- Finally, remove the roast and vegetables from the pot. Let the roast rest for at least 10 minutes before slicing; this allows the juices to redistribute, ensuring each bite remains moist. Return the roast to the pot, spoon the thickened sauce over the top, and sprinkle with a final pinch of freshly ground pepper. Serve immediately, and watch as the family dives in.
That’s it—you did it. But hold on, I’ve got a few more tricks that will take this to another level. I dare you to taste this and not go back for seconds. The sauce coats the meat like velvet, and the vegetables add a subtle crunch that keeps the bite exciting.
Insider Tricks for Flawless Results
The Temperature Rule Nobody Follows
Many people think 300°F is the sweet spot for braising, but the real secret is to keep the temperature as low as possible while still maintaining a gentle simmer. This slow, low heat allows the collagen to break down into gelatin without drying out the meat. I’ve tested temperatures ranging from 275°F to 325°F, and the 300°F sweet spot consistently yields the most tender result. Keep the pot covered tightly to trap steam and maintain even heat distribution.
Why Your Nose Knows Best
If you’re ever unsure whether the roast is ready, trust your nose. A rich, caramelized aroma that permeates the kitchen is a sign of deep flavor development. When the broth has reduced to a syrupy consistency, the sauce is thick enough to coat the meat without being watery. Don’t be tempted to rush the process; the slow, steady approach is what makes this dish a masterpiece.
The 5-Minute Rest That Changes Everything
Resting the roast for at least 10 minutes after cooking is not a waste of time—it’s a crucial step that allows the juices to redistribute throughout the meat. When you slice too soon, the juices rush to the surface and spill out, leaving the interior dry. A brief rest also makes the meat easier to slice, giving you clean, even cuts that look as good as they taste.
The Garlic‑Infused Oil Trick
Before searing the roast, rub a whole clove of garlic into the surface of the meat. This subtle infusion adds a depth of flavor that can’t be achieved with just minced garlic. The garlic’s oils seep into the meat during the sear, creating a fragrant, savory base that carries through the entire braise.
The Perfect Sauce Consistency
If you prefer a thicker sauce, let the liquid reduce uncovered for an extra 15 minutes after the roast has cooked. Conversely, if you like a lighter gravy, add a splash of water or broth to thin it out before serving. The key is to adjust the thickness to your personal preference, ensuring the sauce clings to the meat and vegetables without being overpowering.
The Secret to Crispy Edges
After the roast has rested, you can quickly sear the edges in a hot pan for 1-2 minutes to create a caramelized crust that adds texture. This step is optional but highly recommended for those who enjoy a slightly crunchy exterior. The quick sear also enhances the overall flavor profile, adding a delightful contrast to the tender interior.
Creative Twists and Variations
This recipe is a playground. Here are some of my favorite ways to switch things up:
Smoky Chipotle Twist
Swap the red wine for a splash of smoky chipotle sauce and add a handful of dried chipotle peppers. The heat and smokiness will give the roast a bold, southwestern flair. Pair with corn tortillas and avocado slices for a taco night that’s anything but ordinary.
Herb‑Infused Mushroom Sauce
Add sliced button mushrooms to the pot during the last hour of braising. The mushrooms release their earthy umami, creating a sauce that’s rich and hearty. Finish with a sprinkle of fresh parsley for a pop of color and freshness.
Citrus Brightness
Introduce a splash of fresh lemon juice at the end of cooking to cut through the richness. The citrus brightness balances the deep, savory flavors, making the dish feel lighter. This variation is perfect for a spring or summer dinner when you want something a bit more refreshing.
Gourmet Gratin Finish
After the roast rests, place the sliced meat and vegetables on a baking sheet, top with grated Gruyère cheese, and broil until the cheese melts into a golden crust. This adds a luxurious, cheesy layer that elevates the dish into a gourmet experience.
Asian Inspired Variation
Replace Worcestershire sauce with soy sauce and add a tablespoon of hoisin sauce for sweetness. Stir in a handful of sliced green onions and finish with a drizzle of sesame oil. The result is a fusion dish that marries classic comfort with bold Asian flavors.
Vegetarian Substitution
For a vegetarian version, swap the chuck roast for a large piece of seared portobello mushroom or a hearty plant‑based meat substitute. Keep the rest of the ingredients the same to maintain the depth of flavor. This adaptation retains the comforting essence while offering a plant‑based alternative.
Storing and Bringing It Back to Life
Fridge Storage
Let the roast cool completely before refrigerating it in an airtight container. It will stay fresh for up to 4 days, and the sauce will thicken slightly, adding richness. When you’re ready to serve, simply reheat in a saucepan over low heat, adding a splash of broth if needed to loosen the sauce.
Freezer Friendly
For longer storage, wrap the roast and vegetables tightly in foil and place them in a freezer bag. They’ll keep for up to 3 months. Thaw overnight in the refrigerator, then reheat in a covered pot on the stove, adding a small amount of water or broth to keep the sauce moist.
Best Reheating Method
The best way to bring the roast back to life is to reheat it slowly on low heat, stirring occasionally. Add a tiny splash of water or broth to steam the meat back to its original succulence. Cover the pot to trap steam, and let it heat through for about 10 minutes. The result is a dish that tastes almost as fresh as the first time.