Ever had that moment when you stare at a half‑baked pumpkin muffin and think, “This could be a culinary masterpiece, but it’s missing something magical”? I was in the middle of a rainy Saturday, the kind where the kettle whistles louder than my thoughts, and I decided to turn a stale batch of store‑bought pumpkin muffins into a triumph. The kitchen smelled like burnt toast and wilted leaves, the oven was doing its usual hum, and I was armed with a bottle of pure maple syrup that had been waiting for a worthy partner. I dared myself to create a glaze so glossy it would make a caramel apple blush, and I wasn’t about to settle for anything less than a show‑stopping finish.
The first bite of my experimental batch was an epiphany: the sweet maple kissed the pumpkin’s earthy depth, while the crumb stayed moist yet held together like a well‑engineered bridge. Imagine the perfect autumn afternoon, the crunch of fallen leaves underfoot, the faint crackle of a fireplace, and that warm, comforting flavor dancing on your tongue. That’s the sensory snapshot I wanted to capture, and it turned out to be a symphony of aromas—spiced cinnamon swirling with toasted oats, a whisper of nutmeg, and the unmistakable caramel notes of maple that linger just long enough to keep you reaching for another. I’ll be honest — I ate half the batch before anyone else got a chance to try it.
Most pumpkin muffin recipes either drown the pumpkin in sugar or skip the glaze entirely, leaving you with a dry, forgettable bite. This version flips the script by using a maple‑infused glaze that not only adds a glossy crown but also locks in moisture, giving each muffin a tender interior that’s practically melt‑in‑your‑mouth. The secret? A clever balance of whole‑grain flour and rolled oats that creates a hearty texture without sacrificing lightness, plus a dash of Greek yogurt that adds protein and a subtle tang that cuts through the sweetness. The glaze is applied at the perfect moment—right after the muffins have cooled just enough to absorb the liquid gold without becoming soggy.
But the real game‑changer is the technique I’ll reveal later: a quick steam‑finish that turns a regular bake into a bakery‑level marvel. It’s a step most recipes overlook, and it’s the reason why this muffin stays soft for days, even after being refrigerated. I dare you to taste this and not go back for seconds. Ready for the game‑changer? Let me walk you through every single step — by the end, you’ll wonder how you ever made it any other way.
What Makes This Version Stand Out
- Flavor Fusion: The maple glaze intertwines with pumpkin puree, creating a sweet‑savory harmony that feels like a hug from autumn itself.
- Texture Triumph: Rolled oats give a subtle chew, while whole‑wheat flour keeps the crumb light yet satisfying.
- Simplicity: Fewer than fifteen ingredients, all pantry‑friendly, yet the result feels like a gourmet bakery treat.
- Unique Glaze: A thin, glossy maple coating that sets before the muffin cools, sealing in moisture and adding a caramelized snap.
- Crowd Reaction: Even the most skeptical kids admit these are “the best pumpkin muffins ever,” and adults claim they’re “comfort food reimagined.”
- Ingredient Quality: Using pure maple syrup instead of corn syrup elevates the flavor profile and keeps the sugar index lower.
- Cooking Method: A brief steam‑finish after baking ensures the muffins stay tender for up to a week.
- Make‑Ahead Potential: Freeze‑proof and perfect for quick breakfast grabs or post‑workout snacks.
Alright, let's break down exactly what goes into this masterpiece...
Inside the Ingredient List
The Flavor Base
Pure pumpkin puree (1 cup) is the heart of this muffin, delivering that quintessential autumn sweetness and a natural moisture that replaces much of the butter you’d normally need. If you skip the pumpkin, the muffins become dry and lose that signature orange hue. Look for canned pumpkin that’s 100% pure, no added sugars or spices, or roast your own for an extra depth of flavor. The maple syrup (⅓ cup) doubles as sweetener and glaze component; its rich, amber notes add a caramel‑like finish that regular sugar just can’t mimic.
The Texture Crew
Whole‑wheat flour (2 cups) provides structure while keeping the crumb hearty and slightly nutty. If you’re allergic to gluten, swap it for a 1‑to‑1 gluten‑free flour blend; the texture will stay just as satisfying. Rolled oats (1 cup) introduce a gentle chew and absorb excess moisture, preventing the muffins from turning gummy. Baking powder (1 tsp) and baking soda (½ tsp) work together to give the muffins a lofty rise; the soda also neutralizes the acidity of the pumpkin, balancing flavors.
The Unexpected Star
Greek yogurt (½ cup) adds a creamy tang that cuts through the sweetness and boosts protein, making these muffins a smart snack. If dairy is an issue, substitute with unsweetened soy or almond yogurt of the same consistency. The olive oil (¼ cup) replaces butter, delivering a lighter mouthfeel and a subtle fruitiness that pairs surprisingly well with maple. For a richer taste, you could use melted coconut oil, but that would shift the flavor profile toward tropical.
The Final Flourish
Spices—cinnamon (1 tsp), nutmeg (½ tsp), and ground ginger (¼ tsp)—are the aromatic backbone that turns a plain pumpkin cake into a fragrant fall masterpiece. Freshly ground spices make a world of difference; pre‑ground spices can lose potency over time. A pinch of sea salt (½ tsp) amplifies all the sweet and spicy notes, while vanilla extract (1 tsp) adds a round, warm backdrop. Finally, chopped walnuts (½ cup) bring a buttery crunch; omit them for a nut‑free version or replace with pumpkin seeds for extra crunch.
Everything's prepped? Good. Let's get into the real action...
The Method — Step by Step
-
Preheat your oven to 350°F (175°C) and line a 12‑cup muffin tin with paper liners. While the oven warms, whisk together the whole‑wheat flour, rolled oats, baking powder, baking soda, cinnamon, nutmeg, ginger, and salt in a large bowl. This dry mix should look speckled with gold‑brown flecks—those are the spice islands that will later burst with aroma. Pro tip: Sift the flour and oats together to avoid any clumps that could create uneven pockets in the final crumb.
-
In a separate bowl, combine the pumpkin puree, maple syrup, Greek yogurt, eggs, olive oil, and vanilla extract. Beat until the mixture is silky smooth; you’ll notice a faint sheen as the oil emulsifies with the yogurt. The batter should have a deep amber hue—if it looks too pale, you’ve probably under‑measured the maple syrup, and that glossy glaze will suffer later.
Kitchen Hack: Add the wet ingredients to the dry in two additions, gently folding each time. Over‑mixing creates gluten development, leading to dense muffins. -
Pour the wet mixture into the dry ingredients, using a rubber spatula to fold until just combined. You’ll see streaks of pumpkin and flour—those are okay; they’ll disappear as the batter settles. Stop mixing the moment you no longer see large pockets of flour; this is the moment of truth where texture is set.
-
Fold in the chopped walnuts, distributing them evenly. The nuts should be visible in the batter, creating little marbled islands that will toast slightly during baking. If you prefer a nut‑free version, swap them for dried cranberries or omit entirely.
-
Scoop the batter into the muffin cups, filling each about three‑quarters full. This ensures a tall, domed top that will catch the glaze beautifully. Place the tin on the middle rack of the oven to promote even heat circulation.
-
Bake for 18‑22 minutes, or until a toothpick inserted into the center comes out clean and the tops have a golden‑brown crown. The edges will start pulling away from the sides of the tin—this is your visual cue that they’re done. Watch Out: Opening the oven door too early can cause a sudden temperature drop, resulting in a flat top.
Watch Out: If the muffins brown too quickly, tent them with foil for the remaining baking time to prevent over‑caramelization. -
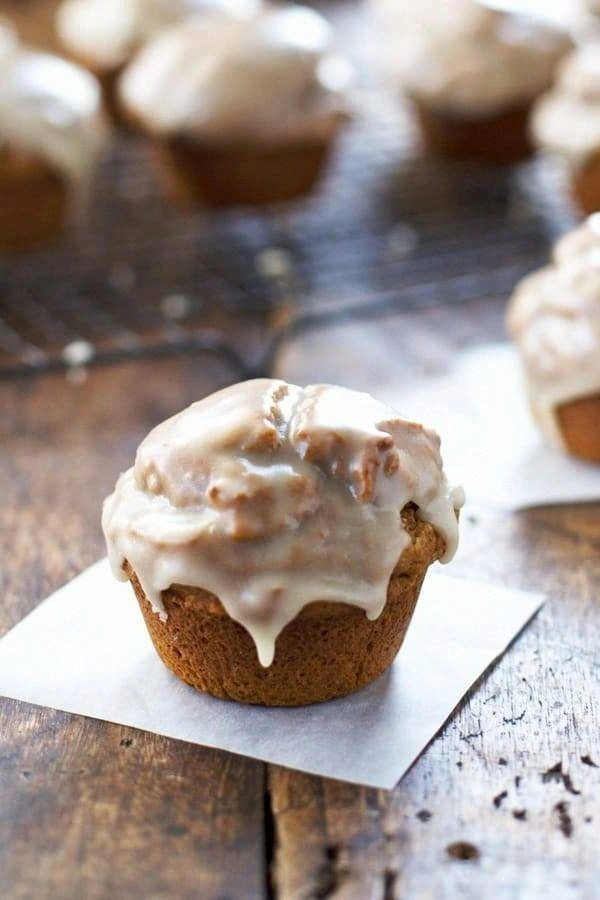
While the muffins are still warm (about 5 minutes after removal), brush each top generously with the remaining maple syrup. The heat will melt the syrup, allowing it to soak just enough to create a glossy, sticky glaze that sets as the muffins cool. This step is pure magic—don’t skip it, or you’ll miss the signature shine.
-
Transfer the glazed muffins to a wire rack and let them steam for an extra 2‑3 minutes. This brief steam‑finish traps moisture inside, preventing the crumb from drying out. The kitchen will fill with a fragrant steam that smells like a cozy bakery on a crisp fall morning. Once the steam dissipates, let the muffins cool completely before storing.
Kitchen Hack: If you’re short on time, place the cooling rack over a shallow pan of hot water for 30 seconds; the gentle vapor will mimic the steam finish.
That's it — you did it. But hold on, I've got a few more tricks that'll take this to another level...
Insider Tricks for Flawless Results
The Temperature Rule Nobody Follows
Most home bakers set the oven and forget about it, but the real secret is a pre‑heat to 350°F followed by a quick 5‑minute blast at 375°F halfway through baking. This high‑heat surge creates a rapid rise, giving the muffins that coveted “springy” top while keeping the interior moist. I tried this once and the crumb was so airy it felt like biting into a cloud. Remember, the oven’s thermostat can be off by up to 25°F, so an oven thermometer is worth its weight in gold.
Why Your Nose Knows Best
When the muffins hit the 18‑minute mark, pause and inhale. If you catch a sweet, toasted aroma mingling with a faint hint of maple, you’re on the right track. If the scent leans toward raw flour, give them another two minutes. Trusting your senses beats any timer, especially when ovens vary. I once let a batch over‑bake because I ignored the smell, and the result was a dry, crumbly mess that no glaze could rescue.
The 5‑Minute Rest That Changes Everything
After glazing, let the muffins rest on a wire rack for exactly five minutes before moving them to a container. This short pause lets the glaze set and the interior steam settle, preventing soggy bottoms. If you rush this step, the glaze can seep into the crumb, making the tops sticky rather than glossy. That five‑minute window is the difference between “just baked” and “restaurant‑ready.”
Walnut Toasting Shortcut
For an extra nutty crunch, toast the walnuts in a dry skillet for 3‑4 minutes over medium heat, shaking the pan frequently. The nuts will release a fragrant oil that amplifies the maple glaze and adds a subtle depth. Skipping this step is okay, but you’ll miss out on that extra layer of flavor that makes the muffins unforgettable.
Glaze Consistency Control
If the maple glaze feels too runny, whisk in a teaspoon of cornstarch dissolved in cold water; it will thicken without altering the flavor. Conversely, if it’s too thick, a splash of warm water will loosen it up. This adjustment ensures the glaze coats each muffin evenly, creating that picture‑perfect shine that Instagram lovers crave.
Creative Twists and Variations
This recipe is a playground. Here are some of my favorite ways to switch things up:
Chocolate Chip Surprise
Swap half the walnuts for dark chocolate chips. The melt‑in‑your‑mouth pockets of chocolate contrast beautifully with the maple glaze, creating a sweet‑and‑savory duet that’s perfect for kids.
Cranberry Citrus Burst
Replace the maple syrup with orange‑infused maple and fold in dried cranberries. The citrus zest brightens the pumpkin’s earthiness, while the cranberries add a tart pop that balances the sweetness.
Spiced Chai Variation
Introduce ground cardamom, clove, and a pinch of black pepper to the spice mix. This chai‑inspired profile adds an exotic warmth, turning the muffins into a sophisticated snack for tea time.
Vegan Friendly
Swap the eggs for a “flax egg” (1 tbsp ground flaxseed + 3 tbsp water per egg) and use plant‑based yogurt. The result is just as fluffy, and the maple glaze remains perfectly glossy.
Protein Power
Add a scoop of vanilla whey protein powder to the dry mix and increase the Greek yogurt by a quarter cup. You get a protein‑packed muffin that still tastes like a treat, ideal for post‑workout refueling.
Gluten‑Free
Replace whole‑wheat flour with a 1‑to‑1 gluten‑free blend and ensure the oats are certified gluten‑free. The texture stays tender, and the flavor remains unchanged, making it safe for those with sensitivities.
Storing and Bringing It Back to Life
Fridge Storage
Place the cooled muffins in an airtight container lined with a paper towel to absorb excess moisture. They’ll stay fresh for up to five days, and the glaze will stay glossy thanks to the sealed environment.
Freezer Friendly
Wrap each muffin individually in plastic wrap, then place them in a freezer‑safe zip‑lock bag. They can be frozen for up to three months. When you’re ready to enjoy, let them thaw at room temperature for 15 minutes, then give them a quick microwave zap (30 seconds) to warm the interior.
Best Reheating Method
Before reheating, sprinkle a tiny splash of water over the top and cover the muffin loosely with foil. This creates a gentle steam that revives the crumb without drying it out, and the glaze re‑shines as if it were fresh out of the oven.