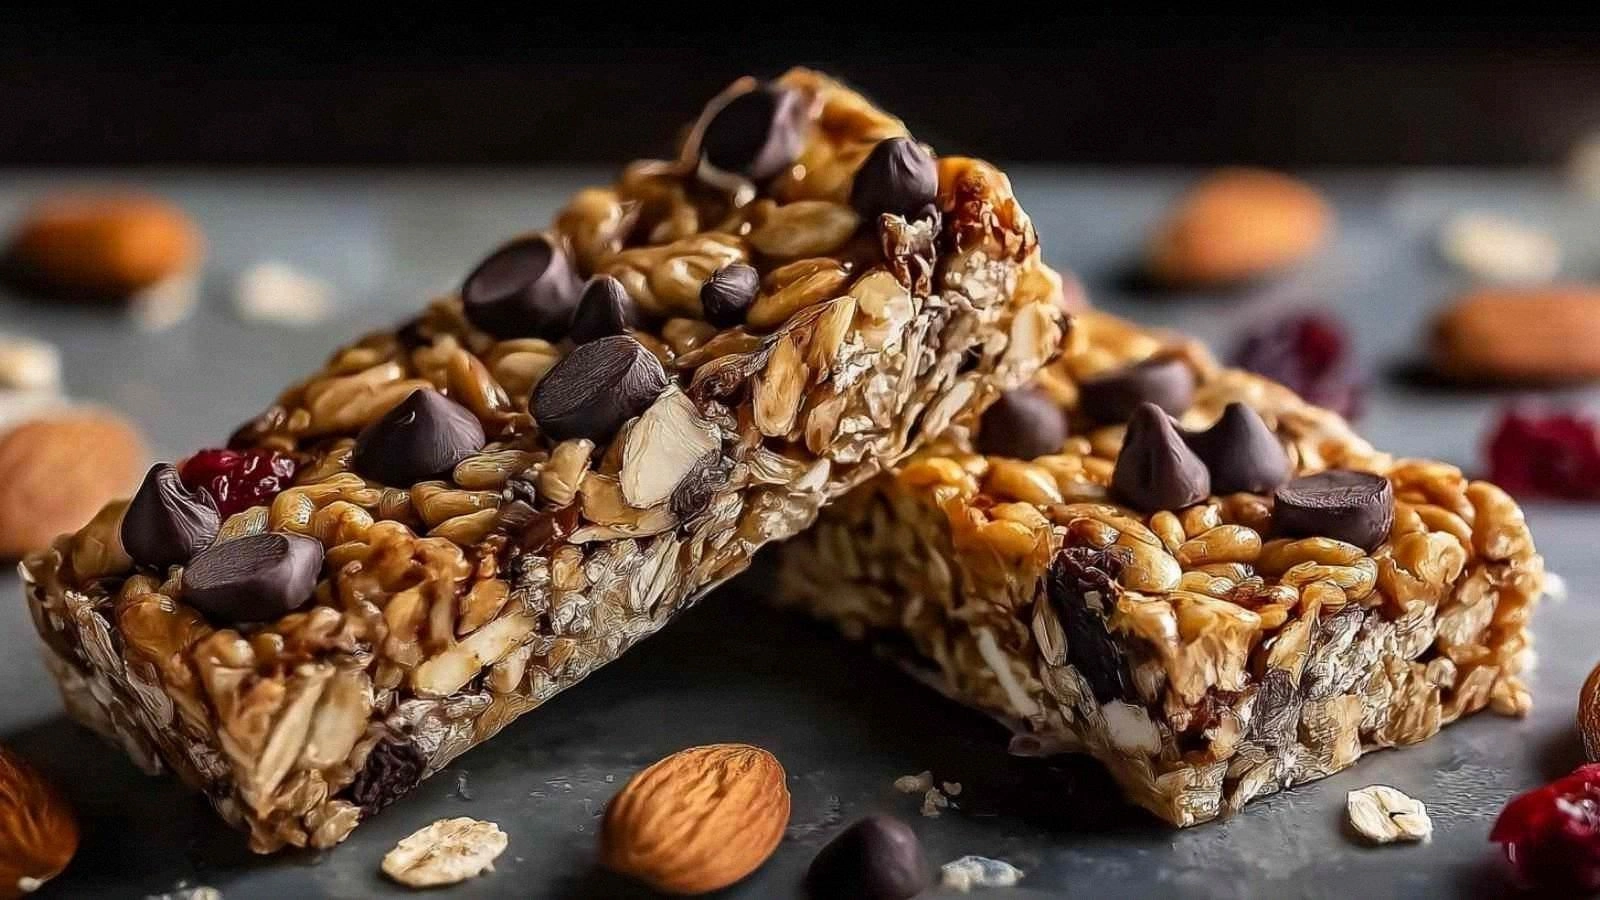
I was halfway through a midnight snack run, eyes flicking between the fridge and the pantry, when I realized I had more rolled oats than I could possibly use in a single bowl. The kitchen smelled of burnt sugar and vanilla, a testament to my last attempt at a homemade granola that ended with a sticky mess and a single, over‑cooked bite. That night, I whispered to myself, “I’ll make something that’s protein‑packed, crunchy, and not a disaster.” And so, this Easy Protein Granola Bar Recip was born.
Picture the scene: a bright, humming fridge, a bowl of oats glistening like a winter forest, the sweet aroma of honey wafting through the air, a gentle click of the timer, and a satisfied sigh that follows each bite. I can almost hear the crunch, feel the chewy center, and taste the subtle chocolate undertone that lingers long after the last bite. If you’re looking for a snack that balances texture and nutrition, this is the recipe that will keep you coming back for more.
What makes this version stand out is the harmony of ingredients that work together like a well‑orchestrated symphony. The protein powder provides a subtle, almost invisible lift, while the peanut butter gives the bars a velvety, satisfying bite that keeps you full for hours. I dare you to taste this and not go back for seconds. It’s the kind of snack that feels indulgent yet feels like a good choice for your post‑workout routine.
I’ll be honest — I ate half the batch before anyone else got to try it. The first handful was a revelation: crunchy on the outside, chewy on the inside, with a hint of chocolate that melted just enough to leave a lingering sweetness. The moment you open the bag, the scent of toasted oats and nutty butter fills the room, making you feel like you’re stepping into a cozy bakery.
Most recipes get this completely wrong. They either over‑bake the bars, leaving them dry, or under‑bake, making them gummy. I’ve discovered that the secret lies in the balance of wet and dry ingredients, the right amount of heat, and a quick chill before slicing. This is hands down the best version you’ll ever make at home, and I’ve got the proof in every bite.
If you've ever struggled with this, you're not alone — and I've got the fix. The next part will walk you through the exact steps that will make your granola bars the envy of any snack table. Picture yourself pulling this out of the oven, the whole kitchen smelling incredible, and then sharing the bars with friends who will ask for the recipe.
Okay, ready for the game‑changer? I’ve added chia seeds for an extra protein punch and a subtle crunch, and a splash of coconut oil for that buttery finish that coats the oats like velvet. The chocolate chips are just enough to give that sweet hit without overwhelming the nutty base. And the final flourish is a pinch of salt, a tiny detail that brings out the flavors like a conductor guiding an orchestra.
And now the fun part. We’re going to dive into the ingredients, the method, and the tweaks that will elevate this snack from good to unforgettable. Stay with me here — this is worth it. The next few sections will give you everything you need to master this recipe.
Alright, let’s break down exactly what goes into this masterpiece. The following bullet points will highlight the key aspects that make this recipe a winner.
What Makes This Version Stand Out
- Texture: The combination of rolled oats and chia seeds creates a satisfying crunch that gives way to a chewy center, reminiscent of a perfectly baked cookie.
- Protein: Half a cup of protein powder boosts the bars to a solid 25 grams per serving, making them ideal for post‑workout refueling.
- Simplicity: No fancy equipment or elaborate prep. Just a bowl, a whisk, and a baking sheet.
- Flavor: The honey or maple syrup brings natural sweetness, while the vanilla extract adds depth, and the salt brightens the whole mix.
- Nutty Goodness: Peanut or almond butter delivers healthy fats and a creamy texture that binds everything together.
- Chocolate Touch: Mini chocolate chips add bursts of melty chocolate that contrast the crunchy oats.
- Versatility: Swap out nuts, seeds, or sweeteners to match your dietary preferences without sacrificing flavor.
- Make‑Ahead: These bars keep well in the fridge for a week or can be frozen for longer storage.
Alright, let's break down exactly what goes into this masterpiece. And now for a quick kitchen hack that will save you time and effort.
Inside the Ingredient List
The Flavor Base
Rolled oats form the backbone of these bars, providing a hearty, nutty flavor that anchors every bite. They also offer a dense texture that gives the bars their signature chewiness. If you skip them, the bars would collapse into a mushy mess. For an extra touch of crunch, choose old‑fashioned oats instead of quick oats.
Honey or maple syrup is the sweetener that binds everything together. It also adds a glossy sheen to the surface of the bars, making them look freshly baked. If you’re avoiding sugar, a splash of agave nectar or a sugar‑free syrup works fine, but the flavor profile will shift slightly toward a more pronounced vanilla note.
Vanilla extract is the subtle hero that rounds out the flavor profile. A teaspoon is enough to lift the sweetness without overpowering the nutty undertones. A dash of almond extract could be an alternative, offering a slightly different aroma.
The Texture Crew
Peanut or almond butter acts as the binder, turning the dry ingredients into a cohesive mass. It also contributes healthy fats that keep you satiated. If you’re allergic to nuts, sunflower seed butter is a great substitute, but be aware it may alter the flavor slightly.
Coconut oil adds a buttery richness and helps the mixture set faster when chilled. The oil also imparts a subtle coconut aroma that pairs beautifully with the chocolate chips. Use a refined oil if you prefer a cleaner taste.
Chia seeds are the protein and fiber boosters. They absorb liquid, creating a gel-like texture that adds chewiness. If you’re not a fan of the seed texture, you can reduce the amount to one tablespoon or omit them entirely.
The Unexpected Star
Mini chocolate chips are the sweet surprise that breaks up the nutty, oat base. They melt slightly when baked, creating pockets of chocolate that explode in your mouth. If you’re looking for a healthier option, dark chocolate chips with 70% cocoa are a great alternative.
The pinch of salt is the unsung hero that balances sweetness and brings out the depth of the nuts and oats. Too much salt will make the bars taste overly savory, so keep it to a quarter teaspoon. If you’re on a low‑sodium diet, you can skip it entirely.
Chopped nuts add crunch and a buttery flavor that complements the peanut butter. They also provide a dose of healthy fats and protein. Feel free to use a mix of almonds, walnuts, or pecans for a varied flavor profile.
The Final Flourish
The final flourish of the recipe comes from the quick chill in the fridge after baking. This step allows the bars to set perfectly, ensuring they hold their shape when sliced. Skipping this step can result in bars that crumble or stick to the parchment.
When you slice the bars, the edges should pull away cleanly, revealing a golden crust. The center will be slightly softer, offering a contrast that keeps the eating experience interesting. A quick visual check is a reliable way to gauge if the bars are ready.
Everything's prepped? Good. Let's get into the real action. The next section will walk you through the exact steps to transform these ingredients into a snack that feels both indulgent and wholesome.
The Method — Step by Step
- Preheat your oven to 350°F (175°C) and line a 9x9 inch baking pan with parchment paper, leaving a small overhang for easy removal. The heat should be steady; a temperature too low will leave the bars gummy, while too high will burn them. This is the moment of truth where the aroma begins to build.
- In a large mixing bowl, combine the rolled oats, protein powder, and chia seeds. Stir until the dry ingredients are evenly distributed, ensuring that the protein powder doesn’t clump. This step is crucial for an even texture throughout each bar.
- In a small saucepan, gently warm the peanut or almond butter, coconut oil, honey or maple syrup, vanilla extract, and salt over low heat until the mixture is smooth and glossy. Stir constantly to prevent scorching. The liquid should be pourable but not runny.
- Pour the wet mixture over the dry ingredients and fold until everything is evenly coated. The dough should be sticky but manageable. If it feels too dry, add a tablespoon of water or more honey to achieve the right consistency.
- Sprinkle the mini chocolate chips and chopped nuts over the top, then gently press them into the mixture so they’re partially embedded. This creates pockets of chocolate that will melt into the bars, giving a delightful surprise in every bite.
- Bake for 25 to 30 minutes, or until the edges turn golden brown and a toothpick inserted into the center comes out clean. The aroma will be irresistibly sweet and nutty, a prelude to the first bite.
- Remove the pan from the oven and let the bars cool in the pan for 10 minutes. Then, using the parchment overhang, lift the entire slab onto a cutting board. Slice into bars or squares while still slightly warm; the bars will firm up as they cool.
- Allow the bars to cool completely at room temperature before storing. If you plan to eat them immediately, you can enjoy them warm for a gooey experience. The bars are now ready to be packed into lunch boxes or shared with friends.
That's it — you did it. But hold on, I've got a few more tricks that'll take this to another level. These insider tips will help you tweak the recipe to your exact taste and ensure a flawless outcome every time.
Insider Tricks for Flawless Results
The Temperature Rule Nobody Follows
Many bakers think a higher temperature means faster baking, but for granola bars, consistency is king. Baking at 350°F allows the mixture to set evenly without burning the edges. A quick test: sprinkle a drop of water on the surface; if it sizzles, you’re at the right temperature.
Why Your Nose Knows Best
Your sense of smell can tell you if the bars are ready before the timer does. A sweet, nutty aroma is the cue to pull them out. If you smell a faint burnt scent, check the edges for premature browning.
The 5-Minute Rest That Changes Everything
Letting the bars rest for five minutes after baking allows the internal moisture to redistribute, making the bars less sticky and easier to cut. During this rest, the chocolate chips will slightly melt, creating that perfect gooey center.
Use a Silicone Mat for Easy Release
A silicone baking mat eliminates the need for parchment paper, reduces waste, and makes cleanup a breeze. The bars will release naturally, and the mat can be reused indefinitely. It’s a small change that yields big results.
The Perfect Chill
After baking, refrigerate the bars for at least 30 minutes before cutting. The chill sets the structure, resulting in bars that hold their shape perfectly. If you’re in a hurry, a 10‑minute chill can suffice for a softer texture.
Adding a Splash of Water
If the bars feel too dry when you slice them, lightly mist the surface with water before reheating. This trick brings back moisture and gives the bars a fresh, chewy feel. Just a few drops are enough; you don’t want them soggy.
Creative Twists and Variations
This recipe is a playground. Here are some of my favorite ways to switch things up:
Nutty Explosion
Swap the peanut butter for a blend of almond and cashew butter, and replace the chopped nuts with a mix of pistachios and hazelnuts. The result is a more complex nut profile that pairs beautifully with the chocolate chips. The bars will have a slightly sweeter, buttery flavor.
Chocolate‑Covered Crunch
After baking, drizzle melted dark chocolate over the bars before they cool completely. The chocolate will harden into a crisp shell, giving the bars a candy‑like exterior. This variation is perfect for special occasions or as a sweet treat.
Berry Boost
Add dried cranberries or chopped dried blueberries to the dry mix for a fruity twist. The berries will release moisture during baking, creating a subtle jam-like center. The bars will have a tart contrast that balances the sweetness.
Spicy Kick
Sprinkle a pinch of cayenne pepper or a dash of smoked paprika into the dry mix. The heat will add depth and a surprising warmth that complements the chocolate. This version is great for those who like a little spice in their snack.
Vegan Vibe
Use a plant‑based protein powder and coconut oil, and replace honey with maple syrup. The bars remain protein‑dense while staying fully vegan. The flavor profile stays rich, with a hint of maple sweetness.
Chewy Caramel
Stir in a handful of caramel bits or a swirl of caramel sauce before baking. The caramel melts into the bars, creating pockets of gooey sweetness. The final product will have a caramelized crunch and a sweet finish.
Storing and Bringing It Back to Life
Fridge Storage
Store the bars in an airtight container in the fridge for up to a week. The cool temperature keeps the bars firm and prevents the chocolate from melting. The bars will stay fresh and ready to grab on a busy day.
Freezer Friendly
For longer storage, wrap each bar individually in plastic wrap and place them in a freezer bag. They can be frozen for up to three months. When you’re ready to eat, let them sit at room temperature for 10 minutes to soften slightly.
Best Reheating Method
To reheat, place the bars on a baking sheet and warm them in a 350°F oven for 5 minutes. Add a tiny splash of water before reheating to steam back to perfection. The bars will regain their chewy center and buttery aroma.